background image

12


IV.

 ABOUT YOUR REFRACTOR TELESCOPE: 

Your telescope has a refractor type optical design. It uses lenses to gather and focus light. The 

combination of the front objective lens and eyepiece gathers more light than the human eye is able 

to collect on its own, focus it, and present the viewer with a brighter, clearer, and magnified virtual 

image. Light enters the open end of the telescope tube. The objective lens refracts or bends the 

light. This refraction causes parallel light rays to converge at a focal point, while those not parallel 

converge upon a focal plane. This results in a focused image which is enlarged for viewing through 

the eyepiece. 

The primary front objective lens is a precision ground and polished component that is precisely 

positioned at one end of the optical tube, and is pre-aligned for maximum performance at the 

factory and should not need any adjustment.  

Therefore, never tamper with or remove the lens 

at this end of the optical tube. Doing so will void your warranty and affect or damage the 

performance of your telescope. 

TECHNICAL SPECIFICATIONS: 

Objective Lens Diameter:  80mm (3.15”) 

  Focal Length: 800mm K 

Maxumum Magnification: 40x     Eyepieces: 10mm, 25mm 

Accessories:  45° Erecting Image Diagonal Prism, Red Dot Finder, Astronomy CD 

V. 

USING YOUR TELESCOPE: 

A.  It is recommended to use your telescope outside or at times through open windows.  Your view 

can be distorted by reflections in the glass of a closed window or at times by air currents of 

differing temperatures passing through an open window.  

B.  Let your telescope adjust to the outside temperature. Your telescope will perform    

      much better if the temperature of the mirrors, eyepiece lenses, and the air inside the   

      tube are the same as the outside temperature. It may take up to 30 minutes to  

      equalize the temperatures when the difference in temperatures is extreme. 
C.  Find a location far from glaring light.  If you live in an urban area, your viewing will probably 

improve the farther you move away from the city’s lights. The sky glow of a town or city can 

dramatically reduce the telescope’s performance and viewing capabilities. 

D.  Remove the dust cap from the end of the telescope. The open end of the optical tube should 

be  pointed toward the subject you wish to observe. 


E.  Begin your viewing session by using only the K25 eyepiece. It will give you the widest angle 

and the brightest, sharpest views. Adjust the angle and position of the telescope as outlined in 

the previous sections.  

F.  When possible, avoid sudden temperature changes, as the moisture in the air will condense on 

the mirrors and eyepiece lenses.  Should this occur after bringing your telescope indoors, 

remove the dust caps and allow the moisture to evaporate naturally. Point the telescope 

downward to minimize the collection of airborne dust.  Once all of the moisture has evaporated, 

replace the dust caps. 

Summary of Contents for CDB804AZ3

Page 1: ...INTRODUCTION Please retain the packaging and instructions for further reference as they contain important information CDB804AZ3 ...

Page 2: ...has been designed for both a beginner and advanced star gazer It provides views of the moon and planets as well as dozens of galaxies star clusters and nebulae As a terrestrial land telescope the CDB804AZ3 brings the world s natural wonders closer It delivers superb scenic views and allows for observation of animals and landscapes from a distance To obtain the best performance from your telescope ...

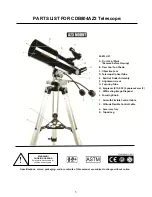
Page 3: ...TS LIST FOR CDB804AZ3 Telescope PARTS LIST A Dust Cap Mask Remove before Viewing B Dew Cap Sun Shade C Objective Lens D Telescope Optical Tube E Red Dot Finder Assembly F Alignment screws G Focusing Tube H Eyepieces K10 K25 Eyepiece cases 2 I 45 Erecting Image Diagonal J Focusing Knob 1 Azimuth Flexible Control Cable 2 Altitude Flexible Control Cable a Accessory Tray b Tripod Leg ...

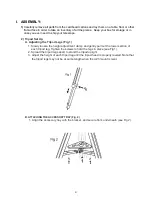
Page 4: ... 1 Slowly loosen the height adjustment clamp and gently pull out the lower section of each tripod leg Tighten the screws to hold the legs in place see Fig 1 2 Spread the tripod legs apart to stand the tripod upright 3 Adjust the height of each tripod leg until the tripod head is properly leveled Note that the tripod legs may not be at same length when the AZ3 mount is level B ATTACHING THE ACCESSO...

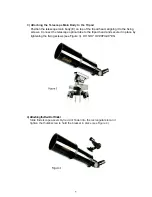
Page 5: ... to the fixing screws Connect the telescope optical tube to the tripod head and secure it in place by tightening the fixing screws see Figure 3 DO NOT OVERTIGHTEN 4 AttachingtheRedDotFinder Slide finderscope assembly red dot finder into the rectangular slot and tighten the thumbscrew to hold the bracket in place see Figure 4 ...

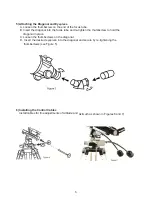
Page 6: ... tube and re tighten the thumbscrew to hold the diagonal in place C Loosen the thumbscrews on the diagonal D Insert the desired eyepiece into the diagonal and secure by re tightening the thumbscrews see Figure 5 6 Installing the Control Cables Install cables for fine adjustments of Altitude and Azimuth as shown in Figures 6 and 7 ...

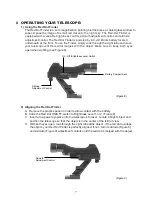
Page 7: ...p both eyes open when sighting see Figure 8 2 Aligning the Red Dot Finder On Off Brightness Level Switch Battery Compartment Altitude Adjustment Control Azimuth Adjustment Control Figure 8 Figure 9 A Remove the plastic spacer in order to allow contact with the battery B Slide the Red Dot ON OFF switch to Brightness Level 1 or 2 Figure 8 C Insert a low power eyepiece into the telescope s focuser Lo...

Page 8: ...th movements such as centering objects in view The micro adjustment controls have limited travel so it is best to center them on their threads before making a coarse adjustment 3 Focusing Slowly turn the focus knobs one way or the other until the image in the eyepiece is sharp The image usually has to be finely refocused over time due to small variations caused by temperature changes flexures etc ...

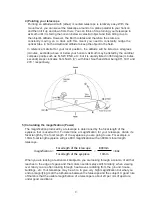
Page 9: ...orth 0 with East South and West being 90 180 and 270 respectively 5 Calculating the magnification Power The magnification produced by a telescope is determined by the focal length of the eyepiece that is used with it To determine a magnification for your telescope divide its focal length by the focal length of the eyepieces you are going to use For example a 10mm focal length eyepiece will give 80...

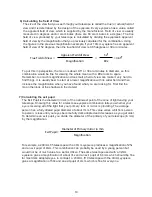
Page 10: ...n you have found what you are looking for First find the moon then look at the shadows in the craters 7 Calculating the exit pupil The Exit Pupil is the diameter in mm of the narrowest point of the cone of light leaving your telescope Knowing this value for a telescope eyepiece combination tells you whether your eye is receiving all of the light that your primary lens or mirror is providing The av...

Page 11: ...d heat which will affect observing Observing through a window is not recommended because the window glass will distort images considerably And an open window can be even worse because warmer indoor air will escape out the window causing turbulence which also affects images Astronomy is an outdoor activity 3 Choosing the best time to observe The best conditions will have still air and obviously a c...

Page 12: ...de or at times through open windows Your view can be distorted by reflections in the glass of a closed window or at times by air currents of differing temperatures passing through an open window B Let your telescope adjust to the outside temperature Your telescope will perform much better if the temperature of the mirrors eyepiece lenses and the air inside the tube are the same as the outside temp...

Page 13: ...dust from lenses and mirrors Remove the dust cap Once removed point the can away from the lens and gently expel some air and any condensation or dust that has accumulated on the discharge tube Spray the lens with short bursts of air to carefully remove the dust particles Clean eyepieces and optical surfaces with special lens paper only Eyepieces should be handled with care Avoid touching optical s...

Page 14: ...t is noticeably red and stands out like a beacon in the night sky The apparent brightness of Mars varies as the planet orbits around the sun and throughout its period of visiblity it will look brighter or dimmer depending on its distance from Earth Jupiter is the largest planet in our solar system and the second brightest next to Venus Jupiter has many moons four of which are often visible through...

Page 15: ...ing views of Saturn s rings Jupiter s major moons the Orion Nebula and much more 2 Why can t I see anything through my telescope If you see only gray or black when looking through your telescope even after searching for an object to view it is very likely that you are using an eyepiece that is too powerful To solve this problem always start with the lowest power eyepiece at first and only insert t...

Page 16: ...16 Made in China ...
Reviews: