IMPORTANT SAFETY INSTRUCTIONS
WARNING:
When using electric appliances, basic
precautions should always be followed, including
the following:
1. Keep AAA batteries away from small children. If
swallowed promptly see a doctor and have the
doctor phone (202) 625-3333 collect.
2. Do not install the batteries backwards,
follow the + and - symbols as shown in the
instructions. Do not charge or put in a fire. Do
not mix alkaline, standard, or rechargeable
batteries. Do not mix old and new batteries. The
batteries may explode or leak causing injury.
3. Do not leave discharged batteries in the product
for an extended period of time as this could
permanently damage the product.
4. Replace all batteries at the same time.
SAVE THESE INSTRUCTIONS
TO INSTALL OR REPLACE BATTERIES
IN HEADLAMP
Your new headlamp operates on three “AAA” cell
batteries. For longest life, use alkaline batteries.
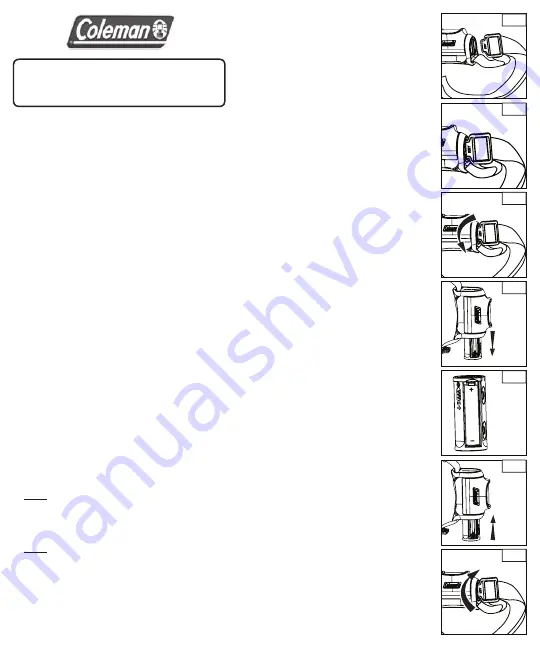
1. Use the end of the strap buckle as a “Key”
(Fig. 1), and insert it into the slot of the battery
cover located on the side of the headlamp
(Fig. 2).
2. Remove battery door by rotating
counterclockwise 1/4 turn (Fig. 3).
Note:
Battery door is designed to stay attached
to the strap buckle “Key”.
3. Remove battery cartridge from headlamp body
by turning on side and shaking gently (Fig. 4).
Note:
The cartridge is easily removed if
batteries are installed, but may require
additional shaking if no batteries are in
the cartridge.
4. Install three batteries in the correct orientation as
shown on the battery cartridge housing (Fig. 5).
5. Properly align battery cartridge and then
re-load back into the headlamp body
(Fig. 6).
6. Properly locate battery door, and then
rotate clockwise 1/4 turn to fully secure
(Fig. 7).
7. Remove “Key” from battery door by pulling
gently on the strap buckle.
TO OPERATE HEADLAMP
1. Four lighting modes are available: Red,
Low, Medium & High.
2. Operate by pressing the power button on
top of the headlamp. Each cycle of the
power button will advance the headlamp to
the next mode. Operating in the Low and
Medium modes will extend the battery life.
3. This headlamp is designed with a
convenient feature that allows the
headlamp to be powered off with one click
after the headlamp has been operating in
one mode for more than 10 seconds.
4. This headlamp is equipped with a battery
indicator which is located on the bottom
of the headlamp housing. The battery
indicator provides GREEN, AMBER and RED
indications based on the voltage of the
batteries installed. The battery indicator is
designed to operate for 3 seconds when
the headlamp is powered on or if the light
mode is changed.
• GREEN light indicates normal operation
with several hours of operation available.
• AMBER light indicates battery life
is shortened and battery should be
replaced soon.
• RED light indicates battery life is almost
complete and the batteries should be
replaced immediately.
THINGS YOU SHOULD KNOW
1. Operating time for this light depends
on whether it is run continuously or
intermittently. Intermittent operation
extends the run time of the batteries.
2. LEDs are lifetime light sources and do not
need to be replaced.
Fig. 1
Fig. 2
Fig. 3
Fig. 4
Fig. 5
Fig. 6
Fig. 7
INSTRUCTION CARD
CHT7 3AAA HEADLAMP


