background image

Models/Modelos

CM9130

Owner’s Manual

Manuel de Usuario

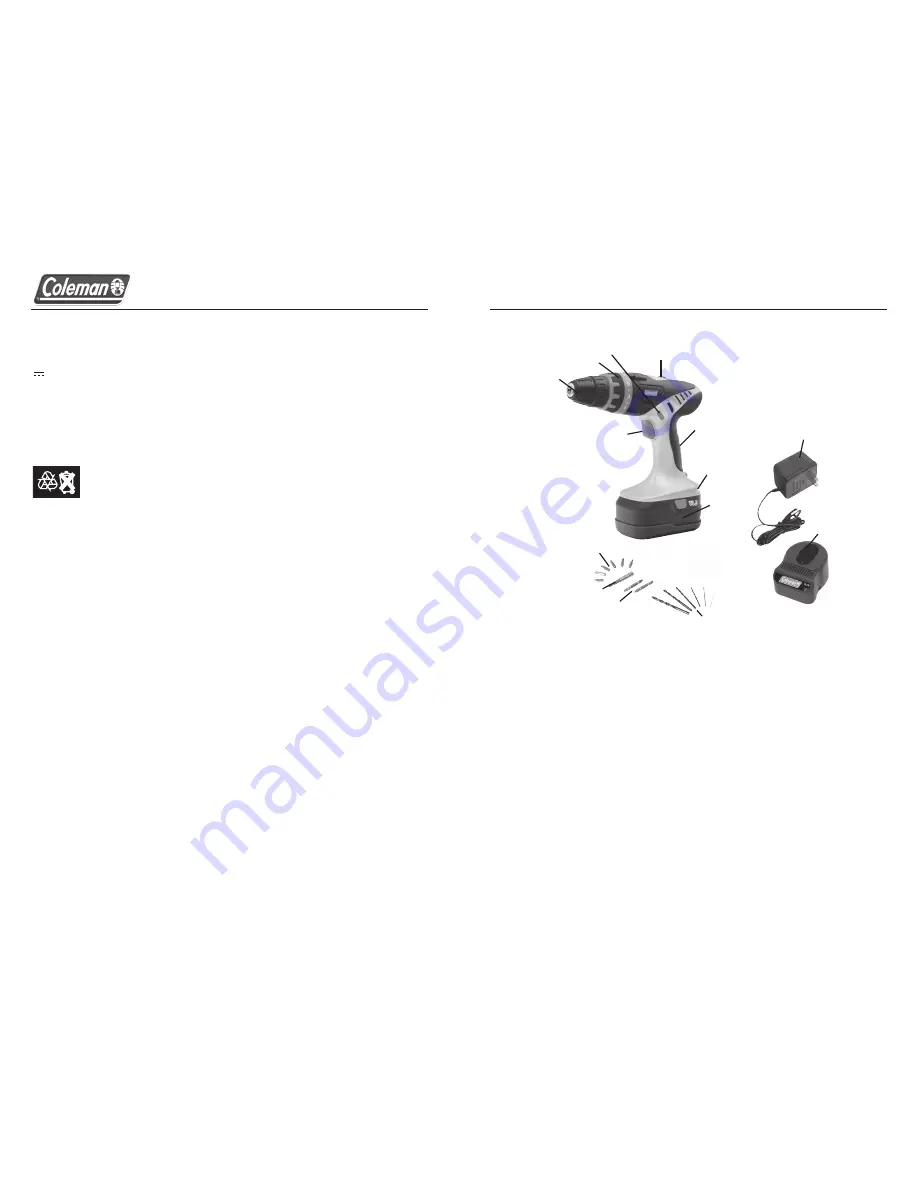
Controls and Components:

Symbols:

V ……................................................ volts

     .............................................. direct current

n

0

  ……............................................... no load speed

.../min ................................................ revolutions or reciprocation per minute

Hz ……...............................................Frequency

Ø ……..................................................Diameter

                  .................................Contains non-spillable nickel-cadmium battery.  


    Battery must be recycled or disposed of properly.

FUNCTIONAL DESCRIPTION

SPECIFICATIONS 

Voltage   

19.2V

Speed 1  

0-400RPM

Speed 2  

0-1,200RPM

Torque Settings  23 + Drill
Chuck Capacity  up to 3/8”
Charger Input   120V AC 60Hz
Charging Time   Approx 3-5 hours
Battery Type  

Ni-Cd

Ni-Cd

Ni-Cd

Batteries and AC Charger

1. Battery with Release Buttons On Each Side 

2. 120V AC Adaptor 

3. Charging Stand with LED Charging Indicators

Drill:

4. 3/8” Jacobs Keyless Chuck 

5. 24 Adjustable Torque Settings Control Ring 

6. Forward/Lock/Reverse Switch 


7. High/Low Speed Switch  

8. Variable Speed Trigger Switch 

9. Accessory/Bit Holder 

10. Comfort Rubber Grip 

Accessories:

11. 6 Various Screwdriver Bits 

12. 2” Extension Bar 

13. 2 Double Ended Screwdriver Bits 

14. 6 Various Drill Bits 

(Each Drill comes with a storage case.)

5

6

1

2

3

4

5

6

7

8

9

10

11

12

13

14

Summary of Contents for CM9130

Page 1: ...ate of purchase WHAT THIS WARRANTY DOES NOT COVER AMONG OTHER THINGS THIS WARRAN TY DOES NOT COVER DEFECTS RESULTING FROM ACCIDENTS DAMAGE WHILE IN TRANSIT TO OUR SERVICE LOCATION ALTERATIONS UNAUTHORIZED REPAIR FAILURE TO FOLLOW INSTRUCTIONS MISUSE FIRE FLOOD WAR AND ACTS OF GOD IF YOUR PRODUCT IS NOT COVERED BY OUR WARRANTY CALL OUR CUS TOMER SERVICE DEPARTMENT AT 888 231 4022 TO DISCUSS FURTHER...

Page 2: ...njury 2 Dress properly Do not wear loose clothing or jewelry Contain long hair Keep your hair clothing and gloves away from moving parts Loose clothes jewelry or long hair can be caught in moving parts 3 Avoid accidental starting Be sure switch is in the locked or off position before inserting battery pack Carrying tools with your finger on the switch or inserting the battery pack into a tool with...

Page 3: ...p and water neutralize the area with a mild acid such as lemon juice or vinegar If the liquid gets into your eyes flush them with clean water immedi ately for a minimum of 10 minutes and seek medical attention 8 Check for misalignment or binding of moving parts breakage of parts and any other condition that may affect the tool s operation 9 Use only accessories that are recommended by the manufact...

Page 4: ...3 8 Charger Input 120V AC 60Hz ChargingTime Approx 3 5 hours BatteryType Ni Cd Ni Cd Ni Cd Batteries and AC Charger 1 Battery with Release Buttons On Each Side 2 120V AC Adaptor 3 Charging Stand with LED Charging Indicators Drill 4 3 8 Jacobs Keyless Chuck 5 24 AdjustableTorque Settings Control Ring 6 Forward Lock Reverse Switch 7 High Low Speed Switch 8 Variable SpeedTrigger Switch 9 Accessory Bi...

Page 5: ... slip at its present torque setting to prevent driving the screw too deep or to prevent damage to the tool To operate the drill in forward setting simply keep the Forward Lock Reverse switch flat against the side of the drill as shown To change OPERATION INSTRUCTIONS FOR USE Charging The Battery THE BATTERY IES MAY NOT BE FULLY CHARGED FROM THE FACTORY READ ALL INSTRUCTIONS THOROUGHLY PRIOR TO FIR...

Page 6: ...ng wood screws pre drill pilot holes into the surface to make driving easier This will also prevent the wood from splitting Note When drilling the drill bit can become stuck If this happens a very high torque will be produced Always take care to hold the drill firmly to prevent possible damage or injury TROUBLESHOOTING TIPS DRILL DOES NOT WORK Recharge the battery CHARGING INDICATOR LED NOT ILLUMI...

Page 7: ...OS A LA PROPIE DAD DEBIDO A NUESTRO PRODUCTO O A SU FALLA DE FUNCIONAMIENTO NI TAMPOCO CUALQUIER OTRO DAÑO INCIDENTAL O CONSECUENTE INCLUYENDO LESIONES PERSONALES Algunos estados no permiten las limitaciones al tiempo de duración de las garantías implícitas ni la exclusión o limitación de los daños incidentales o consecuentes por lo que las exclusiones y limitacio nes anteriores podrían no ser apl...

Page 8: ...leve el interruptor a la posición de apagado o cerrado Esas medidas preventivas de seguridad reducen el riesgo de arrancar accidentalmente las herramientas 5 Almacene las herramientas inactivas fuera del alcance de los niños y de otras personas sin experiencia Las herramientas en manos de usuarios sin experien cia son peligrosas 6 Cuando no use el paquete de baterías manténgalo alejado de otros ob...

Page 9: ...ador si se le ha golpeado fuertemente si se ha caído o si se ha dañado de cualquier otra forma 8 No abra el taladro las baterías o el cargador de baterías No contienen el ementos que deban recibir servicio El abrir la unidad anula la garantía 9 Cuando no se le esté usando desenchufe el cargador de la fuente de alimen tación 10 No toque los terminales dentro del cargador de baterías con cualquier o...

Page 10: ...da en la fuente de alimentación de 120 voltios 1 Para comenzar a cargar quite el paquete de baterías de la herramienta presionando los botones para liberación de las baterías en ambos lados del paquete y tirando hacia abajo 2 Coloque el paquete de baterías en el cargador asegurándose de que los polos positivo y negativo correspondan con los polos positivo y negativo del cargador de baterías NOTA L...

Page 11: ...n su carga Si almacena la herramienta por largos perío dos sin usarla recargue las baterías cada mes o dos El tener ese hábito alarga la vida de las baterías Al usar el taladro PRECAUCIÓN Antes de cambiar cualquier barrena asegúrese siempre de que la herramienta esté apagada y que se ha sacado el paquete de baterías del taladro Afloje el mandril sin llaves sosteniendo el anillo y girando la camisa...

Page 12: ...MPARA LED INDICADORA DE CARGA NO SE ENCIENDE DURANTE LA RECARGA Compruebe que el paquete de baterías está conectado apropiadamente al cargador Compruebe que el cargador está conectado apropiadamente en ambos extremos Mantenimiento Limpie el taladro con regularidad Antes de limpiarlo saque el paquete de baterías y todos los accesorios barrenas etc Para la limpieza use SOLAMENTE jabón suave y un pañ...

Reviews: