Page 9
BRAKE MAINTENANCE
1. Check cables are corrosion free and lubricated to maintain smooth function.
2. Check all cables are free of kinks or frayed section, replace as necessary.
3. From time to time check all the retaining bolts are secure including those
of the pads.
4. Replace lost cable end protectors to avoid cables fraying.
5. To assure smooth braking, wheels must run true and be correctly adjusted, with the
rim brake tracks free from dents and kinks. The brake blocks should be in correct
alignment with the rim brake track. See your dealer if you are in any doubt
regarding wheel and brake adjustment.
6. We recommend that only genuine replacement parts are used for safety critical
components like brake friction pads and cables. if in doubt consult your retailer.
'V' BRAKE ADJUSTMENT
Although every effort has been made to ensure the brakes are set in a manner that
will ensure minimal re-adjustment prior to riding it is not possible to prevent transit
movement or disturbance when unpacking. In addition to the 5mm and 6mm allen key
wrenches and a multi metric spanner included with your cycle you will find the following
tools useful for correct assembly and adjustment of your cycle; a small adjustable wrench
(up to 20mm), a pair of pliers with wire cutting facility, a small cross cut screwdriver, and
a small flat blade screwdriver. For certain maintenance and replacement work specific
cycle tools are needed, if in any doubt contact your cycle supplier.
Below are simple instructions for general brake setting.
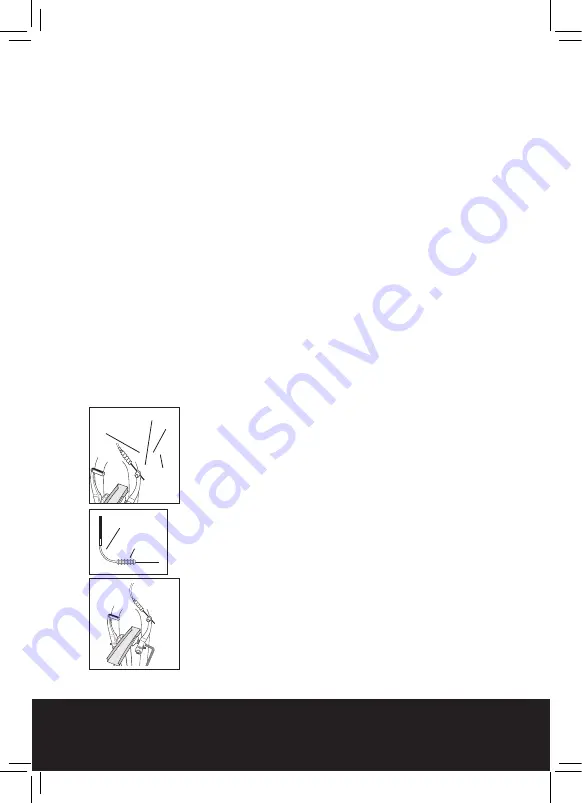
1. If the cable nipple is not located in to its housing in
the lever then simply align the slots in the cable adjuster
with the slot in the brake body and fit the nipple into
the housing. Pull the cable into position through the
slots and turn the adjuster sufficient to disrupt slot
alignment (take care the ferrule is located into the cable
adjuster.)
2. Ensure the fittings (lead pipe and rubber boot) are in
position at the brake end of the cable.
3. Loosen the brake pad retaining nut so the pad can
move freely then push the brake arm so that the pad
can be positioned with its surface parallel to the rim to
keep the pad away from the tyre (Take care to match
the curve of the rim with any curvature along the length
of the pads. Tighten the pad in position (6-8Nm). Repeat
on the left and on the right side.
1.
3.
2.
Nipple
Slot
Lead Pipe
Rubber
Boot
Reach Adjuster
Screw
Ferrule
Page 10
7.
4.
5a.
Brake Pipe
Hanger
Pinch
Bolt
2-3mm
65mm
5b.
Tension
Adjuster
4. Locate the brake cable wire into position behind
the pinch bolt (some have a hole to thread the wire
through). Loosely secure the wire in position.
5. Locate the curved lead pipe into the brake lead
pipe hanger. Loosen the pinch bolt and pull the wire
through so that the pads come into contact with
the rim surface (5a). Set the pads to have 2-3mm
of clearance to the rim on both sides (5b). Tighten
the pinch bolt securely (6-8Nm) and check that the
wire is not damaged or cut through. The distance
between the lead pipe tip and the pinch bolt should
not be less than 65mm. You can exchange positions
of the thick and thin washers behind the pads to
achieve this.
6. Test the brake function, the brake lever should
move through no more than approx 20% - 30% of
its travel before the pads are firmly against the rim.
7. If you find when you pull the brake lever that one
pad hits the rim before the other. You will need to
alter the spring tension in the brake arms. You can
increase spring tension by screwing the adjuster in
clockwise and reduce by turning anti clockwise. The
pad that hits first needs the tension reducing, or you
can increase the tension in the opposing arm ( judge
this by the relative tension adjuster positions). It is
wise to first check that the wheel is centrally located
in the frame or forks before commencing with this
adjustment.
8. New brake cables will stretch; this can be adjusted
by pulling more cable through the pinch bolt or by
using the cable adjuster at the lever. Take care if you
screw the adjuster outwards to return the adjuster
locking ring so it is firmly up against the brake lever
body. IT IS NOT SAFE TO RELY UPON THE THREAD OF
THE LEVER ALONE TO SUPPORT BRAKING FORCES.
Page 9
Page 10
Page 9
BRAKE MAINTENANCE
1. Check cables are corrosion free and lubricated to maintain smooth function.
2. Check all cables are free of kinks or frayed section, replace as necessary.
3. From time to time check all the retaining bolts are secure including those
of the pads.
4. Replace lost cable end protectors to avoid cables fraying.
5. To assure smooth braking, wheels must run true and be correctly adjusted, with the
rim brake tracks free from dents and kinks. The brake blocks should be in correct
alignment with the rim brake track. See your dealer if you are in any doubt
regarding wheel and brake adjustment.
6. We recommend that only genuine replacement parts are used for safety critical
components like brake friction pads and cables. if in doubt consult your retailer.
'V' BRAKE ADJUSTMENT
Although every effort has been made to ensure the brakes are set in a manner that
will ensure minimal re-adjustment prior to riding it is not possible to prevent transit
movement or disturbance when unpacking. In addition to the 5mm and 6mm allen key
wrenches and a multi metric spanner included with your cycle you will find the following
tools useful for correct assembly and adjustment of your cycle; a small adjustable wrench
(up to 20mm), a pair of pliers with wire cutting facility, a small cross cut screwdriver, and
a small flat blade screwdriver. For certain maintenance and replacement work specific
cycle tools are needed, if in any doubt contact your cycle supplier.
Below are simple instructions for general brake setting.
1. If the cable nipple is not located in to its housing in
the lever then simply align the slots in the cable adjuster
with the slot in the brake body and fit the nipple into
the housing. Pull the cable into position through the
slots and turn the adjuster sufficient to disrupt slot
alignment (take care the ferrule is located into the cable
adjuster.)
2. Ensure the fittings (lead pipe and rubber boot) are in
position at the brake end of the cable.
3. Loosen the brake pad retaining nut so the pad can
move freely then push the brake arm so that the pad
can be positioned with its surface parallel to the rim to
keep the pad away from the tyre (Take care to match
the curve of the rim with any curvature along the length
of the pads. Tighten the pad in position (6-8Nm). Repeat
on the left and on the right side.
1.
3.
2.
Nipple
Slot
Lead Pipe
Rubber
Boot
Reach Adjuster
Screw
Ferrule
Summary of Contents for 344/6960
Page 1: ...INSTRUCTION MANUAL HELPLINE CALL FCSI LTD ON 01789 207419 ...
Page 19: ...BIKE CARE Page 18 Page 18 ...
Page 21: ...Page 20 Page 20 Page 20 Page 20 ...
Page 24: ......


