background image


3. Installation process 
 

Step 1.: Check the accessories packed with the appliance. 

series 

Parts name 

Specification 

Quantity 


Screw 

M6x20 

On the heater 

Bracket set 

Aluminum 

In the package 

2A 

Bolt+Nut 

M6 

Fixed on the No.2 Bracket set 

2B 

Bolt+Nut 

M8 

Fixed on the No.2 Bracket set 

Expansion bolt 

M6x60   

In the package 

Hanger 

STEEL 

In the package 

Bolt 

M8×60 

In the package 

5A 

Nut 

M8 

Fixed on NO.5 Bolt M8*60 

Washer 

Ø6.2xØ14x1 

Fixed on No.2A Bolt M6*100 

Washer 

Ø8.2xØ16x1 

2  pcs  Fixed  on  Bolt  of  No.2B 

and 1 pc on Bolt of No.5 

Spring Washer 

Ø8.2xØ11x1.5 

Fixed  on  Bolt  of  No.2B  and 

No.5 

Tools needed: Screwdriver , spanner. These tools need be prepared by the final user.   


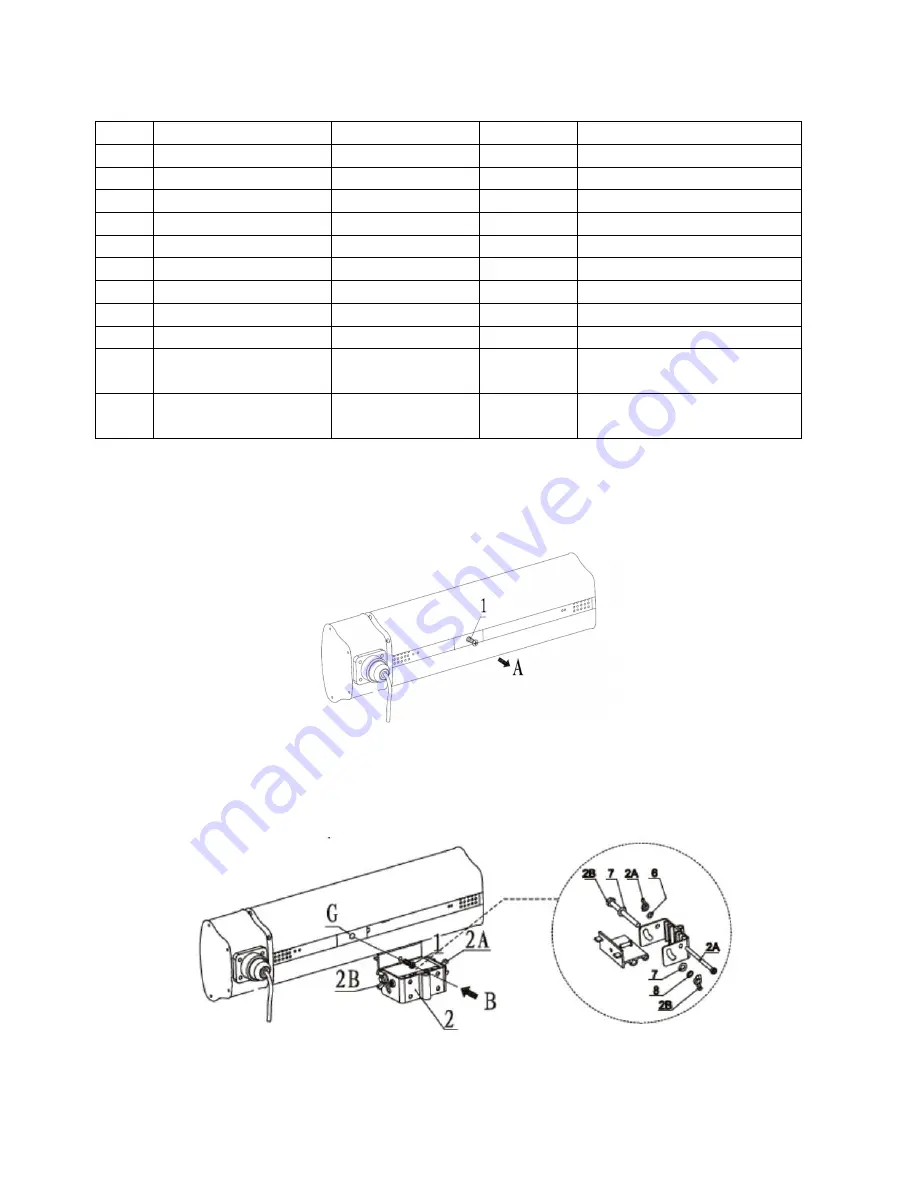
Step 2: Take off the screw M6x20 from the heater by screwdriver.   

Attention : Please operate in the direction A. 


Step 3: Fix the bracket set (No.2 of accessories list) on the heater by the screw M6x20, which is took off from 

the step 1.     

Attention : Please operate in the direction B.


Summary of Contents for CLHR-20WR

Page 1: ...www colorato net INSTRUCTION MANUAL FOR ELECTRIC INFRARED HEATERS MODEL CLHR 20WR Read carefully this manual before using the appliance and keep it for future reference ...

Page 2: ... Do not use the appliance in particularly duty and explosive areas Do not use the appliance in a building site green house barn or stable where there s flammable dust Do not use the appliance as a sauna heater Warning Do not touch the radiating plate To avoid burns do not touch the appliance surface by hand and other body parts It is also necessary to exclude the possibility of touching the heater...

Page 3: ... is likely to be tripped over Children and persons with reduced physical sensory or mental capabilities or lack of experience and knowledge are not allowed to use the appliance unless they have been given supervision or instruction concerning use of the appliance in a safe way and understand the hazards involved Children shall not play with the appliance Cleaning and user maintenance shall not be ...

Page 4: ...stance of 1 8 m above the ground 0 65m from walls 0 3 m from the ceiling 1 5 m from the combustibles like curtains 1 m from persons or animals 2 2 Heating area The infrared strip heater produces radiant heat which heats objects rather than the air Therefore it is imperative that objects or people to be heated are within the direct radiant footprint of the heater The below diagrams show the approxi...

Page 5: ... the package 5A Nut M8 1 Fixed on NO 5 Bolt M8 60 6 Washer Ø6 2xØ14x1 1 Fixed on No 2A Bolt M6 100 7 Washer Ø8 2xØ16x1 3 2 pcs Fixed on Bolt of No 2B and 1 pc on Bolt of No 5 8 Spring Washer Ø8 2xØ11x1 5 2 Fixed on Bolt of No 2B and No 5 Tools needed Screwdriver spanner These tools need be prepared by the final user Step 2 Take off the screw M6x20 from the heater by screwdriver Attention Please op...

Page 6: ...he main power and press the switch on the pilot lamp will flash and The heater is in stand by mode Press the key ON on the remote control the buzzer responds one sound The pilot will be light The heater will start work in low power mode in first time using or work in the pre set power model Press the KEY LOW set the heater work in 33 of the rated power The buzzer responds one bee sound Press the K...

Page 7: ...he reflector should be cleaned regularly by professionals Do not use any abrasive or caustic cleaning agents Never immerse the appliance in water Danger to life 6 Maintenance Any maintenance or repairs including replacing the bulb element should only be carried out by a qualified electrician 7 Specifications MODEL CLHR 20WR Switch YES Remote controller YES Voltage Frequency 230V 50 Hz Power 2000 I...

Reviews: