Colortrac SmartLF Installation and Operating Manual
PAS144 P/N: P002038 Colortrac Ltd © 2004
9
8. INSTALLING SMARTLF S/W FROM THE SOFTWARE INSTALLATION CD
1. Insert the software installation CD. It should Auto-Play. If the
CD fails to launch go to the CD drive using Explorer and double-
click the launch file to start the installer manually.
2. Click the ‘Install Products’ button.
3. At the install products screen click the ‘.NET install’ button if you
have not already installed .NET from the Internet.
4. At the install products screen click the ‘SmartLF Scan’ button to
install the SmartLF application.
Once the installation is complete you will be able to locate the
SmartLF program under Program Files > Colortrac > SmartLF.
You have now installed the SmartLF application.
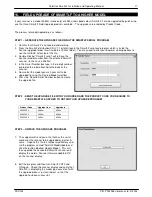
5. Testing the software installation
Go to Programs from the Windows Start button and navigate to the
SmartLF entry and release. After a small delay the SmartLF screen
will display. Note that if the scanner is not powered up or the USB2
cable is not connected the software interface will appear greyed as
shown below.
9. LOADING A DOCUMENT INTO SMARTLF
Documents are loaded right-side justified and face-down with the edge of the paper in line with the first mark of the
document ruler markings. Look for the yellow paper symbol.
Colortrac SmartLF is not limited to scanning recognised document sizes, for example A1, A2 and E size. The
maximum scan width for SmartLF is 1016mm (40”) but the maximum length is limited only by the attached computer
and scanning software. As soon as the READY status is displayed (after 10 seconds), documents can be loaded into
the scanner.


