Backrest Angle
Good Stability (old style)
The most important considerations when setting the correct backrest angle is posture
control, balance and stability. The optimal adjustment must be achieved without ex-
erting excess pressure on any part of your back.
Your Colours chair is equipped with a safety backrest locking mechanism.
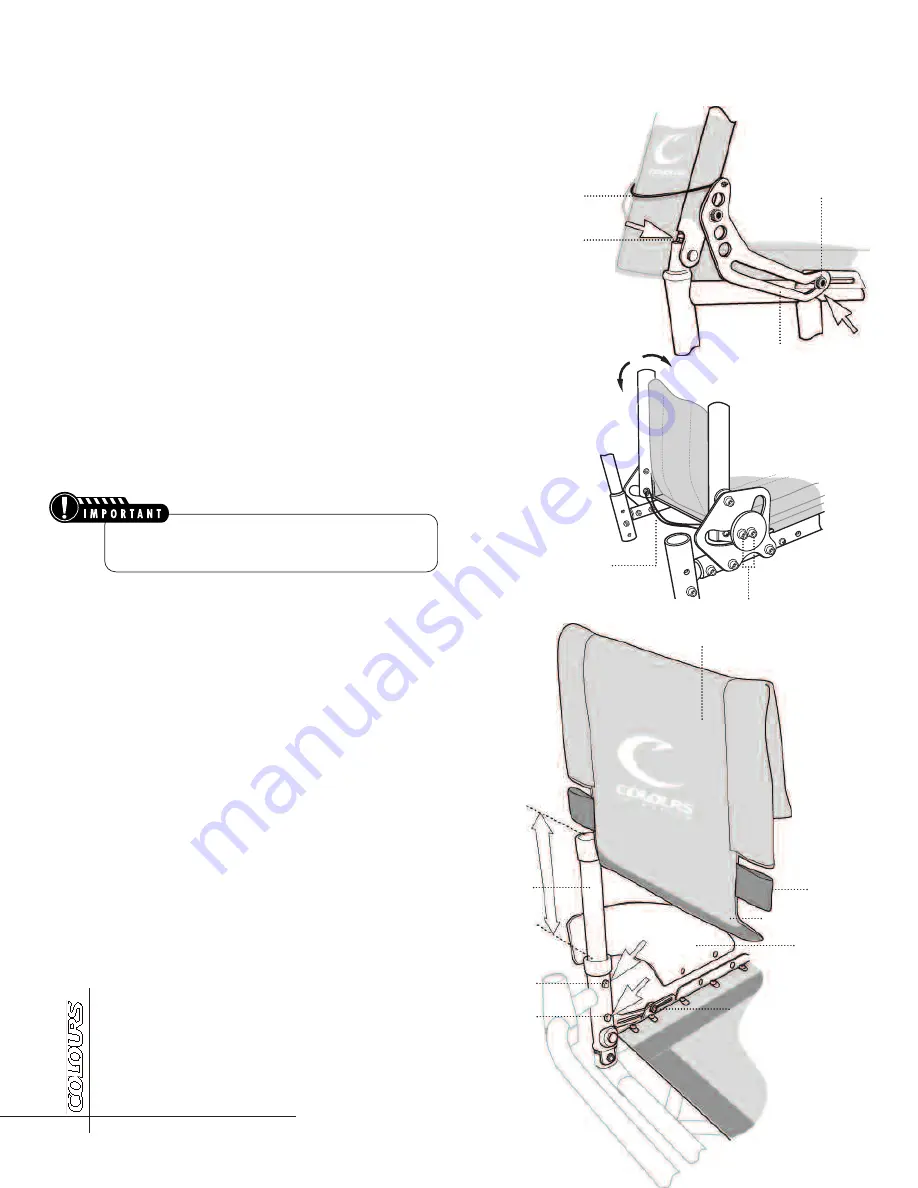
To adjust the backrest angle:
1. Loosen the screws on each backrest locking mechanism.
2. Fold the backrest forward while pulling down on the string attached to the
backrest locking mechanism.
3. By turning the set screw by 1/4" increments clockwise the backrest angle will
be adjusted to the rear. Turning the screw by 1/4" increments counterclock-
wise will bring the backrest angle forward.
4. Repeat step 3 on the other set screw.
5. Return the backrest to the full upright position. The backrest lock will auto-
matically engage.
6. Retighten the screw on the backrest locking mechanism.
Backrest Locking Mechanism (with angle adjust)
1. Adjust angle by loosening 2 screws on each side, then position backrest at correct
angle then retighten the screws.
2. Pull cord to release locking back. Pull cord again to restore back to vertical position.
THE SET SCREW
THE BACKREST LOCKING MECHANISM
Make sure the final setting is the same for both the
right and the left side of the backrest.
1
1
2
2
3
The backrest height assists you with greater balance and stability. After you be-
come more familiar with the chair, you may wish to lower the backrest height to
gain greater flexibility*. To adjust the backrest height:
1. Remove the seat cushion (secured to Velcro lining.)
2. Remove backrest lock.
3. Remove the side guard by using an Allen wrench to take out the
two screws securing the panel in place.
4. Unfasten the velcro secured bindings that are attached at the base
of the backrest support bar.
5. Unfasten the lumbar Velcro of the backrest cushion.
6. Remove the backrest cushion by pulling it off of backrest support bars.
7. To adjust the backrest height, remove the screw securing the
telescoping tubes and adjust up or down in 1” increments.
8. Once you have adjusted the backrest height reinstall the screw
securing the telescoping tubes.
9. Reinstall backrest cushion. Note: Be sure to adjust the backrest
seat cushion by folding over and reattaching Velcro.
10. Reattach the lumbar Velcro and bindings.
11. Reinstall the side guards, backrest lock and seat cushion.
Backrest Height
7
4
3
2
7
6
THE BACKREST
LOCKING MECH-
ANISM
BACKREST CUSHION
5
LUMBAR VELCRO
TELESCOPING
TUBE
* Threre are two adjustable and four nonadjustable telescoping tubes available.
Adjustable telescoping tubes: 9” to 12” and 13” to 15”.
Nonadjustable backrest support bars: 8”, 16”, 17” and 18”.
8
O W N E R ’ S M A N U A L


