11
5
Operating
Your Lawn
Mower
WARNING
The operation of any
lawn mower can result
in foreign objects
being thrown into
the eyes, which can
damage your eyes
severely. Always wear
safety glasses while
operating the mower,
or while performing
any adjustments or
repairs on it.
Be sure no one other
than the operator is
standing near the lawn
mower while starting
engine or operating
mower. Never run
engine indoors or
in enclosed, poorly
ventilated areas. En-
gine exhaust contains
carbon monoxide, an
odorless and deadly
gas. Keep hands, feet,
hair and loose clothing
away from any moving
parts on engine and
lawn mower.
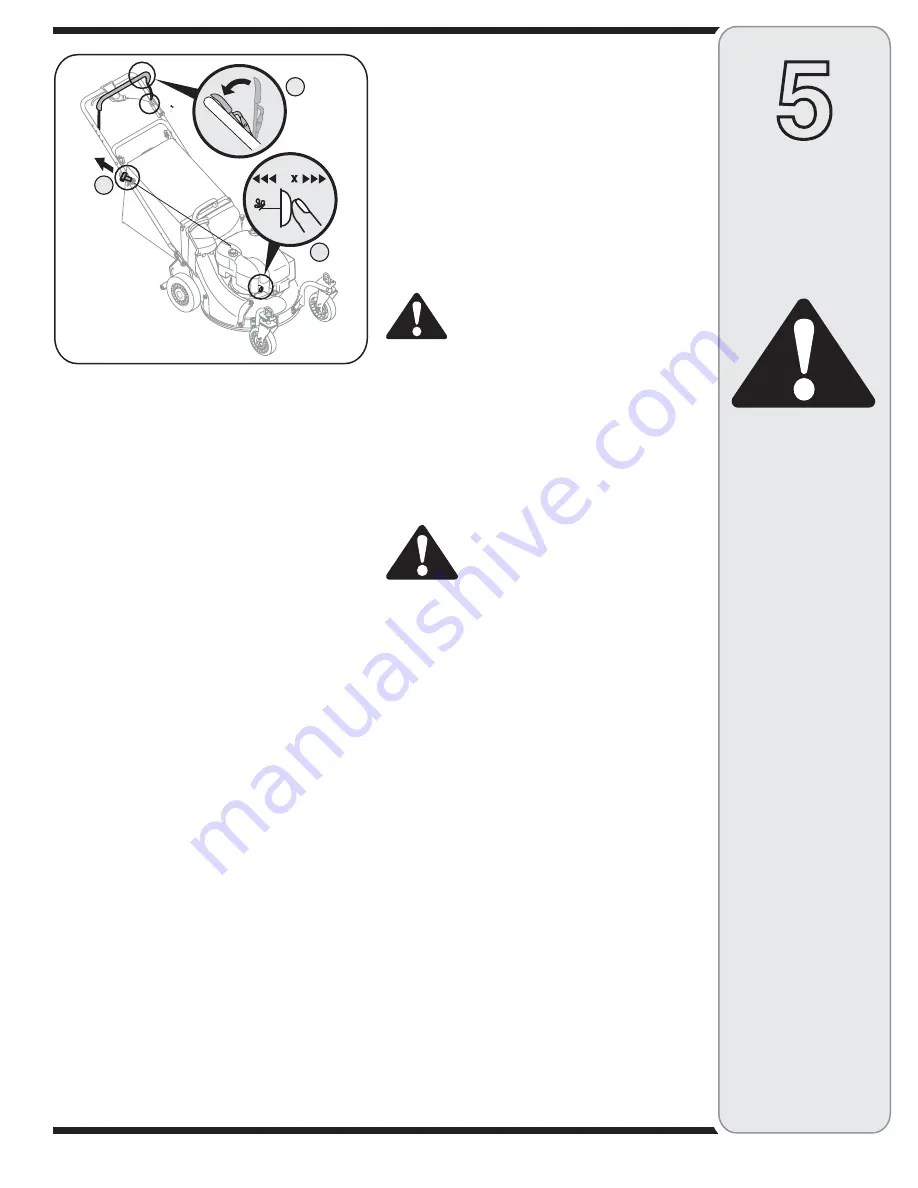
Figure 10
in the larger holes for locked, straight ahead operation,
place pins in smaller holes to allow casters to rotate
freely.
Before Starting
1. Service the engine with gasoline and oil as instructed
in the separate engine manual.
2. Attach spark plug wire to spark plug. If unit is
equipped with a rubber boot over the end of the
spark plug wire, make certain the metal loop on the
end of the spark plug wire (inside the rubber boot)
is fastened securely over the metal tip on the spark
plug.
3. Before each use, check for proper drive clutch
operation by performing the following before starting
the engine:
a. With the drive control released, push mower
forward. It should move freely. Pull mower back-
ward. It should move with only a small amount of
resistance.
b. If it does not the clutch may not be releasing
completely. Do not start the engine until correc-
tions have been made. Check the control cable
for severe bend, kinks and binding. Also check for
grass build-up around the belt.
To Start Engine
and Engage Blade
1. If your unit is equipped with a primer, choke or fuel
valve lever, operate as instructed in the separate
engine manual packed with your unit.
2. Standing behind the unit, depress the blade control
handle and hold it against the upper handle as shown
in Figure 10.
3. Grasp the starter handle as shown and pull slowly
until resistance is felt, then pull rapidly to start engine
and avoid kickback. Return it slowly to the rope guide.
4. To engage the drive, squeeze the drive control handle
towards the upper handle. Release the drive control
to slow down when negotiating an obstacle, making a
turn, or stopping.
5. The six speed shift lever is located on the drive clutch
control housing on the upper handle. See Figure 9.
This lever is used to select the operating speed of
the mower. Release the drive clutch control when
changing speeds.
To Stop Engine
1. Release the blade control handle to stop the engine
and blade.
WARNING: The blade continues to rotate
for a few seconds after the engine is shut
off.
2. Disconnect and ground the spark plug wire as
instructed in the separate engine manual to prevent
accidental starting while equipment is unattended.
Using Your Lawn Mower
Be sure the lawn is clear of stones, sticks, wire, or other
objects which could damage the lawn mower or the
engine. Such objects could be accidently thrown by the
mower in any direction and cause serious personal injury
to the operator and others.
WARNING: If you strike a foreign ob-
ject, stop the engine. Remove wire from
the spark plug, thoroughly inspect the
mower for any damage, and repair the
damage before restarting and operating
the mower. Extensive vibration of the
mower during operation is an indication
of damage. The unit should be promptly
inspected and repaired.
IMPORTANT: Move the shift lever ONLY when the
engine is running. Shifting the speeds with the engine off
can cause damage to the unit. Disengage the drive clutch
control before changing the speed selection.
Operating Tips
1. For best results do not cut wet grass.
2. New grass, thick grass, or wet grass may require a
narrower cut.
3. If the grass has been allowed to grow in excess of 4
inches, mulching is not recommended. Mow using
the side discharge to reduce the grass height to 3-1/4
inches or less before mulching.
4. Periodically check all fasteners and make sure these
are tight.
NOTE: To operate your unit using the grass bag, mulcher
or optional side discharge refer to page 7.
3
1
2
3
Summary of Contents for 978
Page 20: ...20 NOTES ...


