18
10
11
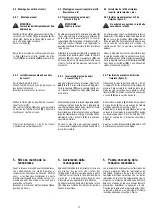
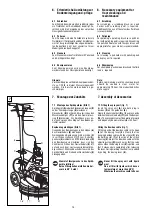
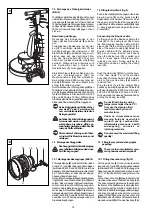
7.3.2 Montage des Saugbehälters (Bild 10)
Behälter
(A)
in untere Steckvorrichtung
(9)
der
Führungsstange
(8)
stecken. Oberen Teil des
Behälters
(A)
fest gegen die Führungsstange
(8)
drücken, so dass die Schnappverbindung
(B)
einrastet. Elektrische Verbindung des Be-
hälters
(A)
mit der am hinteren Teil des Klemm-
kastens
(15)
befindlichen Gerätesteckdose
(24)
herstellen.
7.3.3 Montage des Saugschlauches
Stellen Sie sich hinter die Maschine. Das län-
gere Saugschlauch-Stück von rechts nach links
zwischen Führungsstange
(8)
und Behälter
(A)
durchschieben. Dann das mittlere, kurze Teil des
T-Stücks in den Anschluss des Behälters
(A)
,
die beiden anderen Enden des Saugschlauches
in die Anschlussöffnungen des Absaugringes
(G)
stecken.
Hinweis:
Nach Einschalten der Einscheibenmaschine
startet das Sauggerät automatisch mit einer Ver-
zögerung von ca. 2 Sekunden.
7.3.4 Papierbeutelwechsel beim Sauggerät
(Bild 11)
Fassen Sie mit einer Hand in die Griffmulde des
Behälters. Mit einem kräftigen Ruck nach oben
den Behälterdeckel abziehen.
Gefüllten Papierbeutel vom Ansaugstutzen ab-
ziehen und herausnehmen. Neuen Papierbeu-
tel auf den Ansaugstutzen aufstecken (evtl. vor-
her die Perforation an der Papierbeutelöffnung
aufreissen). Behälterdeckel aufsetzen.
7.3.2 Fitting the suctionappliance (fig. 10)
Plug the appliance
(A)
into the lower plug-in
device
(9)
of the guide bar
(8)
. Push the upper
part of the appliance
(A)
firmly against the guide
bar
(8)
, so that the snap connection
(B)
engages.
Make the electrical connection of the container
(A)
with the socket
(24)
located at the back of
the switch box
(15)
.
7.3.3 Fitting the suction hose
Stand behind the machine. Push the longer
suction hose piece from right to left between
the guide bar
(8)
and the appliance
(A)
. Then
insert the middle, shorter part of the T-piece
into the connection of the appliance
(A)
, and
the two other ends of the suction hose into the
connection opening of the suction ring
(G)
.
Note:
After switching the single brush machine on
the suction unit starts automatically with a delay
of approx. 2 seconds.
7.3.4 Exchanging the paper bag of the vac
unit (fig. 11)
Reach with one hand into the handle indentation
of the container. Lift off the lid with a strong
pull upward.
Pull off full paper bags from the connection
piece and take out. Push the new paper bag
onto the suction piece (perhaps rip open the
perforation on the paper bag opening
first).Close with cover.
A
G
4
B
8
9
9
24
14
A

