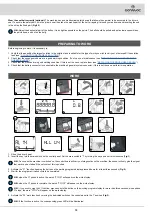
2. Make sure the machine is in a safe condition (see “
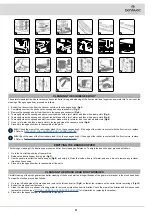
3. Grip the handle for moving the seat mounting plate and turn the plate to the maintenance position (
Fig.1
).
4. Disconnect the battery connector from the machine's main system connector (
Fig.2
).
ATTENTION:
the following operations must be carried out by qualified personnel. An incorrect connection of the connector may cause problems
with machine functioning.
5. Connect the external battery charger cable to the battery connector.
N.B.
: the coupling connector of the battery charger is consigned inside the bag containing this instruction booklet, and must be assembled on
the cables of the battery charger as indicated in the instructions.
CAUTION
: before connecting the batteries to the battery charger, make sure it is suitable for the batteries used.
CAUTION
: carefully read the Use and Maintenance Manual of the battery charger used for recharging.
CAUTION
: keep the battery inspection carter open for the duration of the battery recharging cycle to allow gas fumes to escape.
6. When the recharge cycle is complete, disconnect the external battery charger cable from the battery connector.
7. Connect the battery connector to the machine's main system connector.
8. Grip the handle and turn the seat mounting plate to its working position.
FILLING WITH DETERGENT SOLUTION
Before filling the tanks, proceed as follows:
1.
Take the machine to the usual place for filling the solution tank.
2. Stand at the back of the machine and open the rear panel.
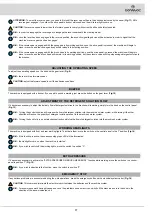
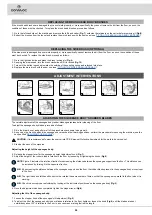
3. Make sure the cap of the recovery tank drainage tube is closed. If it isn't, close it (
Fig.3
).
4. Make sure the cap of the membrane settling tank drainage tube is closed. If it isn't, close it (
Fig.4
).
5. Make sure the tap of the degreaser settling tank drainage tube is closed. If it isn't, close it (
Fig.5
).
6. Check that the solution tank drainage tube cap is closed. If this is not the case, close it (
Fig.6
).
7.
Check to make sure that the water system filter cap, located on the front left-hand side of the machine, is closed. If this is not the case, close it
(
Fig.7
).
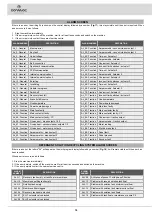
8. Turn the tank cover into the maintenance position, using the support to prevent it from rotating (
Fig.8
).
9. Remove the recovery tank cover (
Fig.9
).
10. Add the liquid detergent to the tank in the concentration and manner indicated on the detergent manufacturer's label; use the minimum amount
of detergent recommended.
CAUTION
: it is recommended to wear the appropriate PPE (Personal Protective Equipment) for the work to be carried out
.
ATTENTION:
always use detergents whose manufacturer's label indicates their suitability for scrubbing machines. Do not use acid or
alkaline products or solvents without this indication.
N.B.
: always use low-foam detergent. To avoid the production of foam, put a minimum quantity of anti-foam liquid in the recovery tank before
starting to clean. Do not use pure acids.
11. After putting the detergent in the recovery tank, close the top-up opening with the cover that was removed previously.
12.
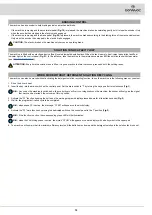
Connect the filling tube to the quick connector on the machine (
Fig.10
) and turn on the water tap.
N.B.
: fill with clean water, at a temperature no higher than 50°C (122°F) and no lower than 10°C (50°F).
13. Turn on the machine and turn the key a quarter turn clockwise (
Fig.11
).
14. Activate the “F1” function, keeping the button on the working programs display pressed down for at least three seconds (
Fig.12
).
15. Wait until the tanks are completely full.
N.B.
: when the F1 phase is active, the words “F1 ON” will appear on the work display.
N.B.
: when the F1 phase is complete, the words “F1 OFF” will appear on the work display.
WARNING
: if the F1 is complete but the tanks have not been fully filled, repeat the F1 phase.
N.B.
: it is advisable to equip the end section of the filling tube with a tap attachment to prevent water from leaking when disconnecting from
the quick connector present on the machine.
INSERTING WATER SYSTEM FILTER
Before using the machine for the first time the water system filter needs to be reset, for shipping reasons the filter cartridge and the cap have been
removed. To insert the filter cartridge in the water system filter body proceed as follows:
1. Take the machine to the maintenance area.
2. Make sure the machine is in a safe condition (see “
”).
13


