CLEANING THE SQUEEGEE BODY
The careful cleaning of the whole vacuum unit ensures better drying and cleaning of the floor as well as a longer vacuum motor life. To carry out the
cleaning of the squeegee body, proceed as follows:
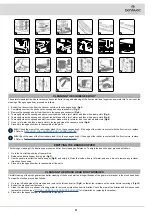
1. Extract the vacuum tube from the vacuum nozzle on the squeegee body (
Fig.1
).
2. Completely unscrew the knobs on the squeegee body pre-assembly (
Fig.2
).
3. Remove the squeegee body from the slits in the squeegee connector (
Fig.3
).
4. Thoroughly clean the squeegee body vacuum chamber with a jet of water, and then with a damp cloth (
Fig.4
).
5. Thoroughly clean the squeegee body rear rubber blade with a jet of water, and then with a damp cloth (
Fig.5
).
6. Thoroughly clean the squeegee body front rubber blade with a jet of water, and then with a damp cloth (
Fig.6
).
7. Use a jet of water and then a damp cloth to thoroughly clean the vacuum nozzle (
Fig.6
).
8. Proceed in the opposite order to reassemble all the parts.
N.B. :
Check the wear of the rear rubber blade (4) on the squeegee body; if the edge of the rubber in contact with the floor is worn, replace
it. Refer to
REPLACING THE SQUEEGEE BODY RUBBER BLADES
N.B.:
Check the wear of the front rubber blade (5) on the squeegee body; if the edge of the rubber in contact with the floor is worn, replace
it. Refer to
REPLACING THE SQUEEGEE BODY RUBBER BLADES
EMPTYING THE DEBRIS HOPPER
The thorough cleaning of the debris hopper ensures better floor cleaning performance. To empty the debris hopper, proceed as follows:
1. Go to the front left-hand side of the machine.
2. Release the debris hopper locking pin (
Fig.7
).
3. Use the handle to extract the debris hopper (
Fig.8
) and empty it. Clean the inside with a jet of water, and use a brush to remove any residual
impurities if necessary.
4. Proceed in the opposite order to reassemble all the parts.
CLEANING THE BRUSH HEAD BODY BRUSHES
Careful cleaning of the brush guarantees better cleaning of the floor as well as a longer lifespan of the gear motor present in the brush head body.
To clean the brushes, proceed as follows
1. Go to the left-hand side of the machine and remove the left-hand carter (
Fig.9
); unfasten the retainers on the carter before removing it (
Fig.10
).
2. Extract the brushes from the tunnel.
3. Clean the brush under a stream of running water to remove any impurities from its bristles. Check the wear of the bristles and if this excessive,
FITTING THE BRUSH HEAD BODY BRUSHES
” for information on replacing the brushes).
4. Proceed in the opposite order to reassemble all the parts.
21
6
4
5
2
3
1
7
9
8
10
11
12
22
23
21
13
14
15
16
17
18
19
20


