background image


13

WORK 


MACHINE START-UP, VERSIONS 80B-90B 

Comac sweeping machines should only be used by trained, authorised operators, 
and only when the machine itself is in perfect working order. Faulty sweeping 
machines must be taken out of service immediately. 

Before carrying out any type of work: 

1.  check the parking brake is disengaged 
2.  turn the key to position I (clockwise) 
3.  check the battery charge is sufficient for carrying out the planned work 


ATTENTION

: To avoid any permanent damage to the batteries, 

it is essential to avoid their total run-down. When the run-down 
buzzer sounds, the machine must be switched off (maintaining 
just the forwards function so it can reach the recharge point). 


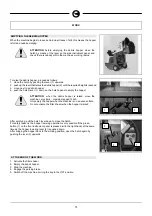
4.   Open the hatch of the debris hopper (green indicator light ON).      


5.    On the side instrument panel, activate the lever to lower the central brush, 
and the lever for the side brush (only for cleaning near pavements, walls, etc.).   

6.    Activate the suction (left-hand lever).  

7.   Press the pedal command to move, and adjust the machine speed according 
to the quantity of dust and dirt on the floor. 

8.   If you need to transfer the machine to another area, you are advised not to 
use the brushes (raise them). 


ATTENTION

: the machine is fitted with a micro-switch under the 

seat to indicate the presence of an operator on board; this switch 
stops the machine moving if the operator is not correctly seated. 


INITIAL START-UP AND USE OF THE MACHINE, VERSIONS 80D – 90D 

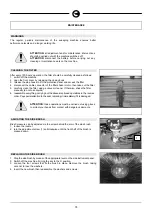
Move the accelerator lever until it is in the minimum position. 
Start the motor by means of the start-up key, bringing it to the heating position (I). 
Wait about 6 seconds, until the glowplug indicator light (11) switches off. 
When the indicator light is OFF, turn the key to the start position. 
When the motor switches on, release the key. 
After an initial heating phase (see “after motor start-up“), bring the motor to a speed 
of about 2000rpm, using the accelerator lever. 
The machine is now ready to work.  
 

Observe the warnings given in the Use and Maintenance booklet of the motor 
for start-up operations (motor start-up).


MACHINE DIRECTION 

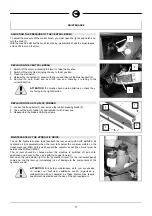
The choice of direction when using the machine does not involve any switches or 
levers, but is implemented via the pedal command: pressing the right-hand pedal the 
machine moves forwards, while the left-hand pedal enables reverse movements. 
 

Summary of Contents for CS80 Series

Page 1: ...MANUAL USE AND MAINTENANCE CS80 CS90 ED 11 2009 EN Doc 10009923 Ver AA...

Page 2: ...he present catalog is forbidden by law The company reserves itself the right to bring changes of technical character and or of endowment The images are meant of pure reference and not binding in terms...

Page 3: ...TOR BATTERY CUT OUT 12 BRUSH ACTIVATION LEVERS 12 BRAKE POSITION 12 ACCELERATOR PEDAL POSITION 12 WORK 13 MACHINE START UP VERSIONS 80B 90B 13 INITIAL START UP AND USE OF THE MACHINE VERSIONS 80D 90D...

Page 4: ...er service office It is only by prompt action of this type that the missing material can be obtained and any compensation for damage successfully claimed Introductory comment Even the best machines wi...

Page 5: ...f advance Aut Aut Aut Aut Forward speed km h 0 8 0 8 0 8 0 8 Machine length mm 2020 2020 2020 2020 Machine height mm 1430 1430 1430 1430 Machine width mm 1130 1130 1230 1230 Battery voltage and capaci...

Page 6: ...raising the side brush Side brush symbol Used to indicate the lever for lowering the side brush Debris hopper symbol Used to indicate the lever for lowering the debris hopper Debris hopper symbol Use...

Page 7: ...arry out routine maintenance Otherwise request the intervention of the COMAC technical assistance centre If you need to replace any components request the ORIGINAL spare parts from a COMAC dealer and...

Page 8: ...emove the metal points at the base of the packaging 3 remove the cardboard Dimensions of the packaging in cm and weight of the packed machine without batteries CS 80B 203x128x162 780kg CS 80D 203x128x...

Page 9: ...or 1 into which the male connector fixed to the battery charger cables must be inserted The male coupling connector is consigned in the bag that also contains this instruction booklet When assembling...

Page 10: ...ve the batteries completely discharged even if the machine is not being used While recharging check the level of the electrolyte and if necessary top up with distilled water 8 MACHINE PREPARATION VERS...

Page 11: ...cator lights version 80B 90B From the left they are 1 key inserted green 2 clogged debris filter red 3 brake oil level red 4 direction indicators green 5 parking brake red 6 position brake green 7 pos...

Page 12: ...OR BATTERY CUT OUT 1 battery cut out 1 2 hydraulic oil level indicator light battery and diesel versions 2 BRUSH ACTIVATION LEVERS 1 central brush lever 1 2 Side brush lever 2 BRAKE POSITION 1 Parking...

Page 13: ...d dirt on the floor 8 If you need to transfer the machine to another area you are advised not to use the brushes raise them ATTENTION the machine is fitted with a micro switch under the seat to indica...

Page 14: ...e the filter shaker motor and free the dirt captured by the filter itself To maintain effective suction via the filter shaker clean the filter every 20 30 minutes and always before emptying the debris...

Page 15: ...hopper ATTENTION when the debris hopper is raised move the machine very slowly maximum speed 1km h Only empty the hopper when the machine is on an even surface Do not activate the filter shaker when...

Page 16: ...r using a vacuum cleaner Otherwise shake the filter manually do not use liquids 6 reassemble everything carrying out the above mentioned operations in the reverse order Pay special attention to the se...

Page 17: ...e rubber pressing blade 2 2 Take out the worn rubber 3 and replace it with a new one 3 Reassemble the blade and fixing screws MAINTENANCE OF THE HYDRAULIC DRIVE Top up the hydrostatic drive tank benea...

Page 18: ...ar and tear of the flap rubber If necessary replace it 3 Check whether the filter is clogged If necessary clean it thoroughly or replace it 4 Check the central brush is correctly assembled EXCESSIVE O...

Page 19: ...19 DISPOSAL Product subject to the directive WEEE 2002 96 EC...

Page 20: ...20 CONNECTING THE BATTERIESE 14V...

Page 21: ...er bristles are recommended for surfaces with light dirt or dust Remember that when the bristles are worn and therefore too short they become rigid and cannot pick up the dirt efficiently TABLE FOR CH...

Page 22: ...pa Via Invalidi del Lavoro no 1 37050 Santa Maria di Zevio Verona Italy The sound power level measured and guaranteed is shown in the table below MODEL LwA dB A LwA guaranteed dB A CS80B CS90B CS80D C...

Page 23: ...23 COMAC spa Via C Nova Zampieri 5 37057 San Giovanni Lupatoto Verona ITALY Tel 39 045 8774222 Fax 39 045 8750303 E mail com comac it o info comac it www comac it...

Reviews: