background image

6

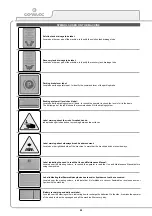
MAIN MACHINE COMPONENTS

The front components of the machine are:

1. 

Filter retainer ring on vacuum cap

2. 

Starter battery (G version)

3. 

Squeegee unit vacuum nozzle

4. 

Side splash guard vacuum nozzle

5. 

Detergent level check bulb (CDS versions)

6. 

Vacuum cap

7. 

Side carter

8. 

Battery box (B version)

9. 

Vacuum cap retainer hinge

10.  Recovery tank retainer hinge

11.  Battery connector

12.  Electrical system connector

13.  Brush motor thermal circuit breaker

14.  Vacuum motor thermal circuit breaker

15.  Command display

16.  Headlights

17.  Starter battery retainer (G version)

18.  LPG cylinder retainer (G version)

19.  Rear rubber-pressing blade retainer

20. 

Gasoline tank filter (G versions)

21. 

Detergent solution filter

22. 

Solution tank inlet cap filter

23.  Squeegee front rubber blade

24.  Squeegee rear rubber blade

25.  Rung

26.  Quick female connection (CDS versions)

27.  Quick male connection (CDS versions)

28.  Machine tail-light command switch

29.  Main key switch (B version)

30.  Main key switch (G version)

31.  External blade on splash guard rubber-pressing blade

32.  Retainer blade for vacuum cap rotation

33.  Internal blade on splash guard rubber-pressing blade

34.  Front rubber-pressing blade

35.  Rear rubber-pressing blade

36.  Blinking light

37.  Command lever for machine direction switch

38.  Command lever for brush head sideways movement switch

39.  Tap command lever

40.  Command lever for engine air (G versions)

41.  Parking brake lever

42.  Engine rpm adjustment lever (G version)

43.  Squeegee rotation release lever

44.  Side splash guard movement handle

45.  Handle for raising seat mounting plate

46.  Command knob for selector switch for the fuel to be injected in 

the endothermic engine carburettor

47.  Command knob for switch to select the pressure on the 

brushes

48.  Command knob for working program selection switch

49.  Command knob for working speed selection switch

50.  Detergent percentage adjustment knob (CDS version)

51.  Adjustment knob for quantity of water in the water system (CDS 

version)

52.  Spring safety clip

53.  Control panel

54.  Control panel (G version)

55.  Front splash guard on brush head

56.  External splash guard

57.  Internal splash guard

58.  Right side splash guard

59.  Left side splash guard

60.  Rear splash guard on brush head

61.  Brake pedal

62.  Drive pedal

63.  Squeegee unit retainer knob

64.  Knob for adjusting the height of the squeegee unit

65. 

Rubber-holder for optional quick solution tank filling kit

66. 

Vacuum cap filter guard

67.  Buzzer button

68. 

Command display confirmation button

69.  Gasoline bypass tap (G version)

70.  Detergent solution bypass tap (CDS version)

71. 

Detergent solution filter tap

72.  Operator seat

73.  Gasoline tank (G version)

74.  Detergent tank (CDS version)

75.  Recovery tank

76.  Solution tank

77.  Red indicator light showing a traction engine fault

78.  Red indicator light showing that the parking brake is ON

79.  Red indicator light showing that the liquid in the solution tank 

has reached reserve level

80.  Red indicator light showing that the liquid in the recovery tank 

has reached the overflow level

81.  Red indicator light showing that the liquid in the braking system 

has reached a critical level

82.  Red indicator light showing that the brush head engine is 

working beyond the critical threshold

83.  Green indicator light showing that the machine tail-lights are 

working

84.  Green indicator light showing that the brush head unit is back in 

its standard position (inside the machine body)

85.  Green indicator light showing that the squeegee unit has 

reached its working position

86.  Green indicator light showing that the left-hand vacuum motor 

is functioning

87.  Green indicator light showing that the right-hand vacuum motor 

is functioning

88.  Green indicator light showing that the electrical motor in the 

brush head is functioning

89.  Green indicator light showing that the solenoid valve in the 

machine water system is functioning

90.  Green indicator light showing that the main switch is functioning 

(B versions)

91.  Green indicator light showing that the main switch is functioning 

(G versions)

92.  Safety clip

93.  Side splash guard retainer pin

94.  Starter battery support (G version)

95.  LPG cylinder support (G version)

96.  Support for engine oil drainage tube (G versions)

97.  Gasoline tank inlet cap (G versions)

98.  Solution tank inlet cap

99.  Cap of recovery tank maintenance drain well

100.  Detergent tank cap (CDS version)

101.  Cap for engine oil drainage tube (G versions)

102.  Squeegee vacuum tube

103.  Side splash guard vacuum tube

104.  Gasoline tank level tube (G versions)

105.  Engine oil drainage tube (G versions)

106.  Recovery tank drainage tube

107.  Solution tank drain pipe

108.  Rubber-pressing blade retainer screw

109.  Adjustment screw for squeegee tilt

110.  Steering wheel

Summary of Contents for ULTRA 120 B-G

Page 1: ...ORIGINAL INSTRUCTION DOC 10029463 Ver AC 04 2016 SCRUBBING MACHINES ULTRA 120 B G USE AND MAINTENANCE MANUAL...

Page 2: ......

Page 3: ...IONS 28 TRANSPORTING THE MACHINE G VERSIONS 29 TYPE OF BATTERY TO BE USED B VERSIONS 31 TYPE OF BATTERY TO BE USED G VERSIONS 31 TYPE OF LPG CYLINDER TO BE USED G VERSIONS 31 MAINTENANCE AND DISPOSAL...

Page 4: ...R 53 DRAINING THE SOLUTION TANK 53 CLEANING THE RECOVERY TANK 54 CLEANING THE SOLUTION TANK 54 CLEANING THE DETERGENT SOLUTION FILTER 55 CLEANING THE SQUEEGEE VACUUM TUBE 55 CLEANING THE BRUSH HEAD SP...

Page 5: ...e of protective gloves Indicates that the operator should always wear protective gloves to avoid the risk of serious injury to his hands from sharp objects Symbol indicating a treading ban Informs the...

Page 6: ...3 Squeegee unit retainer knob 64 Knob for adjusting the height of the squeegee unit 65 Rubber holder for optional quick solution tank filling kit 66 Vacuum cap filter guard 67 Buzzer button 68 Command...

Page 7: ...7 36 72 102 6 9 10 110 107 106 75 5 76 74 58 7 59 7...

Page 8: ...8 100 74 28 29 67 48 49 47 37 38 39 16 82 87 77 86 81 85 78 84 50 79 88 51 80 89 90 83 25 62 61 39 14...

Page 9: ...9 103 4 56 31 43 109 15 3 98 22 65 24 108 19 34 35 23 68 44 63 64 99...

Page 10: ...10 2 94 17 101 96 105 69 12 11 18 73 40 97 95 104 42...

Page 11: ...d the chemical action of a water detergent solution As it advances it collects the dirt removed and the detergent solution not absorbed by the floor The machine must only be used for this purpose This...

Page 12: ...linders Endothermic engine capacity G versions cm3 688 Net endothermic engine power G versions kW 15 5 at 3600 rpm Maximum net endothermic engine torque G versions Nm 48 3 Nm at 2500 rpm Endothermic e...

Page 13: ...L DATA U M ULTRA 120 B ULTRA 120 G bi fuel ULTRA 120 G gasoline Machine weight kg 760 1050 1039 Machine weight in transport mode kg 1275 1050 2 1039 3 Machine weight in working mode kg 1685 1366 1332...

Page 14: ...e engine has just been working G versions The bi fuel version of the machine must not be kept in underground or poorly aired places near combustible materials or electric systems or near air vents duc...

Page 15: ...Turn off the fuel flow adjustment tap For the bi fuel version close the valve in the LPG cylinder G versions To prevent unauthorised machine use the power supply should be interrupted switch the mach...

Page 16: ...uel versions After replacing the cylinder carry out a seal test on the connections using soapy water never use flames for this purpose After this perform a machine switch on test G bi fuel versions If...

Page 17: ...he overpressure and prevent fuel from spurting out Don t inhale the fuel vapours Fuels may contain substances similar to solvents Avoid any contact of mineral oil products with the skin and eyes Use g...

Page 18: ...apours or mixtures and also non diluted acids and solvents acetones aluminium and magnesium powders These substances may also corrode the materials used to construct the machine If the machine is used...

Page 19: ...n Authorised Retailer or dealer Restore all electrical connections after any maintenance interventions Have the machine checked by an authorised technical assistance centre every year When disposing o...

Page 20: ...hands Indicates danger to hands due to crushing between two surfaces Label warning about sideways brush head movement Located on the right hand side of the machine to warn that the brush head can move...

Page 21: ...the vacuum motor Label about vacuum cap filter cleaning Located on the rear part of the machine to identify the position of the vacuum cap filters and remind the operator to clean them after every mac...

Page 22: ...nt canister to identify its position Detergent tank instruction label CDS versions Located on the bottom part of the seat mounting plate to indicate the quantities for filling the detergent tank Deter...

Page 23: ...on the brush head Symbol for selector of sideways brush head movement Indicates the lever for selecting the direction in which the brush head can move Symbol of indicator light for over strained brus...

Page 24: ...enoid valve Indicates the green indicator light The indicator light informs the operator that the solenoid valve in the machine water system is working Symbol of indicator light for active brush head...

Page 25: ...ine ATTENTION these operations must be carried out using protective gloves to avoid any possible contact with the edges or tips of metal objects 4 Insert a ramp in the rear part of the machine ATTENTI...

Page 26: ...of the machine Fig 16 22 Grip the handle 4 and lower the seat mounting plate to the working position Fig 8 TAKING THE MACHINE OUT OF ITS PACKAGING G VERSIONS The machine is shipped in specific packagi...

Page 27: ...19 Insert the key 2 in the main switch 1 on the control panel Bring the main switch 1 to I turning the key a quarter turn to the right Fig 11 ATTENTION wait a few seconds before turning the key to STA...

Page 28: ...t the machine safely proceed as follows 1 Make sure the solution and recovery tanks are empty If this is not the case empty them read DRAINING THE SOLUTION TANK and DRAINING THE RECOVERY TANK 2 Sit on...

Page 29: ...rting any task make sure the current regulations concerning the safe transport of dangerous substances are scrupulously observed 1 Make sure the solution and recovery tanks are empty If this is not th...

Page 30: ...erator seat in the direction shown by the arrow Fig 11 ATTENTION the indicator light 10 relating to the engaged parking brake will be deactivated on the control panel Fig 12 12 Press the drive pedal 1...

Page 31: ...ry compartment with the aid of suitable lifting devices ATTENTION dead batteries are classified as dangerous waste and as such must be delivered to an authorised body for disposal For the maintenance...

Page 32: ...he key from the instrument panel 6 Get off the machine ATTENTION do not position your foot above the brush head while the machine is coming down the ramp 7 Grip the handle 6 Fig 5 and raise the seat m...

Page 33: ...ble for the specific weight and size 8 Connect the battery cable to the poles in the battery box ATTENTION the batteries must be wired by a specialised technician 9 Connect the battery connector 6 to...

Page 34: ...g position Fig 4 INSERTING THE LPG CYLINDER IN THE MACHINE G VERSIONS INSERTING THE STARTER BATTERY G VERSION To insert the LPG cylinder in its housing on the machine proceed as follows 1 Make sure th...

Page 35: ...flammable Keep away from fires and do not shake fuel containers Don t smoke in the refuelling area Discharge any static electricity from your body before approaching the fuel tank ATTENTION carry out...

Page 36: ...d make sure it is in a safe condition read MACHINE SAFETY 6 Go to the right side of the machine and disconnect the side splash guard vacuum tube 5 from the vacuum nozzle 6 in the splash guard itself F...

Page 37: ...3 is properly tightened Fig 2 5 Remove the solution tank cap 4 Fig 3 Make sure the filter 5 is correctly positioned Fig 3 6 Fill with clean water at a temperature no higher than 50 C and no lower than...

Page 38: ...HINE SAFETY ATTENTION protective gloves should always be worn when handling detergents or acidic or alkaline solutions to avoid serious injury to the hands 3 Remove the detergent canister cap Fig 1 4...

Page 39: ...de of the tank Fig 1 If necessary fill the tank with fuel see FILLING THE GASOLINE TANK G VERSIONS 7 Check the main switch 2 on the control panel is on 0 Fig 2A B versions or Fig 2B G versions If this...

Page 40: ...nob 6 to position C as shown in Fig 5 ATTENTION rotating the i drive selector to the scrubbing with drying program the brush head and squeegee unit will move to their working positions in contact with...

Page 41: ...un down only the battery outline flashes ATTENTION the bottom line shows the hours and minutes of operation The flashing symbol Indicates that the hour meter is counting the machine functioning time W...

Page 42: ...and to carry out a scrubbing without drying operation D Scrubbing only using only the brushes in the brush head 7 Open the detergent solution flow in the machine water system by turning the tap comman...

Page 43: ...re working Fig 9 stop the machine and top up the level of water versions with CDS or water with detergent versions without CDS in the tank ATTENTION to fill the solution tank with detergent solution r...

Page 44: ...you are working just turn the knob 13 on the control panel Fig 1 ATTENTION there are three pressure levels the additional pressure is zero with step 01 and maximum with step 03 ATTENTION the extra pr...

Page 45: ...n should be selected on the basis of the type of floor and the amount and type of dirt to be removed ATTENTION there are eight detergent solution supply levels supply is zero with step 01 and maximum...

Page 46: ...is happens contact a specialised Comac technician as quickly as possible BUZZER The machine is equipped with a buzzer if you need to sound a warning just press the button 1 on the control panel Fig 1...

Page 47: ...e brush head unit will lift up from the floor The squeegee will remain in contact with the floor for a few seconds to allow the drying to finish after which it will lift up off the floor A few seconds...

Page 48: ...3 to the main system connector 4 Fig 4A B versions 6 Connect the alternator connector 5 to the main system connector 4 Fig 4B G versions 7 Grip the handle 2 Fig 2 and lower the seat mounting plate to...

Page 49: ...Tighten the fuel flow tap 10 by moving the lever 11 in the direction shown by the arrow Fig 10 17 Grip the handle 2 and lower the seat mounting plate to the working position Fig 4 18 For machine vers...

Page 50: ...nage tube 2 at the back of the machine from the retainers Fig 2 5 Bend the end of the drainage tube so as to create a choke and prevent the content from coming out Fig 3 put the tube on the discharge...

Page 51: ...quipment to be used for this operation is not supplied with the machine 6 Use a jet of water and then a damp cloth to thoroughly clean the vacuum nozzle 2 Fig 3 7 Press the squeegee rotation retainer...

Page 52: ...rush head splash guard Fig 3 6 Use the relative handle 6 to remove the right hand splash guard pre assembly Fig 4 7 Rotate the brush clockwise Fig 5 until the three buttons come out of the slots on th...

Page 53: ...the vacuum motor filter 7 Fig 8 11 Clean the filter with a jet of water If necessary remove the impurities with a spatula 12 Repeat the steps from 9 to 11 for the filter of the second vacuum motor as...

Page 54: ...7 11 Rinse the inside with a jet of water if necessary use a spatula to remove the sludge that has accumulated at the bottom of the tank 12 Carefully rinse the dirty water level float 8 inside Fig 8 1...

Page 55: ...1 2 Take the machine to the maintenance area ATTENTION the place designated for this operation must comply with current environmental protection regulations 3 Make sure the machine is in a safe condit...

Page 56: ...he machine 5 Remove the pins 4 that block the rotation pins 5 of the brush head splash guard Fig 3 6 Use the relative handle 6 to remove the right hand splash guard pre assembly Fig 4 7 Use a jet of w...

Page 57: ...plied with the machine CLEANING THE DETERGENT TANK VERSIONS WITH CDS 5 Disconnect the quick connection rubber holder 2 located behind the side carter Fig 3 to avoid any risk of it breaking CDS version...

Page 58: ...achine will dispense solution during this operation 7 When you have finished washing the machine water system drain the solution tank completely read DRAINING THE SOLUTION TANK If the machine is to be...

Page 59: ...system Fig 9 ATTENTION as soon as you press the drive pedal the brush head and squeegee unit will move down until they are in contact with the floor and will start working At the same time the soleno...

Page 60: ...lace designated for this operation must comply with current environmental protection regulations 3 Make sure the machine is in a safe condition read MACHINE SAFETY ATTENTION these operations must be c...

Page 61: ...s the machine has reached the maintenance area make sure it is in a safe condition read MACHINE SAFETY ATTENTION these operations must be carried out using protective gloves to avoid any possible cont...

Page 62: ...ecialised technician REPLACING THE STARTER BATTERY G VERSION To replace the starter battery proceed as follows 1 Make sure the machine is in a safe condition read MACHINE SAFETY ATTENTION these operat...

Page 63: ...ition make sure the machine is in a safe condition read MACHINE SAFETY ATTENTION these operations must be carried out using protective gloves to avoid any possible contact with the edges or tips of me...

Page 64: ...el of LPG in the cylinder G versions Replace the old cylinder with a new one read REPLACING THE LPG CYLINDER G VERSIONS Closed tap on the valve in the LPG cylinder G versions Open the valve tap THE BA...

Page 65: ...cleaned Make sure that the brushes fitted on the machine are suitable for the work to be carried out Read CHOOSING AND USING THE BRUSHES The brush bristles are excessively worn Check the condition of...

Page 66: ...or floors with small joints On uneven floors or those with deep joints it is advisable to use softer bristles which can enter the gaps more easily Remember that when the bristles are worn and therefor...

Page 67: ...commercial and industrial use EN 12100 1 Safety of Machinery Basic concepts general principles for design Part 1 Basic terminology and methodology EN 12100 2 Safety of Machinery Basic concepts genera...

Page 68: ...68 NOTES...

Page 69: ...69 NOTES...

Page 70: ...70 NOTES...

Page 71: ......

Page 72: ...COMAC S p A Via Maestri del Lavoro 13 37059 S Maria di Zevio Verona Italy Tel 39 045 8774222 Fax 39 045 8750303 E mail com comac it www comac it...

Reviews: