34
MACHINE
PREP
ARA
TION
If the starter battery is not included with the machine for shipment
reasons, or if it needs to be replaced, proceed as follows:
1. Make sure the machine is in a safe condition (read “MACHINE
SAFETY”).
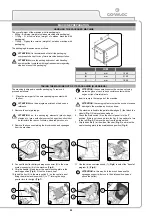
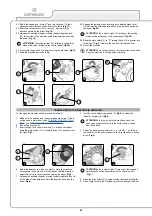
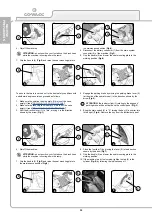
2. Grip the handle for moving the seat mounting plate and raise the
plate to the maintenance position (
Fig.1
).
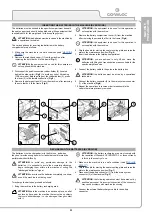
3. Insert the battery in the relative compartment.
ATTENTION:
you are advised to only lift and move the battery
with lifting and transportation means suitable for the specific
weight and size.
4. Fix the battery in place with the relative retainer (1) (
Fig.2
).
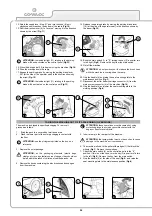
5. Connect the battery cables (2) to the poles in the battery itself
(
Fig.3
).
ATTENTION:
the batteries must be wired by a specialised
Comac technician.
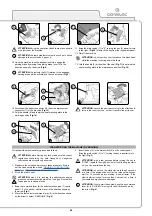
6. Grip the handle for moving the seat mounting plate and raise the
plate to the maintenance position (
Fig.4
).
ATTENTION:
the coupling connector of the battery charger is
consigned inside the bag containing this instruction booklet,
and must be assembled on the cables of the battery charger
as indicated in the instructions.
ATTENTION:
before connecting the batteries to the battery
charger, make sure it is suitable for the batteries used.
ATTENTION:
carefully read the Use and Maintenance
Manual of the battery charger used for recharging.
ATTENTION:
keep the seat mounting plate in the
maintenance position for the whole duration of the battery
recharging cycle, to allow gas fumes to escape.
6. When the recharge cycle is complete, disconnect the external
battery charger cable from the battery connector.
7. Connect the battery connector (2) to the main system connector
(3) of the machine (
Fig.3
).
8. Grip the handle for moving the seat mounting plate and lower
the plate to the working position (
Fig.4
).
INSERTING THE LPG CYLINDER IN THE MACHINE (G VERSIONS)
INSERTING THE STARTER BATTERY (G VERSION)
To insert the LPG cylinder in its housing on the machine, proceed
as follows:
1. Make sure the machine is in a safe condition (read “
MACHINE
SAFETY
”).
ATTENTION:
these operations must be carried out using
protective gloves to avoid any possible contact with the edges
or tips of metal objects.
ATTENTION:
the LPG cylinder must be connected by a
specialised technician.
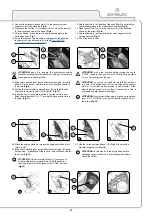
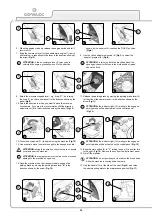
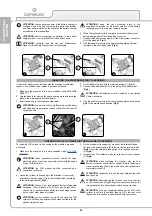
2. House the cylinder in its support in the machine. It is correctly
positioned when the valve (1) is in the left-hand side (according
to the working direction) (
Fig.1
).
ATTENTION:
Comac S.p.A. recommends the use of standard
European 10kg cylinders with
Ø
30cm and height 60cm.
Comac S.p.A. declines responsibility for any damage caused
by the use of other types of cylinder.
ATTENTION:
you are advised to only lift and move the LPG
cylinder with lifting and transportation means suitable for the
specific weight and size.
3. Fix the cylinder to its support by means of the retainer blades
(2). Insert the support screw (3) in the slot on the retainer blade
(
Fig.2
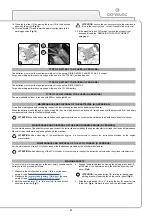
). Insert the retainer blade spring (4) in the support screw
(5) (
Fig.3
).
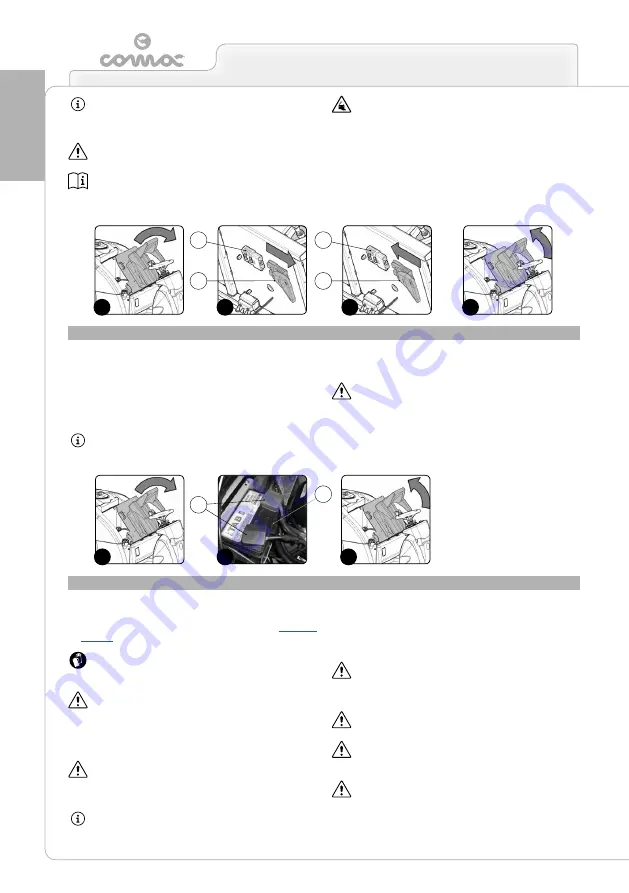
4. Connect the LPG distribution tube (6) to the valve in the cylinder
(7) (
Fig.4
)
ATTENTION:
when replacing the cylinder, stay far from
flames, cinders or active electric devices. Before replacing it,
make sure the taps of both the old and the new cylinders are
completely turned off.
ATTENTION:
remember to insert the seal between the tube
and the valve.
ATTENTION:
after replacing the cylinder, carry out a seal test
on the connections using soapy water (never use flames for
this purpose) before attempting to switch on the machine.
ATTENTION:
if the gas supply diminishes but the LPG in the
cylinder is still at a good level (above 20%), the user must
request the intervention of specialised Comac personnel.
4
2
3
1
3
1
2
2
2
1
1
1
2
Summary of Contents for ULTRA 120 B-G
Page 2: ......
Page 7: ...7 36 72 102 6 9 10 110 107 106 75 5 76 74 58 7 59 7...
Page 9: ...9 103 4 56 31 43 109 15 3 98 22 65 24 108 19 34 35 23 68 44 63 64 99...
Page 10: ...10 2 94 17 101 96 105 69 12 11 18 73 40 97 95 104 42...
Page 68: ...68 NOTES...
Page 69: ...69 NOTES...
Page 70: ...70 NOTES...
Page 71: ......

