36
MACHINE
PREP
ARA
TION
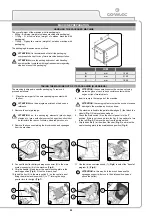
ASSEMBLING THE BRUSH
To assemble the brushes to bush head unit, which for reasons of
packaging are supplied dismantled from the machine, proceed as
follows:
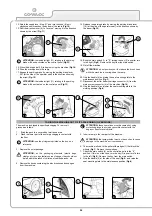
1. Bring the machine to the maintenance area.
ATTENTION:
these operations must be carried out using
protective gloves to avoid any possible contact with the edges
or tips of metal objects.
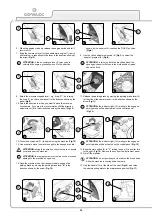
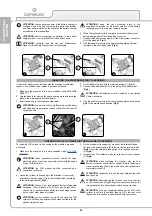
2. Engage the parking brake by moving the parking brake lever (1)
(at the side of the operator seat) in the direction shown by the
arrow (
Fig.1
).
ATTENTION:
the indicator light (2) relating to the engaged
parking brake will be activated on the control panel (
Fig.2
).
3. Use the i-drive adjustment switch (3) to select the “transfer”
program (A) (
Fig.3
).
4. Press the drive pedal (4) to bring the brush heads to their idle
position (
Fig.4
).
5. As soon as the brush head is in the idle position, switch off the
machine and make sure it is in a safe condition (read “
MACHINE
SAFETY
”).
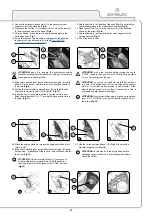
6. Go to the right side of the machine and disconnect the side
splash guard vacuum tube (5) from the vacuum nozzle (6) in the
splash guard itself (
Fig.5
).
ATTENTION:
before pulling the tube (5), loosen the screw
clamp that fixes it to the nozzle (6).
ATTENTION:
the equipment to be used for this operation is
not supplied with the machine.
7. Remove the pins (7) that block the rotation pins (8) of the brush
head splash guard (
Fig.6
).
8. Use the relative handle (9) to remove the right-hand splash guard
pre-assembly (
Fig.7
).
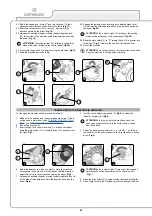
9. Insert the brush in its seat on the brush-holder plate, turning
it until the three buttons enter the slots on the plate. Turn until
the pin is pushed towards the coupling spring and is locked into
place.
ATTENTION:
the picture (
Fig.8
) shows the rotation direction
for coupling the right-hand brush. For the left-hand brush,
turn in the opposite direction.
10.
When the right-hand brush has been fitted, reassemble all the
parts and then fit the left-hand one.
7
5
6
3
4
8
7
1
5
2
6
1
5
6
7
6
5
2
8
7
3
9
4
Summary of Contents for ULTRA 120 B-G
Page 2: ......
Page 7: ...7 36 72 102 6 9 10 110 107 106 75 5 76 74 58 7 59 7...
Page 9: ...9 103 4 56 31 43 109 15 3 98 22 65 24 108 19 34 35 23 68 44 63 64 99...
Page 10: ...10 2 94 17 101 96 105 69 12 11 18 73 40 97 95 104 42...
Page 68: ...68 NOTES...
Page 69: ...69 NOTES...
Page 70: ...70 NOTES...
Page 71: ......

