INSTALLATION GUIDE FOR RX-1839
ENU STATUS : 1-0-0
Copyright - refer to title page
Page 16
3.3
INSTALLATION PROCEDURES
3.3.1 GOODS INWARDS INSPECTION
1. Verify the number of packages received against the packing list.
2. Check all packages for external damage; report any external damage to the shipping courier. If there is
damage, a shipping agent should be present before unpacking and inspecting the contents because
damage caused during transit is the responsibility of the agent.
3. Open and check each package against the packing list. If any items are missing, please contact
Comba.
4. Do not remove items from antistatic packing until ready for installation. If damage is discovered at the
time of installation, contact the shipping agent.
3.3.2 TOOLS
See Appendix A for a full list of the recommended tools required for installation and maintenance.
3.3.3 PREPARATION
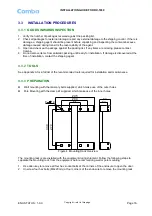
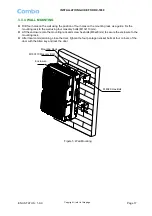
Wall mounting with the masonry bolts supplied, which make use of the outer holes.
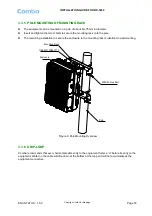
Pole Mounting with the clamp kit supplied, which make use of the inner holes.
85
200
295
270
330
80
62
8
14
Figure 4: Mounting Rack Overview
The mounting rack is pre-installed with the equipment during shipment. Follow the following steps to
separate the mounting rack from the equipment before commencing wall or pole mounting:
1. Use Allen key to remove all four hex socket bolts at the corners of the enclosure to open the door.
2. Unscrew four hex bolts (M8x20mm) at four corners of the enclosure to remove the mounting rack.


