background image

30

座墊

座墊

座墊

請注意假如將


EggShock


Super 

墊放到紙張等上面時,有

可能會滲透痕跡。

Stain may be left if placing the EggShock Super onto 

paper surface.

請注意勿讓幼兒將


EggShock


Super


墊放進口中或拉扯玩

耍,以免造成意外。

Do not let the child to place the EggShock Super into its 

mouth or play around with it in case of accidents.

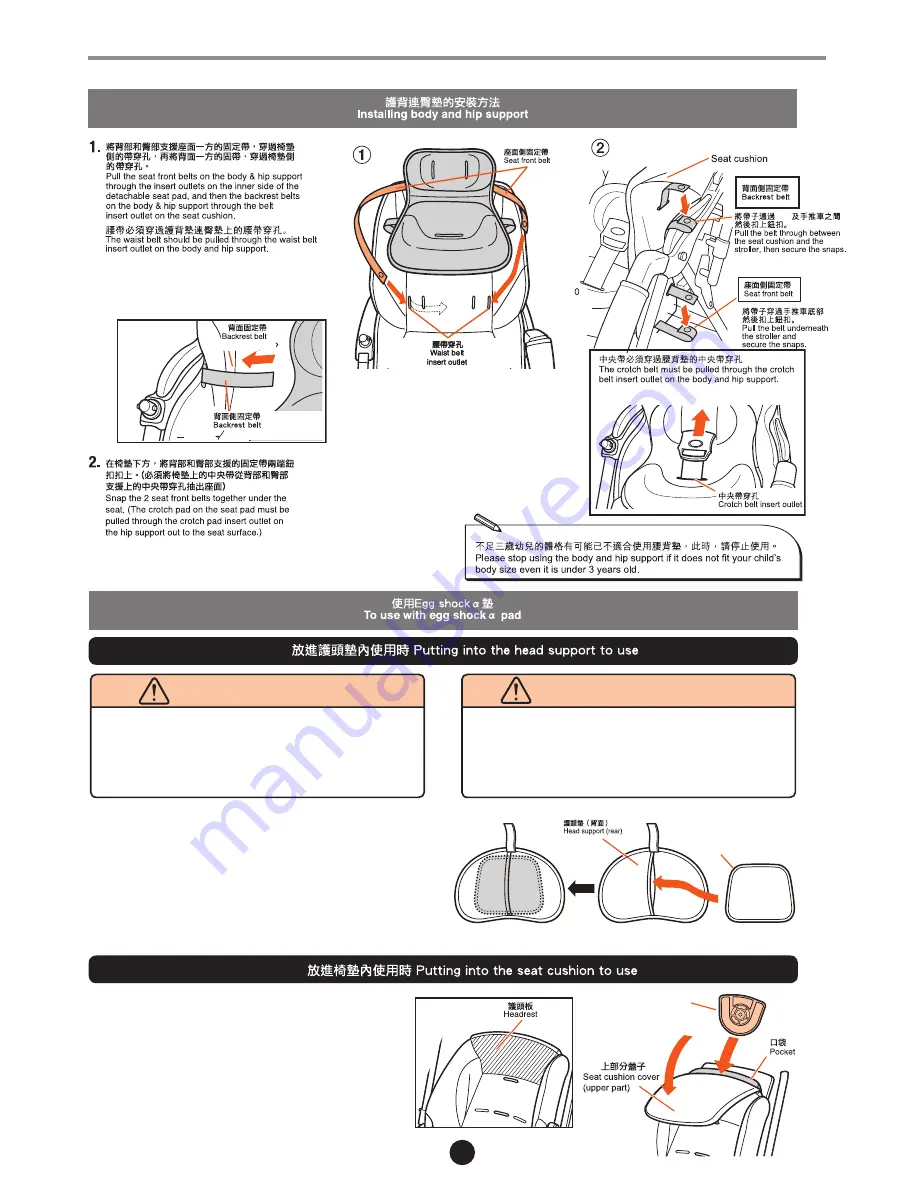
Eggshock

墊可以安裝到

Dacco

墊的頭墊部份之內,保護幼兒頭部免受推行時

的震動影響。

The Eggshock pad can be inserted into the head support of Dacco Seat to 

protect child from the vibrations from the ground when strolling.

請在頭墊背部的口袋進行安裝

*

請注意

Eggshock Super

墊的頭墊

(700

系列

)

部份上下前後方向,然後安裝到頭

墊內側的靠近己方的口袋之內。

Insert the Eggshock pad from the rear pocket of the head support.

*Make sure the head support of Eggshock Super (700 series) is the correct 

direction before installing it into the pocket of the head support.

注意

 CAUTION

警告


WARNING

EggShock


Super

EggShock


Super

當幼兒的頭部抵住頭板時,將頭墊拆除,並將頭墊內的

Eggshock Super

墊放進椅墊內使用。將椅墊頭靠背面的專用口袋打開於入

Eggshock 

Super

墊。

When the child’s head reaches the headrest, please remove the head 

support. Remove the Eggshock super pad from the head support.

Open the pocket at the back of seat cushion (upper part) and put the 

Eggshock Super into it.

EggShock


Super

EggShock


Super

Summary of Contents for Caldia

Page 1: ...Caldia...

Page 2: ...May vary from child s growth rate Accessories that are not attached to main body in sales package Head support Body Hip Support Egg Shock Egg Shock pad Instruction manual this book Main body...

Page 3: ...not use the stroller on steep slopes stairs escalators rough roads beaches mud etc In the event of damage or operation problems stop using the stroller immediately Locked position There is no space i...

Page 4: ...the swivel locks on the parents side are in the proper direction with the triangle mark facing the swivel lock and the swivels are engaged Mark Stopper Do not put or hang parcels or things on the cano...

Page 5: ...ched the normal use or handle please make sure to raise the casters lock lever to release the caster If you do not release the lock there is a possibility that the caster is not automatically switched...

Page 6: ...troller may fall because of the caster not being locked automatically Stroller not yet fixed and causing tipping over Do not over rely on the stoppers Stroller may move suddenly or tip over even when...

Page 7: ...othemain bodyforchildsittingpurpose Otherwisedamagemaybe causedtostroller Donotloadmorethan5kgintothebasket Makesuretoreleaseallswivelswhenswitchingthe handledirection Otherwisethestrollermaybecome dr...

Page 8: ...ge carefully before installation Front guard Canopy lever Headrest Movable headguard Basket Swivel wheel locks Stopper Front and rear wheels total4 places Rear leg latches Head support Safety lock Fol...

Page 9: ...n clear area Please do not touch the folding lever except when folding the stroller After switching the handle position before use please check and make sure the swivel locks on the parents side are i...

Page 10: ...stroller is lifted Make sure the stroller touches at the ground during operation A folded stroller with the backrest in upright position may be a little stiff to unfold In such case please try to lowe...

Page 11: ...may have chance to slip accidentally and cause the stroller to tip and endanger the child In forward facing position please do not touch at the sliders on the rear leg tubes Otherwise the swivel may h...

Page 12: ...y and the swivels are already engaged In case of using the face to face mode and after changing angle of the handle grip it may be causing difficulties of pushing the stroller across the stairs In thi...

Page 13: ...s carrying a child Make sure to engage both sides of the stoppers to avoid sudden movement or tipping over Even when empty always engage both stoppers since the stroller may suddenly move The swivels...

Page 14: ...up Do not let the child operate the front guard It may make the child to fall off from the stroller Do not lift stroller by holding front guard or danger of sliding down will occur Do not get hold of...

Page 15: ...it to the right position It clicks into place automatically Stop rotating when it reaches the right position Look at the canopy from the front side ensuring the left and right side are at the same po...

Page 16: ...15 Canopy lever Undo the snaps Secure the snaps on top front back Top window cover...

Page 17: ...ventilation window Open the air through system backrest ventilation window Roll up inward and store the air through cover to the lower part pocket Close up the air through cover by Velcro fasteners wh...

Page 18: ...Make sure to snap the seat cushion onto the leg support bars Otherwise it may make the baby hurt CAUTION 17...

Page 19: ...off Adjust the seat belt to fit the child to make sure it is not too loose to avoid child being fallen off Do not cross the shoulder belts with each other when securing the shoulder belt to the insert...

Page 20: ...3cm at the waist belt end Please strongly pull the buckle to ensure the safety belt is secured Having questions in adjusting the seat belt There should be space which can accommodate second joint of...

Page 21: ...ngle with a child seated Adjust the length of seat belt properly after change of the seat angle Please be aware of those people around you especially child when adjusting the sitting angle to avoid pi...

Page 22: ...backrest cannot be lifted while the child is leaning against the backrest Reclining belt Release the twist at the recline belt end along the recline mechanism Lower the backrest to the lowest position...

Page 23: ...to release the lock before opening the stroller When feel jammed please do not forcibly fold the stroller to prevent from any damage You should re open the stroller to check and operate again Make su...

Page 24: ...23 Safety lock Slide Released position Folding lever...

Page 25: ...Plug the canopy joint into the canopy holder 4 24 11 20 11 20...

Page 26: ...U U shaped hook U U shaped hook Loop fasten position ahead step Loop fasten position Arrow of the view direction Loop fasten position Rear step 3 1 2 4 2 U Pass the front fixing belts thru the seat f...

Page 27: ...cushion Insecured insert plastics may get detached accidentally when in use Make sure the insert plastics are secured before use WARNING Pull the shoulder belts through insert outlets on the seat and...

Page 28: ...waist belt insert outlets on the base seat and also pull the shoulder belt through the shoulder belt insert outlet on the base seat 2 Pull out the shoulder belts and the waist belt through the should...

Page 29: ...2 1 Leg support bar Snaps Seat cushion lower side Snap Detaching the seat cushion 1 2 Please detach the seat cushion according to the reverse steps of attaching the seat cushion 1 Release the install...

Page 30: ...pad Attached in the seat cushion Make sure to apply the Egg Shock pad when using the head support Remove the head support to use when the child s head is too tight against it at an upright backrest D...

Page 31: ...trolling Eggshock Super 700 Insert the Eggshock pad from the rear pocket of the head support Make sure the head support of Eggshock Super 700 series is the correct direction before installing it into...

Page 32: ...the color may fade after numbers of washing It is recommended to use Combi detergent for underwear which is made of natural fatty acid as the ingredient and does not contain bleach and oxide Furtherm...

Page 33: ...stroller during storage to avoid deformation If the baby stroller is stored in vertical position please make sure the swivel is locked and please lock the stopper as well to avoid the baby stroller fa...

Page 34: ...33...

Page 35: ...34...

Page 36: ...157996010 15kg Caldia 5 kg...

Reviews: