Appendix C: Workstations
MicroBlaster MB1006
Comco Inc.
C-4
Issue Date: September 2003
Installation
(cont’d)
4. Using a 4" diameter flexible duct and 2 hose clamps (usually provided with the dust
collector) connect the workstation to a dust collection unit.
5. Follow the instructions in sections 2 and 3 of this manual to prepare for blasting.
CAUTION:
The air that comes out of the nozzle contains abrasive. Do
not point the nozzle at anything that could be harmed or damaged as a
result of abrasive flow.
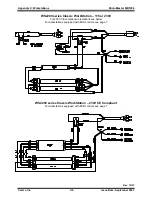
6. With the Power switch on the rear of the workstation turned OFF, connect the power
cord to the AC voltage outlet.
7. Turn the Power switch to the ON position. The lamps in the workstation should light.
Operation
1. Micro-abrasive blasting operations should be conducted according to the instructions
in sections 2 and 3 of this manual.
CAUTION:
Never point the nozzle in the direction of the glass window.
The abrasive stream will etch the glass, reducing operator visibility and
requiring premature replacement of the workstation window.
2. Turn the Power OFF when the workstation is not in use.
Common Problems, Causes and Solutions
Light won’t illuminate
Fluorescent lamps burned out
Powder build-up in lamp bracket,
preventing electrical contact
Ballast failed
Switch failed
Dust builds up inside
1. Remove old lamps
2. Replace lamps (commercial items)
1. Unplug unit
2. Remove lamps
3. Use brush to clean out bracket
4. Reinstall lamps
5. Plug in unit and test
1. Remove lamps
2. Turn Power switch to ON
3. Using voltmeter, test for voltage
across lamp bracket terminals
CAUTION:
Practice electrical safety to
prevent shock.
1. Unplug unit
2. Remove back panel
3. Using ohmmeter, test for continuity
across switch terminals with the
switch set to ON.
Service dust collector
Rev. 10/07
Summary of Contents for MicroBlaster MB1006
Page 10: ......

