background image

ISTRUZIONI ORIGINALI 


ORIGINAL INSTRUCTIONS 


TR 420 


Parti 

Pos. 

Parts 

Vite TE M10x60 

Screw TE M10x60 

Dado M8 

Nut M8 

Rondella 8x17 

Washer 8x17 

Vite TCEI M8x90 

Screw TCEI M8x90 

Vite TCEI M12x80 

10 

Screw TCEI M12x80 

Rondella 12x24 

11 

Washer 12x24 

Dado M12 

12 

Nut M12 

Vite TCEI M8x20 

14 

Screw TCEI M8x20 

Rondella 8x17 

15 

Washer 8x17 

Dado M8 

16 

Nut M8 

Rondella 12x48 

19 

Washer 12x48 

Dado M12 

20 

Nut M12 

Rondella 10x20 

21 

Washer 10x20 

Vite TCEI M8x50 

24 

Screw TCEI M8x50 

2 rondelle 8x17 

25 

2 Washer 8x17 

Dado M8  

26 

Nut M8 


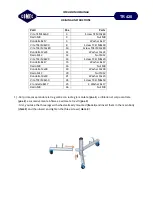
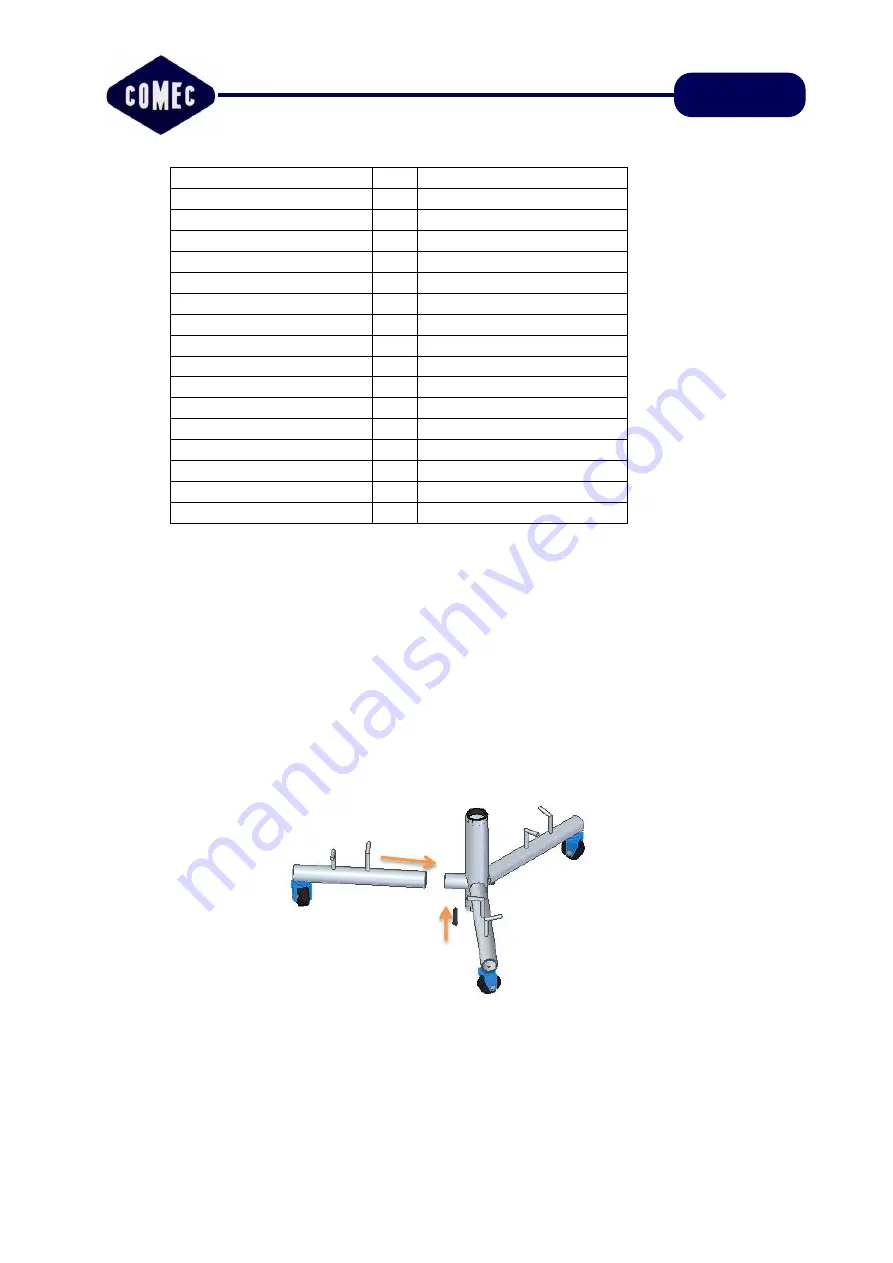
1)


-Per prima cosa prendere le tre gambe con ruote già montate (

pos.1

)  e infilarle nel corpo centrale 

(

pos.2

) e successivamente infilare e avvitare le tre viti (

pos.3

-First, you take the three legs with wheels already mounted (

item 1

) and insert them in the main body 

(

item 2

) and then insert and tighten the three screws ( 

item 3

 ) 


Summary of Contents for TR 420

Page 1: ...TRUCTIONS TR 420 5025554 00 TR 420 TORNIO PER TAMBURI E DISCHI FRENO BRAKE DISC AND DRUM LATHE COMEC srl Corso Italia 55 A 33080 PORCIA Pordenone ITALY tel 39 0434 921101 fax 39 0434 922877 E mail comec comecpn com http www comecpn com ...

Page 2: ...anutenzione 5 RICONDIZIONAMENTO DISCHI FRENO 6 ELIMINAZIONE ERRORI 7 TORNITURA STAZIONARIA 7 1 Supporto da tavolo 8 RICONDIZIONAMENTO TAMBURI FRENO 9 DATI TECNICI 1 2 INDEX 1 INDICATIONS 1 1 Introduction 1 2 Table of contents 1 4 Safety instructions 2 ASSEMBLY PREPARATION INSTALLATION 2 1 Before bringing the machine into service 3 BRINGING THE MACHINE INTO SERVICE 5 1 Oil level check 5 2 Checklist...

Page 3: ...onamento del tornio Frammenti metallici prodotti durante la tornitura possono essere causa di gravi lesioni agli occhi 1 3 2 2 Non indossate mai vestiti larghi o svolazzanti quando assumete il comando del tornio La macchina ha delle parti mobili nelle quali tali indumenti potrebbero impigliarsi 1 3 2 3 Tenete sempre le mani a distanza di sicurezza dalle parti mobili quando la macchina è in funzion...

Page 4: ...ing of brake discs and brake drums They can be operated only according to the operating instructions given by COMEC s technical documentation The technical data on the nameplate must be observed The technical documentation must be complied In case of applications whose transmission or motor failure can be a danger for people appropriate safety measures must be adopted 1 3 4 SEGNALI DI SICUREZZA La...

Page 5: ...evention must be observed Pericolo Gravi lesioni e danni a persone possono essere causati da parti rotanti e pericolo di schiacciamento Danger Serious personal injuries can be caused by moving parts danger of crushing Pericolo Danni a persone e cose possono essere causati dal rovesciamento della macchina Danger Damage to person or property can be caused by toppled machine Pericolo Danni a persone ...

Page 6: ...llowing EEC directives are in force in relation to the disposal of the machine Directive 91 156 CEE regarding waste Directive 91 689 CEE regarding dangerous waste Directive 94 62 CEE regarding packing and packing waste Upon disposal of the machine the identity plate showing the CE mark and also the documentation supplied with the machine must be destroyed 2 PREPARATION Come avviare la macchina 1 I...

Page 7: ... Se si verificano rumori di funzionamento insoliti e o vibrazioni del meccanismo potrebbe trattarsi di un danno alla trasmissione Si prega quindi di rivolgersi al servizio di assistenza COMEC Read carefully the manual as well as the maintenance instructions before bringing the machine into service Wipe the excess of oil The machine can be operated only by qualified personnel The machine TR420 C an...

Page 8: ...l portautensili in termini di gioco laterale nella guida a coda di rondine Il gioco laterale causa spesso incrinazioni e solchi quando il disco è in fase di ricondizionamento 4 MAINTENANCE The machine TR420 is simple and robust With just a few tips about maintenance you can ensure a long and profitable life to your machine Daily maintenance Check the edges of the cutting tips If there are chips or...

Page 9: ...ebbe danneggiare l adattatore Alcuni veicoli richiedono una trazione integrale che elimina la chiusura del mozzo della ruota Per alcuni è necessario inoltre l utilizzo di un distanziatore DS4066 66mm o DS033 33mm Se l adattatore non aderisce perfettamente e perpendicolarmente usate un distanziatore 5 BRAKE DISC LATHING IN 4 STEPS AND 8 MINUTES TR420 is very easy to use You need just 4 steps and 8 ...

Page 10: ...avanti dell adattatore va inserito in uno dei sei fori della flangia di regolazione girevole Ruotate la manopola di montaggio e avvitate saldamente l asse centrale della macchina all adattatore fissate saldamente il tornio al veicolo Warning Adapters are made of cast iron not aluminium or steel as wheels They are not suitable for the use of impact wrench Do not use any impact wrenches to tighten t...

Page 11: ... senza sporcizie o residui nella guida Un appoggio fisso e stabile riduce eventuali vibrazioni Securing the cutting head Vibrations are the main cause of surface problems Make sure that the cutting head is firmly fastened without grime or residues in the guide A good layer reduces potential vibrations c Posizionate la testa di taglio e regolate la camma d interruzione La testa di taglio può essere...

Page 12: ...e Accendete il motore l oscillazione tra il punto più alto e quello più basso sarà visibile sulla scala del comparatore 3 linee di divisione nessuna correzione necessaria Spegnete il motore Next set the switch cam that is turn the cutting head tips until the lathe tool tips touch the outer edges of the brake disc Loosen the cam s setscrew and slide it backwards until it touches the automatic end s...

Page 13: ...iete nel bordo interno raggio minimo della superficie di contatto potete regolare la profondità del PROCESSO DI FINITURA A ogni arresto alla vite di alimentazione la punta di taglio si muove di 0 05 mm Dovreste determinare questo valore se l altezza totale della superficie di attrito è stata sgrossata perbene The difference on the scale between the highest and the lowest point through two parts So...

Page 14: ...ozzo della ruota stringetelo utilizzando un dado a flangia prima di passare all altro lato Quando rimuovete il disco dopo la tornitura è necessario contrassegnarlo in modo che possa essere rimontato nella posizione corretta 6 Now where you have set the depth tighten the tensioning screw They have to be tightened in order to minimize vibrations Place the vibration damper on the lathe tool arm The v...

Page 15: ...re dovrebbe essere utilizzato OGNI volta Muovete la testa di taglio ruotate cioè la testa come rappresentato Turn the adjusting screw of the lathe tool counterclockwise until the tips can not touch both side of the brake disc Switch on the lathe Turn the cutting head backwards to about 10 mm behind the outer edge of the brake disc with the lathe tool tips Start with the inner lathe tool arm behind...

Page 16: ...rnio siano fissati Controllare gli inserti Assicurarsi che la testa di taglio sia ben fissata Utilizzate l ammortizzatore di vibrazioni Controllate se la tavola portautensili è storta Avvitate la barra di controllo 6 MISTAKES RECTIFICATION Ensuring a smooth surface TR420 should make your surface smooth with no rattling or roughness If your surface finishing does not correspond to our description t...

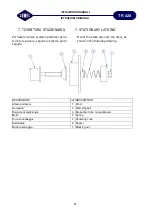
Page 17: ...e lo schema qui di seguito 7 STATIONARY LATHING Mount the brake disc onto the arbor as shown in the following drawing DESCRIZIONE POS DESCRIPTION Albero portaconi 1 Arbor Campana 2 Clamping bell Disco da ricondizionare 3 Brake disc to be reconditioned Molla 4 Spring Cono di centraggio 5 Centering cone Distanziale 6 Spacer Dado di serraggio 7 Blocking nut ...

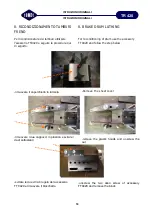
Page 18: ...o rimuovere il coperchietto in lamiera rimuovere i due cappucci in plastica e svitare i dadi sottostanti svitare le due viti a brugola del accessorio TT0420 e rimuovere il blocchetto 8 BRAKE DRUM LATHING For reconditioning of drum use the accessory TT0420 and follow the step below Remove the sheet cover remove the plastic hoods and unscrew the nut unscrew the two allen screw of accessory TT0420 an...

Page 19: ...cure with the two Allen screws Fix the accessory for turning drums with tool to machine with two screw 9 TECHNICAL DATA Diametro disco min max 102 380 mm Min max disc diameter Spessore disco min max 5 45 mm Min max disc thickness Diametro tamburo min max 170 330 mm Min max drum diameter Profondità tamburo max 80 mm Max drum deep Velocità dell asse mandrino 0 180 RPM Spindle axle speed Velocità ava...

Page 20: ...ISTRUZIONI ORIGINALI ISTRUZIONI ORIGINALI 20 TR 420 5555555 5505555 400 5050050 400 NOTE NOTES ...

Page 21: ...ISTRUZIONI ORIGINALI ISTRUZIONI ORIGINALI 21 TR 420 505400 ...

Page 22: ......

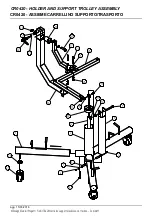
Page 23: ...420 ISTRUZIONI DI MONTAGGIO CARRELLO DI SUPPORTO Prima di iniziare a montare il carrello verificare con l esploso che siano presenti tutti i pezzi indicati Before you start assembly the cart check with the exploded that you have all the parts shown ...

Page 24: ... 15 Washer 8x17 Dado M8 16 Nut M8 Rondella 12x48 19 Washer 12x48 Dado M12 20 Nut M12 Rondella 10x20 21 Washer 10x20 Vite TCEI M8x50 24 Screw TCEI M8x50 2 rondelle 8x17 25 2 Washer 8x17 Dado M8 26 Nut M8 1 Per prima cosa prendere le tre gambe con ruote già montate pos 1 e infilarle nel corpo centrale pos 2 e successivamente infilare e avvitare le tre viti pos 3 First you take the three legs with wh...

Page 25: ... two spacer item 8 9 7 6 5 4 3 Inserire il tubo interno pos 9 posizionare il braccio pos 17 in asse con il pistone e fissarlo tramite il bullone pos 14 15 16 e successivamente fissare il braccio al tubo interno con il bullone pos 10 11 12 Insert the internal tube item 9 position the support arm item 17 in line with the piston and secure with the blot pos 14 15 16 and then fix the support arm to th...

Page 26: ...te avvitare la maniglia con la rondella pos 22 21 Insert the pivot arm item 18 in one of two hole and secure with washer and nut item 19 20 then insert the washer and screw the handle to lock item 22 21 5 Inserire la staffa a L pos 23 nel supporto a C e fissarla con i due bulloni pos 24 25 26 Insert the L bracket item 23 in C support and fix it with 2 blots item 24 25 26 ...

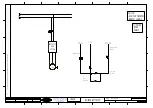
Page 27: ...ISARCIMENTO DEI DANNI SUBITI E FATTA RISERVA DI TUTTI I DIRITTI DERIVANTI DA BREVETTI O MODELLI B APPROV CONTR DISEGN DATA F S FOGL F E D C B A F E D C NUMERO MODIFICHE PAGINA 3 5 4 2 1 6 VERSIONE SABIK DATA ULTIMA REVISIONE A Agg 11 03 2016 COMEC srl Corso Italia 55 A 33080 PORCIA Pordenone ITALY E mail comec comecpn com tel 39 0434 921101 fax 39 0434 922877 http www comecpn com TR420 SCHEMA ELET...

Page 28: ...ASSEMBLY CR0420 ASSIEME CARRELLINO SUPPORTO TRASPORTO Agg 15 03 2016 X Disegni Codici Progetti Finiti TR420 carrello supporto esploso carrellino Copia dft 1 2 3 4 5 6 7 8 9 10 11 12 16 13 14 15 17 19 20 21 22 23 24 25 26 28 29 27 30 18 ...

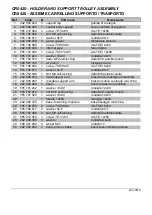
Page 29: ...55 752 008 1 Nut M8 self locking dado M8 autobloccante 16 242 000 250 1 fixed support arm braccio fisso sostegno macchina 17 242 000 260 1 movable support arm braccio mobile sostegno macchina 18 242 000 280 1 bush boccola braccio removibile 19 555 701 242 1 washer 12x48 rondella 12x48 20 555 752 012 1 nut M12 self locking dado M12 autobloccante 21 555 701 020 1 washer 10x20 rondella 10x20 22 1 han...

Page 30: ...AC0420 MOUNTING KIT FOR DISCS AND DRUMS AC0420 KIT MONTAGGIO DISCHI E TAMBURI Agg 01 10 2015 X Disegni Codici Progetti Finiti TR420 PARTICOLARI TR420 AC0420 dft 1 2 3 4 5 6 Accessory not included ...

Page 31: ...ssaggio dischi tamburi 2 242 000 120 1 bell campana 3 242 000 150 1 centering cone cono centraggio 4 538 043 100 1 spring molla 5 242 000 160 1 spacer distanziale 6 555 751 024 1 nut M24 dado M24 20130919 AC0420 MOUNTING KIT FOR DISCS AND DRUMS AC0420 KIT MONTAGGIO DISCHI E TAMBURI ...

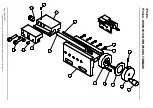
Page 32: ...TT0420 DISPOSITIVO TORNITURA TAMBURI TT0420 Agg 19 10 2015 X Disegni Codici Progetti Finiti TR420 PARTICOLARI TR420 tornitura tamburi TT0420 dft 1 2 3 4 5 6 7 8 9 10 11 12 13 14 15 16 17 ...

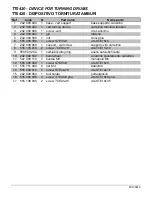
Page 33: ...ino 8 555 105 016 2 screw TCEI 5x16 vite TCEI 5x16 9 550 503 254 1 self lubricating ring anello autolubrificante 10 242 000 540 1 handwheel volantino spostamento carrellino 11 547 000 110 1 handle M6 manopola M6 12 555 405 008 1 screw STEI 5x8 vite STEI 5x8 13 555 751 004 5 nut M4 dado M4 14 555 404 016 5 screw STEI 4x16 vite STEI 4x16 15 242 000 560 1 tool holder portautensile 16 555 408 008 3 sc...

Reviews: