background image


15

4) Port Forwarding setting for remote connection

Port forwarding 

is the operation that allows the transfer of data from one device to another via a specific communication port. 

This procedure enables an external user (mobile phone) to access a device on a local network (1456 /1456S). 

The procedure for opening router ports for device 1456 /1456S is required in order to allow remote access to the system via a 

web page (

port TCP 8080

) and via an App (

port TCP 64100*, port UDP 64100*

).

* The 64100 port is not available for a number of Internet providers, in this case we suggest to use the following ports 

25, 80, 110, 143 or to contact the relative Internet provider.


With the PC still connected to art. 1456 /1456S

 1. 

Access the browser and enter the IP address of the router in the navigation bar, for example: 

192.168.1.1

 2. 

Log in by entering the username and password (these can be found in the router user manual).

The port configuration method may differ according to the brand and type of router used

 3. 

Search for the sections “Port Opening” or “Apps and games” or “Port Forwarding” (if not displayed on the main menu, 

search for them in Advanced settings) and add the ports you wish to configure.

 4. 

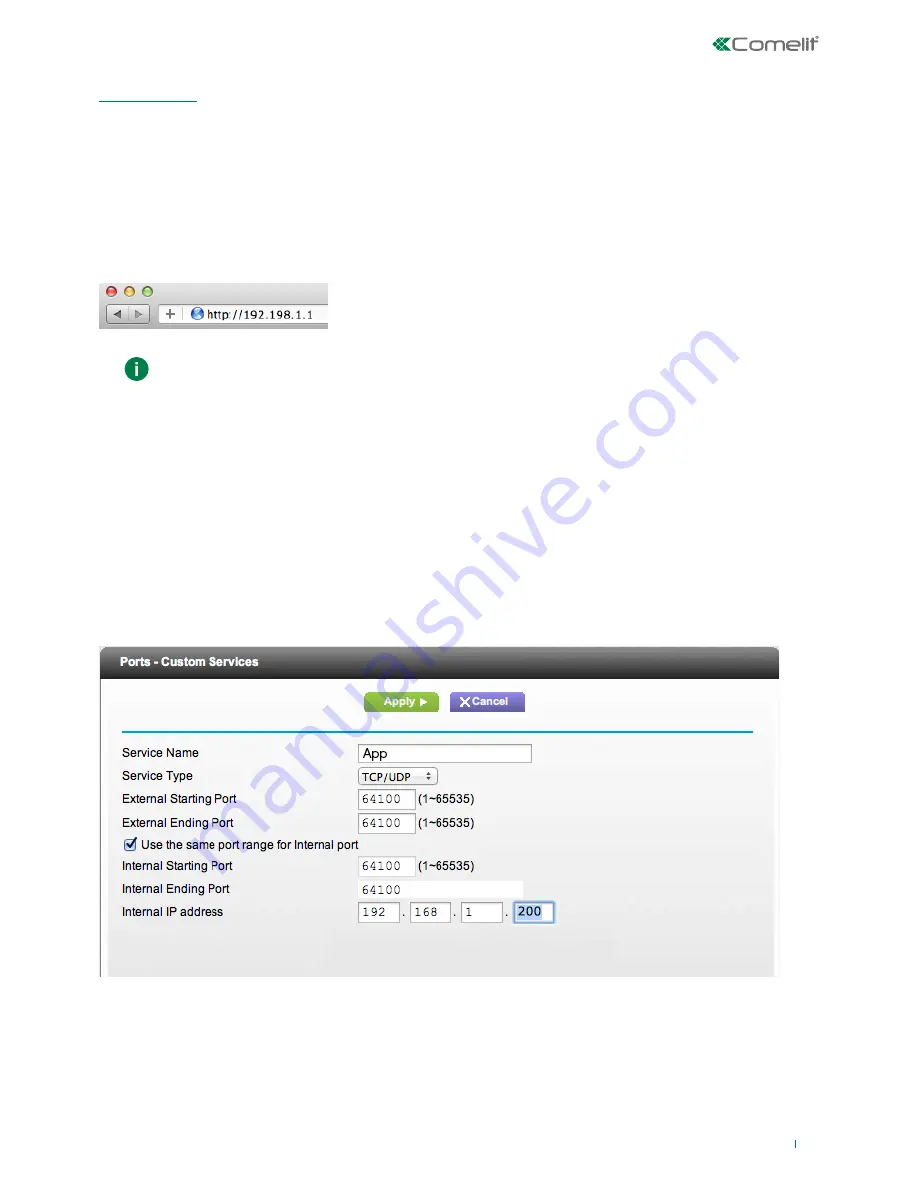
Fill in the configuration panel (see example in the figure below):

a. 

Enter a name.

b. 

Select the desired protocol (

TCP

 for the port 8080,

 TCP/UDP

 for port 64100).

c. 

Enter the desired value for the external port (for example: 8080 / 64100), enter the same value in Start and in End if you 

wish to open a single port.

d. 

For the internal port, enter the desired value (8080 / 64100); enter the same value in Start and End fields to open a single 

port.

e. 

Enter the IP address of the ViP gateway, for example (default= 

192.168.1.200

).

f. 

Confirm.

 5. 

Repeat the procedure for each port you wish to open.

Summary of Contents for 1456

Page 1: ...ANUAL Apartment gateway 1456 1456S FLOOR VIP SYSTEM GATEWAY SOLO CON CAVO ROSSO COMELIT 2E7T000500 ONLY WITH COMELIT RED CABLE 2E7T000500 FIXED POE SETTABLE POE NO POE HOME 1 VIP SYSTEM HOME 2 HOME 3 HOME 4 Art 1456 ...

Page 2: ...io and video communication systems in residential commercial or industrial settings and in public buildings or buildings used by the public Installation All activities connected to the installation of Comelit products must be carried out by qualified technical personnel with careful observation of the indications provided in the Manuals Instruction sheets supplied with those products Wires Cut off...

Page 3: ...oor entry monitors to be connected 1 Ethernet port for ViP system riser input default addressing Autoip 2 Dip switches for the procedures Reboot with predetermined network settings and Restoring factory settings 3 Power supply input via Art 1441 Art 1441B 4 CV1 and CV2 for setting port HOME2 5 CV3 and CV4 for setting port HOME3 6 HOME4 non POE Ethernet port for PC or router connection default Stat...

Page 4: ...artment including Smartphone Tablet Comelit App PSTN GSM Telephone Door entry phone configured as Slave A master door entry monitor is required Up to 15 slaves devices can be added for each apartment including Smartphone Tablet Comelit App PSTN GSM Telephone additional door entry phones configured as Slave Example Example If a monitor is subsequently added the monitor must be programmed in slave m...

Page 5: ...device powered by Art 1440 via port VIP SYSTEM there will be sufficient PoE power available to operate a maximum of 1 door as POE on port HOME1 HOME2 or HOME3 Settable POE SETTABLE POE HOME2 HOME3 SETTABLE CV1 CV2 CV3 CV4 CV1 CV2 CV3 CV4 NO POE STANDARD ETHERNET CV1 CV2 CV3 CV4 CV1 CV2 CV3 CV4 NO POE STANDARD ETHERNET DEFAULT CV1 CV2 CV3 CV4 CV1 CV2 CV3 CV4 POE DO NOT USE STANDARD ETHERNET Only co...

Page 6: ...rail mounted Yes DIN modules no 4 Power supply voltage 48Vdc 56Vdc Min max power consumption mA 50mA Operating temperature C 5 C to 40 C Operating relative humidity 25 75 IP protection rating IP30 GENERAL DATA Product height mm 62 Product width mm 70 Product depth mm 90 ...

Page 7: ... from the website pro comelitgroup com An active internet connection is also required f f Article 1456 1456S has 2 network interfaces HOME and VIP SYSTEM labelled for easy identification which can be configured separately to meet different system requirements Depending on the type of system connect the devices as shown in the following figures Take particular care with regard to the network interf...

Page 8: ...M HOME 2 HOME 3 HOME 4 Art 1456 HOME INTERFACE STATIC IP ADDRESS 192 168 1 200 default see page 5 ROUTER Art 1441 Art 1441B Installer PC ViP SYSTEM INTERNET SIP PROVIDER All system devices form part of a single network so it it is only necessary to configure interface HOME In this case DO NOT alter the configuration of interface VIP SYSTEM KIT SYSTEM ...

Page 9: ... 168 1 1 2 ViP Manager addressing Follow the procedure below to perform a system scan in DHCP to locate all the devices connected to interfaces VIP SYSTEM and HOME an IP address will be automatically assigned to the devices in addressing mode Autoip connected to interface VIP SYSTEM an IP address will be automatically assigned to the devices in addressing mode DHCP connected to interface HOME if t...

Page 10: ...56S f select Information ViP address g assign an unequivocal ViP address to the device h and press Write page i to save the current settings In the case of a system with 2 1456 1456S devices it will be necessary to assign to interface HOME of one of the two devices a new Static IP address as described in case 2 as each device must have a unequivocal IP address ...

Page 11: ...ce 192 168 1 200 NOT belonging to the same router network e g 192 168 0 1 ASSIGN A NEW STATIC IP ADDRESS TO INTERFACE HOME The following procedure describes how to assign network settings to the device 1456 1456S that are compatible with those of the devices connected to interface HOME 1 Open the software ViP Manager version 2 5 0 or later downloadable from the website pro comelitgroup com 2 From ...

Page 12: ...uration IP address g assign device 1456 1456S a Static IP address h and an IP netmask i compatible with the system for example IP 192 168 0 5 netmask 255 255 255 0 warning the IP address must not already be in use 5 Enable Use default gateway l ONLY for the interface connected to the router interface A by default 6 Set the gateway address m for example 192 168 0 1 press Write page n to save the cu...

Page 13: ... address will be automatically assigned to the devices in addressing mode DHCP connected to interface HOME if the system is connected to a server with the function active devices with Static IP address will be identified only if they have a network address that is compatible with that of interface HOME 1 From Options a Local connections b tick DHCP Enable c and confirm d 2 Launch the system scan b...

Page 14: ...w operation of the ComelitViP remote Comelit 1 0 application an active internet connection is also required 1 Select article 1456 1456S and select Configuration DynDNS a 2 Select ComelitDNS b in order to use the free ComelitDNS service 3 Press Register CDNS c to register a ComelitDNS hostname 4 Complete the registration panel NB make a note of the data entered or copy and paste them directly into ...

Page 15: ...gation bar for example 192 168 1 1 2 Log in by entering the username and password these can be found in the router user manual The port configuration method may differ according to the brand and type of router used 3 Search for the sections Port Opening or Apps and games or Port Forwarding if not displayed on the main menu search for them in Advanced settings and add the ports you wish to configur...

Page 16: ...tings SIP settings a 2 Enter the IP address hostname of the SIP service provider for example sip messagenet it and the UDP port of the server supplied by the service provider for example 5061 b 3 Leave the parameter Codec preference c for audio encoding decoding on the default setting PCMA PCMU US users only select the codec PCMU DTMF relay opening 1 2 3 sequence of keys to press minimum 3 maximum...

Page 17: ... configure the current device as a backup unit to which failed calls to the device specified in the adjacent column Backup of are to be forwarded Backup of specify the device to be backed up by selecting the corresponding slave device Example backup the slave 3 phone number John Phone is enabled as the backup unit of the App slave 1 John App installed on the same device If the App John App cannot ...

Page 18: ...uators b 3 Complete the mandatory fields see Intercoms Switchboards Cameras External Units Actuators Lock release Lock release Actions Additional Actuators c 4 Press Write page d to add the element to the directory Enable directory modifications Directory enhancement In the section App directories it is possible to configure the directories and enable the possibility to make modifications visible ...

Page 19: ...the activation of an actuator Generic actuator Shutter Door Lighting by completing the following fields Description Enter the description ViP address Enter the ViP address Expansion index Select the actuator module or expansion you wish to to control from the pull down menu from 1 to 10 Output index From the pull down menu select the number of the relay 1 or 2 or the expansion number from 1 to 10 ...

Page 20: ...0 Output index From the pull down menu select the number of the relay 1 or 2 or the expansion number from 1 to 10 that you wish to control Additional Actuators 8 Message server configuration The following procedure describes how to specify on the art 1456 1456S the IP or ViP address of the art 1952 device to be used as a message server if present 1 Select device 1456 1456S and select Configuration...

Page 21: ... the device 1456 1456S and select Configuration Video connections a 2 Edit the values you wish to personalise Maximum video connections on net maximum number of simultaneous video connections on the network max 16 Maximum video connections on tunnel App maximum number of simultaneous video connections on the App max 4 3 Press Write page b to save the current settings ...

Page 22: ...ort 8080 see 4 Port Forwarding setting for remote connection on the router an active internet connection is also required 1A Enter the registered hostname or the public IP address as in the following examples and press enter With the PC connected via Ethernet cable to interface HOME of art 1456 1456S and IP address belonging to the same network as interface HOME 1B Enter the IP address of interfac...

Page 23: ...ice in local or remote and log in 2 Access the Backup Restore section by pressing Backup Restore a 3 Press Make Backup b to create a backup of the current configuration A file with the extension tar gz will appear in the window f f Press the file name c to save the configuration file in the downloads folder on your computer f f Press delete d to delete the configuration file f f Press restore e to...

Page 24: ...e green LED will flash for 5 seconds The device will start with the default network settings 6 At the next restart the device will recover the saved settings Restoring factory settings This procedure allows you to restore all the factory parameter settings and to delete all the device configurations OFF ON With the dip switches in the default positions OFF OFF ON 1 Switch off the power supply to t...

Page 25: ...00 240 V E S NC NO D N G V V M O C 4682HC R T E RX RX TX TX RX RX TX TX ORANGE WIRE WHITE ORANGE WIRE WHITE GREEN WIRE GREEN WIRE 1595 120 230 V Vac 24 Vac 24 485 D D 485 P R G D N G S 3360B J2 J1 J2 J1 6802W P A N V C N 1 1 OUT C F P AL S S 0 1 IN 6602W P A N V C N 1 OP OP 1 OUT C F P V AL S S HOME INTERFACE IP 192 168 1 X HOME INTERFACE IP 192 168 0 X VIP INTERFACE AUTO IP 4 3 2 1 HO ROUTER HO H...

Page 26: ...M APP VIPK 004HIR L 1441B ROUTER INTERNET SIP PROVIDER PSTN GSM APP 4 3 2 1 V 1456 HO N V V RX RX TX TX ORANGE WIRE WHITE ORANGE WIRE WHITE GREEN WIRE GREEN WIRE E S NC NO D N G V V M O C R T E RX RX TX TX 1595 120 230 V VIP 100 100 240 V I P HO HO HO 4894HIM HOME INTERFACE IP 192 168 0 X VIPK 005HIR System wiring for kit Art 8512IM Art 8531 with router and slave apartment gateway Art 1456S System...

Page 27: ...sts in the subnet and or for security reasons so that the actions of each host and the relative user can be kept under control Public IP address in telecommunications and information technology a public IP address is an IP address in the address range of the internet network that is unequivocally allocated and is potentially accessible from any other public IP address and therefore can be used for...

Page 28: ...w w w c o m e l i t g r o u p c o m Via Don Arrigoni 5 24020 Rovetta BG Italy C E R T I F I E D M A N A G E M E N T S Y S T E M S 3ª edizione 06 2017 cod 2G40001902 ...

Reviews: