46
6.13. SPECIFIC INSTRUCTIONS FOR THE USE OF
MODEL AC
The AC machine may be turned on only if the voltage
indicated on the tag corresponds with the available
voltage and that the electrical outlet is grounded
(earthed).
Do not damage the feed cable; do not crush or pull on it.
•
ATTENTION Make sure that the power cable
does not come into contact with the rotary
brushes.
•
ATTENTION - The AC machine has parts, which
are connected to the current; contact with these
could cause grave injuries or even death
.
- Before executing any type of operation on the ma-
chine always disconnect it from the electrical source.
- Never touch electric cables that are defective or
worn.
- Before gaining access to the electrical system it is
always necessary to disconnect the machine from
the electrical source by removing the plug from the
socket-outlet.
- In the case of defective, damaged, or cracked elec-
tric cables, replace immediately with authentic re-
placement parts.
- The network of connections must be protected
from water spray.
- The patch cord for the connection of the ma-
chine to the mains power must conforms to cur-
rent safety rules.
- The electrical system to which the machine is con-
nected must be equipped with a cutout box.
- It is absolutely forbidden to use the machine in
proximity to swimming pools or stretches of water.
•
EMERGENCY SITUATIONS
In case of emergency:
- Immediately disconnect the machine from the
power mains.
- Immediately apply proper first-aid.
If an accident should occur the machine must not be
put into operation until a technician authorized by
the manufacturer has examined it.
•
Turn the key, remove it from the control panel and
disconnect the battery from the machine wiring.
☞
All work on the electrical system as well as all main-
tenance and repair operations (especially those not
explicitly described in this manual) should be carried
out only by authorized service centers or by special-
ized technical personnel who are experts in the sec-
tor and in the pertinent safety regulations.
Performing regular maintenance on the machine,
and carefully following the manufacturer’s instruc-
tions, is the best guarantee for obtaining the best
performances and extended machine service life.
6. OPERATING INFORMATIONS
Summary of Contents for CPS 36 BX
Page 148: ...148...
Page 149: ...149...
Page 150: ...150...
Page 151: ...151...
Page 152: ...152...
Page 153: ...153...
Page 154: ...154...
Page 155: ...155...
Page 157: ...157 1 1 1 1 1 2 2 10 1 3 1 4...
Page 158: ...158 1 2 1 5 2 2 1 m 4 C e 35 C 10 50 30 95 2 10...
Page 159: ...159 2 2 2...
Page 160: ...160 3 3 1 3 2 3 3 3 3 4 0 38 61 DC 12V 70 DC 12V 50 82 cm 56 cm 8 2 c m...
Page 161: ...161 4 4 1 4...
Page 162: ...162 162 B A C D B A B A B C D 1 2 B A C A B A B A B C 4 3 4 4 2 A...
Page 163: ...163 B A C A B C A B A B C DC 12V DC 12V B A C D A B C D AC 7 5 AC A 8 6 A 4 C...
Page 164: ...164 69 101 79 114 47 4 4 3 104 81...
Page 165: ...165 5 A 5 5 1 9 10 11 12 9 10 11 12...
Page 166: ...166 5 2 14 4 13 14 5 2 1 15 16 B 16 13 14 B 5 15 16 D C A A 12V B C D...
Page 168: ...168 6 6 6 1 7 2 7 5 2 7 9 6 2 19 18 A 1 18 C 18 19 A A B A B C B...
Page 169: ...169 8 7 6 3 2 1 20 8 5 5 D 7 2 1 1 2 1 5 D 7 2 6 20 21 6 4 8 5 2 1 20...
Page 171: ...171 6 C C A A B B B B D D 24 25 A B C D 6 7 7 5 24 24 B 24 A 25 A 24 C 24 D 24 B 24...
Page 172: ...172 6 8 50 C 1 D 1 28 2 A A 28 A 29 A 6 29 A 6 9 1 D 1 B 3 B 4 13...
Page 173: ...173 A 30 A 6 30 A 3 C 30 A 6 10 31 33 2 5 C 7 B 5 D 7 C 31 32 33...
Page 175: ...175 6 7 13 3 6 12 5 7 10 6 13 AC DC 12V AC...
Page 176: ...176 7 7 1 50 7 2 29 A 7 3 23 7 4 7 5 7 6 7 7 7...
Page 177: ...177 3 AGM 6 7 8 16 16 D 7 9 7 9 1 7 9 2 7 9 3 7 10 8...
Page 178: ...178 8 8 1 1 8 2 8 3 8 4 8 5 8 6 8 7 8 8 8 9 100 8...
Page 179: ...179 20 30 8...
Page 180: ...180 9 9 12 9 1 2013 56 EU 9 2 2012 19 EU 2012 19 EU...
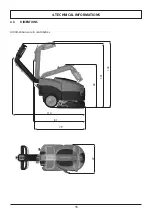
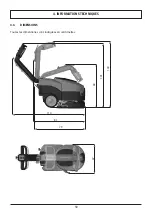
Page 218: ...218 69 101 79 114 47 4 TEKNISETTIEDOT 4 3 MITAT Kaikki mitat on ilmaistu senttimetriss 104 81...
Page 242: ...242 69 101 79 114 47 4 TEKNISK INFORMATION 4 3 M TT Alla m tt anges i centimeter 104 81...
Page 312: ...312 69 101 79 114 47 4 INFORMA IITEHNICE 4 3 DIMENSIUNI Toate dimensiunile sunt n mm 104 81...
Page 336: ...336 69 101 79 114 47 4 TEKN K B LG LER 4 3 EBATLAR cm 104 81...
Page 401: ...1 401 1 1 1 1 2 2 10 1 3 1 4 1 5...
Page 402: ...2 402 2 2 1 4 C 35 C 10 C 50 C 30 95 2 10...
Page 403: ...2 403 2 2...
Page 404: ...3 3 1 3 2 3 3 3 404 4 4 0 38 3 61 kg D 12V 70 kg D 12V 50 kg 82 cm 56 cm...
Page 405: ...4 405 4 4 1...
Page 406: ...406 B A C D B D 1 2 B A C A B B C 4 3 4 4 2 A...
Page 407: ...407 B A C A B C A B DC 12V DC 12V B A C D A B C D AC 7 5 AC A 8 6 4 C...
Page 408: ...408 69 101 79 114 47 4 4 3 104 81...
Page 409: ...409 5 A 5 5 1 9 10 11 12 9 10 11 12...
Page 410: ...410 5 2 14 4 B 13 14 5 2 1 15 0 16 B 16 13 14 B 5 15 16 D C A 12V D...
Page 413: ...413 8 7 6 3 2 1 20 8 A 5 A 5 D 7 C 2 A 1 cm 1 cm 2 1 5 D 7 C 6 20 21 2 A 6 4 8 A 5 A 2 1...
Page 414: ...6 5 22bis E 22 A 22 23 B 6 6 23 B 22 6 414 22 bis A D E F G H A B E D E F H C 22 23 B A B B G...
Page 415: ...415 6 6 7 7 5 24 A 24 B 24 25 C C A A B B B B D D 24 25 A D 24 24 D 24 B 24 A...
Page 416: ...416 6 8 50 C 1 1 D 28 A 2 A A 28 29 A 6 29 A 6 9 3 1 1 D 3 4 B 13...
Page 417: ...417 A 30 A 6 30 A 3 C 30 A 3 C 6 10 31 33 2 5 C 7 B 5 D 7 C ON 31 32 33...
Page 419: ...419 6 7 7 13 3 6 12 5 7 10 6 13 7 7 1 50 7 2 29...
Page 420: ...420 7 3 23 7 4 7 5 7 6 7 7 Pb 3 AGM 6 7 8 16 16 D 7...
Page 421: ...421 7 9 7 9 1 Pb 7 9 2 Pb 7 9 3 7 10 7...
Page 422: ...422 8 8 1 8 2 8 3 8 4 8 5 8 6 8 7 8 8 8 9 100 8...
Page 423: ...423 8 9 20 30 9 12 9 1 2013 56 9 2 WEEE 2012 19 EU 2012 19 EU...
Page 425: ......
Page 427: ......
Page 430: ...7 504 0290 rev 04 09 2021...

