48
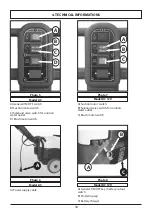
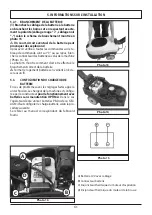
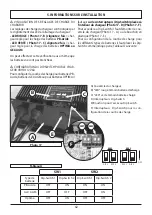
motor ( Photo 16 - C ) wherever foreseen and the
brush motor ( Photo 16 - D ).
When one of these breakers trips automatically, the
disabled function can be reactivated by fully depress-
ing the button of the breaker.
When the thermal breakers trip, especially when the
machine is used during the first few weeks, it might
not be caused by actual machine malfunctions. How-
ever, a specialized technician should check the device
if the relative breaker continues to trip.
7.9.
PERIODIC MAINTENANCE
For all the operations described herein, refer to the
instructions and detailed warnings in the relative
sections.
7.9.1. DAILY OPERATIONS
Disassemble and check the brush or the pad driver
disk (with the abrasive pad assembled).
Check that there are no foreign bodies that may
impede the movement or efficiency of all cleaning
parts.
Check the squeegee: clean the blades and check their
condition/wear.
If Pb-Acid batteries are used, carefully carry out the
operations described by the battery manufacturer.
Charge the batteries.
7.9.2. WEEKLY OPERATIONS
Check and, if necessary, replace the splash guard.
Carefully check the profile of the squeegee blades
and replace them, if necessary.
Check that the suction hoses and conduits are not
clogged;
Thoroughly clean the solution and recovery tanks.
For other models with the Pb-Acid battery: check the
level of the electrolyte in all elements and, if neces-
sary, top up with distilled water. Refer to the battery
manufacturer’s detailed instructions.
Lift the filter compartment cover and check under
the impermeable sponge filter for any signs of liquid;
if there is any, drain it off into the dirty water tank.
7.9.3. OPERATIONS AT EXTENDED INTERVALS
Even though the machine was built with great preci-
sion and conforms to the most severe quality tests,
the electrical and mechanical parts will inevitably be
subjected to wear and aging after extended periods
of use.
For safe and problem-free operation, your machine
should be carefully checked every year by our author-
ized technical service centre (or by a specialist in the
sector familiar with all the pertinent safety regula-
tions contained in this manual).
This type of work may have to be carried out more
frequently if the machine operates in particular/dif-
ficult situations and/or if required maintenance was
not performed.
7.10. RECOMMENDED SPARE PARTS
You’ll always be able to use your machine as effi-
ciently as possible by maintaining a stock of the most
common consumable materials and by scheduling
routine and extraordinary maintenance. Contact your
dealer for a list of these spare parts.
8.
OPERATING CHECKS
8.1.
THE MACHINE DOESN’T WORK
The key isn’t inserted or correctly turned.
Insert and turn the key to position ON.
The battery connector is disconnected or poorly
attached to the main wiring connector.
Firmly connect the two connectors.
The machine is charging.
Complete the charging operation.
The batteries are discharged.
Charge the batteries.
8.2.
THE BRUSH DON’T ROTATE
The brush motor switch is not selected.
Press the button to activate the brushes.
The brush motor thermal breaker tripped; the
motor overheated.
Troubleshoot the cause (cords or similar items that
impede movement, surface too rough, etc.) and press
the reset breaker (the first from the top).
The transmission belt is broken.
Replace it.
The motor relay or the brush motor is broken.
Replace it.
8.3.
NOT ENOUGH OR TOO MUCH CLEANING
SOLUTION
The solution water tank is empty.
Fill the solution water tank after having emptied
the recovery tank.
The solenoid valve switch is in the OFF position
Set the solenoid valve switch to the ON position
The solution water valve is is closed or almost
closed.
Adjust/increase the detergent solution outlet flow
by turning the flow adjustment lever.
The solution water filter is dirt and clogged in
some point.
Open the filter and clean it removing the dirt.
7. MAINTENANCE INFORMATIONS 8. OPERATING CHECKS INFORMATION
Summary of Contents for CPS 36 BX
Page 148: ...148...
Page 149: ...149...
Page 150: ...150...
Page 151: ...151...
Page 152: ...152...
Page 153: ...153...
Page 154: ...154...
Page 155: ...155...
Page 157: ...157 1 1 1 1 1 2 2 10 1 3 1 4...
Page 158: ...158 1 2 1 5 2 2 1 m 4 C e 35 C 10 50 30 95 2 10...
Page 159: ...159 2 2 2...
Page 160: ...160 3 3 1 3 2 3 3 3 3 4 0 38 61 DC 12V 70 DC 12V 50 82 cm 56 cm 8 2 c m...
Page 161: ...161 4 4 1 4...
Page 162: ...162 162 B A C D B A B A B C D 1 2 B A C A B A B A B C 4 3 4 4 2 A...
Page 163: ...163 B A C A B C A B A B C DC 12V DC 12V B A C D A B C D AC 7 5 AC A 8 6 A 4 C...
Page 164: ...164 69 101 79 114 47 4 4 3 104 81...
Page 165: ...165 5 A 5 5 1 9 10 11 12 9 10 11 12...
Page 166: ...166 5 2 14 4 13 14 5 2 1 15 16 B 16 13 14 B 5 15 16 D C A A 12V B C D...
Page 168: ...168 6 6 6 1 7 2 7 5 2 7 9 6 2 19 18 A 1 18 C 18 19 A A B A B C B...
Page 169: ...169 8 7 6 3 2 1 20 8 5 5 D 7 2 1 1 2 1 5 D 7 2 6 20 21 6 4 8 5 2 1 20...
Page 171: ...171 6 C C A A B B B B D D 24 25 A B C D 6 7 7 5 24 24 B 24 A 25 A 24 C 24 D 24 B 24...
Page 172: ...172 6 8 50 C 1 D 1 28 2 A A 28 A 29 A 6 29 A 6 9 1 D 1 B 3 B 4 13...
Page 173: ...173 A 30 A 6 30 A 3 C 30 A 6 10 31 33 2 5 C 7 B 5 D 7 C 31 32 33...
Page 175: ...175 6 7 13 3 6 12 5 7 10 6 13 AC DC 12V AC...
Page 176: ...176 7 7 1 50 7 2 29 A 7 3 23 7 4 7 5 7 6 7 7 7...
Page 177: ...177 3 AGM 6 7 8 16 16 D 7 9 7 9 1 7 9 2 7 9 3 7 10 8...
Page 178: ...178 8 8 1 1 8 2 8 3 8 4 8 5 8 6 8 7 8 8 8 9 100 8...
Page 179: ...179 20 30 8...
Page 180: ...180 9 9 12 9 1 2013 56 EU 9 2 2012 19 EU 2012 19 EU...
Page 218: ...218 69 101 79 114 47 4 TEKNISETTIEDOT 4 3 MITAT Kaikki mitat on ilmaistu senttimetriss 104 81...
Page 242: ...242 69 101 79 114 47 4 TEKNISK INFORMATION 4 3 M TT Alla m tt anges i centimeter 104 81...
Page 312: ...312 69 101 79 114 47 4 INFORMA IITEHNICE 4 3 DIMENSIUNI Toate dimensiunile sunt n mm 104 81...
Page 336: ...336 69 101 79 114 47 4 TEKN K B LG LER 4 3 EBATLAR cm 104 81...
Page 401: ...1 401 1 1 1 1 2 2 10 1 3 1 4 1 5...
Page 402: ...2 402 2 2 1 4 C 35 C 10 C 50 C 30 95 2 10...
Page 403: ...2 403 2 2...
Page 404: ...3 3 1 3 2 3 3 3 404 4 4 0 38 3 61 kg D 12V 70 kg D 12V 50 kg 82 cm 56 cm...
Page 405: ...4 405 4 4 1...
Page 406: ...406 B A C D B D 1 2 B A C A B B C 4 3 4 4 2 A...
Page 407: ...407 B A C A B C A B DC 12V DC 12V B A C D A B C D AC 7 5 AC A 8 6 4 C...
Page 408: ...408 69 101 79 114 47 4 4 3 104 81...
Page 409: ...409 5 A 5 5 1 9 10 11 12 9 10 11 12...
Page 410: ...410 5 2 14 4 B 13 14 5 2 1 15 0 16 B 16 13 14 B 5 15 16 D C A 12V D...
Page 413: ...413 8 7 6 3 2 1 20 8 A 5 A 5 D 7 C 2 A 1 cm 1 cm 2 1 5 D 7 C 6 20 21 2 A 6 4 8 A 5 A 2 1...
Page 414: ...6 5 22bis E 22 A 22 23 B 6 6 23 B 22 6 414 22 bis A D E F G H A B E D E F H C 22 23 B A B B G...
Page 415: ...415 6 6 7 7 5 24 A 24 B 24 25 C C A A B B B B D D 24 25 A D 24 24 D 24 B 24 A...
Page 416: ...416 6 8 50 C 1 1 D 28 A 2 A A 28 29 A 6 29 A 6 9 3 1 1 D 3 4 B 13...
Page 417: ...417 A 30 A 6 30 A 3 C 30 A 3 C 6 10 31 33 2 5 C 7 B 5 D 7 C ON 31 32 33...
Page 419: ...419 6 7 7 13 3 6 12 5 7 10 6 13 7 7 1 50 7 2 29...
Page 420: ...420 7 3 23 7 4 7 5 7 6 7 7 Pb 3 AGM 6 7 8 16 16 D 7...
Page 421: ...421 7 9 7 9 1 Pb 7 9 2 Pb 7 9 3 7 10 7...
Page 422: ...422 8 8 1 8 2 8 3 8 4 8 5 8 6 8 7 8 8 8 9 100 8...
Page 423: ...423 8 9 20 30 9 12 9 1 2013 56 9 2 WEEE 2012 19 EU 2012 19 EU...
Page 425: ......
Page 427: ......
Page 430: ...7 504 0290 rev 04 09 2021...

