


26
Per pulire il corpo esterno della macchina, uti-
lizzare una spugna od un panno, aiutandosi, se
necessario con una spazzola morbida per vin-
cere lo sporco ostinato. La superficie antiurto
della macchina è rugosa per evitare di eviden-
ziare graffi procurati durante l’utilizzo, tuttavia
questa soluzione non facilita l’asportazione di
macchie persistenti sulla superficie. Si possono
anche utilizzare macchine a vapore, ma è vieta-
to l’utilizzo di tubi con acqua corrente o idropu-
litrice.
8.7 BATTERIE
8.7.1 PB-ACIDO
Eseguire le operazioni di manutenzione in ac-
cordo con le istruzioni del costruttore e con tut-
te le indicazioni qui espresse.
Lasciare scoperte (non completamente immerse
nella soluzione acida) le piastre degli elementi
procura una rapida ossidazione e compromette
irrimediabilmente la funzionalità dell’elemento.
La tracimazione di soluzione acida può corrode-
re la macchina.
Utilizzare caricabatteria suggeriti dal costrutto-
re e comunque adatti al tipo di batteria da ca-
ricare.
Ricaricare le batterie sempre in stanze ben ven-
tilate, esiste il rischio di esplosione!
L’utilizzo di batterie al Gel o senza manutenzio-
ne è fortemente consigliato.
8.7.2 GEL
Eseguire le operazioni di manutenzione in ac-
cordo con le istruzioni del costruttore e con tut-
te le indicazioni qui espresse.
Utilizzare solamente caricabatterie suggeriti dal
costruttore.
8.8 DISGIUNTORI TERMICI
La macchina è dotata di protezioni elettriche dei
principali organi di funzionamento per evitare
costosi guasti.
Sono ovvero presenti disgiuntori termici per la
salvaguardia del motore trazione ove previsto, e
per il motore spazzola.
Quando uno di questi interruttori interviene
automaticamente, per riattivare la funzionalità
disabilitata è sufficiente premere a fondo l’inter-
ruttore scattato.
L’intervento dei disgiuntori termici, specie nelle
prime settimane di vita della macchina, potreb-
be non avere effettive origini da malfunzio-
namento della macchina, tuttavia occorre far
controllare da un tecnico specializzato il cor-
retto funzionamento del dispositivo in oggetto
qualora il relativo disgiuntore continui ad inter-
venire.
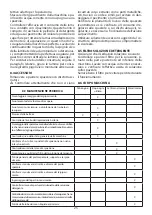
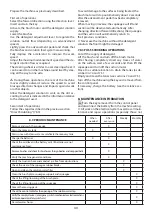
8.9 MANUTENZIONE PERIODICA
Per tutte le operazioni qui descritte fare riferi-
mento alle istruzioni ed avvertenze dettagliate
nei relativi paragrafi. Vedi tabella.
8.10 RICAMBI CONSIGLIATI
Sarete in grado di ottenere sempre il massimo
della redditività dalla Vostra macchina tenendo
sempre a disposizione il materiale di consumo
più comune e programmando manutenzioni
ordinarie e straordinarie. Per l’elenco di questi
ricambi fare riferimento al proprio rivenditore.
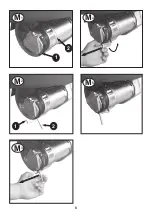
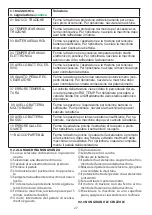
9 CONTROLLO DI ESERCIZIO
9.1 DIAGNOSTICA SEGNALAZIONE ERRORI
Sotto il pannello frontale della macchina (Foto
A - 9), si trovano i principali componenti elettrici
e la scheda di controllo delle funzioni della mac-
china.
Questa scheda è dotata di un sistema di auto
diagnostica che segnala con un LED luminoso rosso
il funzionamento corretto od il malfunzionamento
(Foto L - 5). Vedi tabella.
9.2 RISOLUZIONE DEI PROBLEMI
Queste indicazioni servono per capire le cause
di alcuni problemi a fronte di determinati tipi di
inconvenienti; per il tipo di azione da eseguire si
prega comunque di far riferimento alle sezioni
specifiche sottostanti.
9.2.1 LA MACCHINA NON FUNZIONA
La chiave non è inserita o correttamente gira-
ta.
Inserire e girare la chiave in posizione “1”.
Il connettore della batteria è staccato o mal
collegato al connettore del cablaggio princi-
pale.
Collegare saldamente i due connettori.
Il pulsante di emergenza/interruzione lavoro
è premuto.
Disimpegnare il pulsante di emergenza/in-
terruzione lavoro.
La macchina si sta ricaricando.
Terminare la ricarica.
Le batterie sono scariche .
Ricaricare le batterie.
Nessun operatore seduto sul posto guida.
Sedersi sul posto di guida.
Il fusibile principale è bruciato
Sostituirlo.
La scheda di controllo si è surriscaldata
Verificare le situazioni di utilizzo che possono
avere causato il guasto (pendenza elevata,
ecc.) attendere 30 min. e provare ad evitare
gli stessi utilizzi non corretti. Se il problema
persiste rivolgersi all’assistenza autorizzata.
Summary of Contents for CRS 90 BT
Page 3: ...3 1 2 A B 2 8 7 6 4 1 3 3 7 4 5 6 8 10 9 5...
Page 4: ...4 C D 3 2 4 1 1 2 3...
Page 5: ...5 E 2 1 3 F 2 14 12 7 9 10 11 1 3 6 16 8 15 13 4 5...
Page 6: ...6 3 3 2 1 4 6 7 6 7 1 2 5 1 G H...
Page 7: ...7 4 3 2 5 6 8 L 1 2 I 1 7 9...
Page 8: ...8 1 1 2 M1 M2 M3 2 M4 M5...
Page 93: ...97 8...
Page 94: ...98 7 3 12...
Page 95: ...99 6...
Page 96: ...100 5 2 10...
Page 97: ...101 4 4 35 10 50 30 95...
Page 98: ...102 3 5 1 CE CE 2 1 2...
Page 99: ...103 2 3 1 CE 4 1...
Page 100: ...104 1 1 1 1 1 2...
Page 102: ...106 2 2 1 2 2 2 10 2 3 2 4...
Page 103: ...107 2 5 3 3 1 4 35 C 10 50 C 30 95 2 10...
Page 104: ...108 3 2 4 4 1 4 2 4 3...
Page 105: ...109 4 4 M1 2 M2 2 M2 1 M1 1 3 4 5 M1 1 M1 1 4 5 5 5 1 2...
Page 106: ...110 20 20 20h 5 5 5h 5 20 24 5 1 3 5 2 5 2 1 A 1 2 3 4 5 6 7 8 9 10 B 1 2 3 4 5 6 7 8 C...
Page 108: ...112 6 2 90 Anderson An derson 0 6 3 2...
Page 109: ...113 7 7 1 7 2 7 2 1 G 3 G 3 G 5 7 2 2 G 5 G 3 7 2 3 7 2 2 G 6 G 6 7 2 4 G 4...
Page 110: ...114 G 2 45 G 4 G 2 7 2 5 7 3 0 1 1 0 7 4 50 C 7...
Page 111: ...115 B 5 Q 3 7 5 O 1 7 6 7 7 7 8 7 8 1 7 8 2...
Page 112: ...116 7 8 3 2 7 8 4...
Page 113: ...117 7 8 3 2 7 8 5 7 4 7 5 7 4 7 5 8 8 1 50 8 2 8 3...
Page 114: ...118 8 4 8 5 8 6 8 7 8 7 1 8 7 2 8 8 8 9 8 10 9 9 1 9...
Page 115: ...119 L 5 9 2 9 2 1 1 30 9 2 2 5 8 9 X X X X X X X X X X X X X X X X X...
Page 116: ...120 9 1 01 02 03 04 05 06 07 _ 08 09 10 11...
Page 117: ...121 9 2 3 9 2 4 9 2 5 9 2 6 9 2 7 9 2 8 9 2 9 9 2 10 100 20 30...
Page 118: ...122 10 12 10 1 2013 56 EU 10 2 2012 19 EU 2012 19 EU...
Page 137: ......
Page 138: ......


