


22
e scollegare il connettore batteria dal cablaggio
della macchina.
☞
Far effettuare gli interventi sull’impianto elet-
trico e tutte le operazioni di manutenzione e
riparazione (particolarmente quelle non esplicita-
mente descritte in questo manuale) solo a centri
assistenza autorizzati o a personale tecnico specia-
lizzato esperto nel settore e nelle rilevanti norme
di sicurezza.
La regolarità della manutenzione sulla macchina,
seguendo attentamente le indicazioni del costrut-
tore, garantisce un migliore rendimento ed una
maggiore durata della macchina.
8.1 SERBATOI
Scaricare i due serbatoi come descritto nei relativi
paragrafi.
Rimuovere lo sporco solido riempendo e scari-
cando i serbatoi fino all’effettiva eliminazione di
tutto lo sporco: utilizzare per l’operazione un tubo
di lavaggio o simili.
•
Acqua calda oltre i 50°, idropulitrice ad alta
pressione o spruzzi troppo violenti possono
danneggiare i serbatoi e la macchina.
Lasciare i coperchi dei serbatoi aperti (solo con
macchina a riposo), in modo che possano asciu-
garsi ed evitare così il formarsi di cattivi odori.
8.2
TUBO DI ASPIRAZIONE
Staccare il tubo di aspirazione dal tergipavimento
Tirare il tubo nella parte superiore per sfilare com-
pletamente il tubo di aspirazione dall'alloggia-
mento posto sul serbatoio di recupero.
Ora è possibile lavare e liberare il tubo da ostru-
zioni.
Dopo il lavaggio, reinserire saldamente il tubo
di aspirazione all’interno dell’apposito alloggia-
mento nel serbatoio di recupero.
Infilare saldamente il tubo sul corpo del tergipa-
vimento.
8.3 TERGIPAVIMENTO
•
Non maneggiare il tergi pavimento a mani
nude, indossare guanti ed ogni indumento pro-
tettivo adatto per l’operazione.
Staccare il tergi pavimento dalla macchina e pu-
lirlo sotto acqua corrente con una spugna o una
spazzola.
Controllare l’efficacia ed il consumo delle lamine
a contatto con il pavimento. Queste hanno il com-
pito di raschiare la pellicola di detergente ed acqua
sul pavimento ed isolare la porzione di superficie
per ottenere la massima depressione del motore
di aspirazione: in questo modo l’asciugatura della
macchina è perfetta. Lavorando continuamente in
questo modo, lo spigolo vivo della lamina tende
ad arrotondarsi o deteriorarsi, compromettendo la
perfetta asciugatura, per questo occorre sostituire
le lamine squeegee.
Per sostituire le bandelle consumate, seguire il pa-
ragrafo relativo, girare le lamine per consumare gli
altri spigoli vivi o montarne altre nuove.
8.4 ACCESSORI
Rimuovere e pulire le spazzole od i dischi trasci-
natori.
•
Controllare attentamente che non ci siano in-
castrati corpi estranei come parti metalliche, viti,
trucioli o corde e simili, per evitare di danneggiare
il pavimento e la macchina.
Verificare la planarità di lavoro delle spazzole
(controllare se si è verificato un consumo irrego-
lare sulle spazzole o sui dischi abrasivi), regolarne,
se necessario, l’inclinazione dell’azione sul pavi-
mento.
Utilizzare solamente accessori suggeriti dal co-
struttore, altri prodotti possono compromettere
la sicurezza.
8.5
FILTRO SOLUZIONE DETERGENTE
Assicurarsi che il serbatoio soluzione sia vuoto.
Controllare e pulire il filtro per la soluzione, situato
nella parte anteriore ed inferiore della macchina.
Lavare con acqua corrente se necessario e verifi-
care l’effettiva uscita di soluzione sulle spazzole.
Serrare bene il filtro per evitare perdite durante il
funzionamento.
8.6
CORPO MACCHINA
Per pulire il corpo esterno della macchina, utiliz-
zare una spugna od un panno, aiutandosi, se ne-
cessario con una spazzola morbida per vincere lo
sporco ostinato. La superficie antiurto della mac-
china è rugosa per evitare di evidenziare graffi
procurati durante l’utilizzo, tuttavia questa solu-
zione non facilita l’asportazione di macchie persi-
stenti sulla superficie. Si possono anche utilizzare
macchine a vapore, ma è vietato l’utilizzo di tubi
con acqua corrente o idropulitrice.
8.7 BATTERIE
8.7.1 PB-ACIDO
Eseguire le operazioni di manutenzione in accordo
con le istruzioni del costruttore e con tutte le indi-
cazioni qui espresse.
Lasciare scoperte (non completamente immerse
nella soluzione acida) le piastre degli elementi
procura una rapida ossidazione e compromette
irrimediabilmente la funzionalità dell’elemento.
La tracimazione di soluzione acida può corrodere
la macchina.
Utilizzare caricabatteria suggeriti dal costruttore
e comunque adatti al tipo di batteria da caricare.
Ricaricare le batterie sempre in stanze ben venti-
late, esiste il rischio di esplosione!
L’utilizzo di batterie al Gel o senza manutenzione è
Summary of Contents for 9070 0007
Page 3: ...3 1 2 A B 1 4 5 2 3 7 8 6 4 5 10 9 3 6 7...
Page 4: ...4 C 1 1 D 2 2 3 4...
Page 5: ...5 1 E 1 6 5 2 7 8 3 4 9 10 11 12 14 13 16 15 F 2...
Page 6: ...6 9 1 2 3 4 5 6 3 2 7 8 1 4 G H 1 2 7 8...
Page 7: ...7 L I 1 1 2...
Page 8: ...8 M1 M2 M3 1 2 1 2...
Page 9: ...9 M4 M5...
Page 92: ...92 8...
Page 93: ...93 7 3 12...
Page 94: ...94 6...
Page 95: ...95 5 2 10...
Page 96: ...96 4 4 35 10 50 30 95...
Page 97: ...97 3 5 1 CE CE 2 1 2...
Page 98: ...98 2 3 1 CE 4 1...
Page 99: ...99 1 1 1 1 1 2...
Page 101: ...101 2 2 1 2 2 2 10 2 3 2 4...
Page 102: ...102 2 5 3 3 1 4 35 C 10 50 C 30 95 2 10...
Page 103: ...103 3 2 96 4 4 1 4 2 4 3...
Page 104: ...104 4 4 Foto M1 2 M2 2 M2 1 M1 1 3 4 5 1 1 1 1 4 5 5 5 1 5 1 1...
Page 105: ...105 15 6 8 10 20 15 100 7 8 5 1 2 20 20 20h 5 5 5h 5 20 24 5 1 3...
Page 107: ...107 5 2 2 5 2 3 5 3 6 6 1 6 2 90 Anderson Anderson 0 6 3 7...
Page 108: ...108 7 7 1 7 2 7 2 1 E 3 E 3 E 5 7 2 2 E 5 E 3 7 2 3 7 2 2 G 7...
Page 109: ...109 G 7 7 2 4 G 6 G 2 45 G 6 G 2 7 2 5 7 3 1 1 7 4 50 C B 5 7...
Page 110: ...110 H 2 7 5 O 1 7 6 7 7 7 7 1 7 7 2...
Page 111: ...111 7 7 3 2 7 7 4...
Page 112: ...112 7 8 3 2 7 7 5 7 4 7 5 7 4 7 5 8 8 1 50 8 2 8 3...
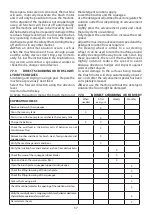
Page 113: ...113 8 4 8 5 8 6 9 X X X X X X X X X X X X X X X X X X...
Page 114: ...114 8 7 8 7 1 1 2 3 4 5 6 7 8 9 10 12 16 19 20 21 22...
Page 115: ...115 8 7 2 8 8 8 9 9 9 1 9 L 1 9 2 9 2 1 1 30 9 2 2 5 9 2 3...
Page 116: ...116 9 2 4 9 2 5 9 2 6 9 2 7 9 2 8 9 2 9 9 2 10 100 20 30...
Page 117: ...117 10 12 10 1 2013 56 EU 10 2 2012 19 EU 2012 19 EU...
Page 134: ......


