Replace or clean them.
The squeegee adjustment is not correct; the ad-
vancement must be exactly perpendicular to the run-
ning direction.
Adjust the squeegee.
The suction hose or the squeegee conduit are clogged.
Clean out and remove any obstructions from the
conduits.
7.9.
THE BATTERY CHARGER DOESN’T WORK
The battery charge doesn’t start .
Check that the battery charger is connected to the
battery. Consult the battery charger manual.
7.10. THE BATTERIES DO NOT CHARGE OR DO
NOT HOLD A CHARGE
At the end of the charging process, the battery is
not correctly charged (see the battery manufacturer’s
instruction-maintenance manual)
Check the battery charger error message and check
the data indicated on the display (see the battery
charger’s instruction manual).
The batteries are new and do not generate 100% of
the rated performances.
39
The accumulator reaches the maximum perfor-
mance after 20-30 complete charge cycles.
The electrolyte has evaporated and does not com-
pletely cover the plates.
Check the battery manufacturer’s use and mainte-
nance manual.
There are significant differences in density among
the various elements.
Replace the damaged battery.
Always consult the battery and battery charger use and
maintenance manual. If this does not solve the prob-
lem, contact the authorised technical service centre.
The manufacturer CANNOT solve problems caused
by using batteries and battery chargers that were not
directly supplied.
8.
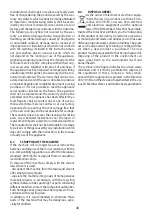
CONDITIONS OF WARRANTY
All our appliances are subjected to rigorous tests and
are covered by warranty against material or manufac-
turing defects for a period of 12 months. The warranty
comes into effect from the date of purchase. The date
of purchase is the date indicated on the receipt issued
by the Reseller when the appliance is consigned. The
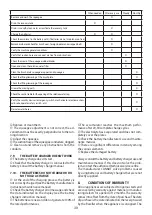
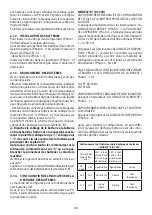
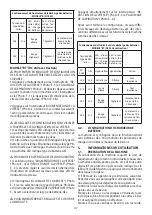
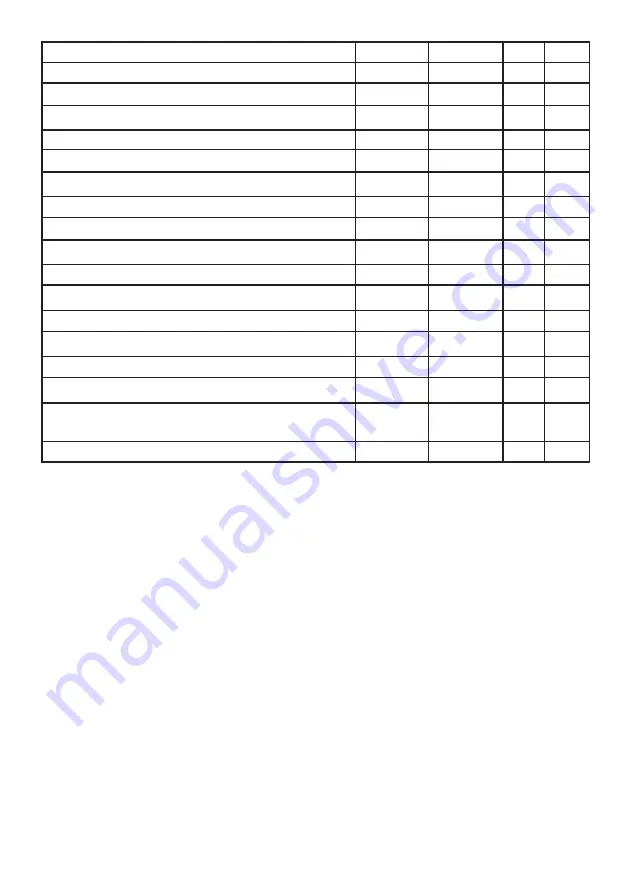
When needed
After every use
Weekly Monthly
Remove and wash the squeegee
X
Drain the recovery tank
X
Drain, rinse with clean water or sanificate the recovery tank
X
Charge the batteries
X
X
Check the acid level in the battery cells (if batteries are not maintenance-free)
X
Remove brushes and check for brush wear, foreign bodies and wrapped belts
X
Verify the machine general conditions.
X
Verify that suction hose and conduct are free from obstructions
X
Check the wear of the squeegee rubber blades
X
Open and clean the solution water filter
X
Clean the brush plate, squeegee support and squeegee
X
Check the lifting/lowering of the brush plate.
X
Check the lifting/lowering of the squeegee.
X
Grease the moving parts.
X
Check the control cable for the opening of the solution water tap.
X
Verify the security devices ( emergency switch, mechanical or electromechani-
cal brake, operator safety switch, etc).
X
Descale water hoses.
X
Summary of Contents for CPS 50 B
Page 3: ...3 2 1 3 A B 6 1 3 4 5 2 E AC 230V...
Page 4: ...4 C D 2 2A 3A 3B 3C 1A 1 3 6 3 4 5 1 8 2 B DC 24V 7...
Page 6: ...6 H G 1 2 1 3 2 I...
Page 7: ...7 1 2 L M 1 1 4 4 3 2 5 7 6 5 2 6...
Page 8: ...8 N O 1 1 2 3 3 2 4...
Page 9: ...9 P 1...
Page 91: ...91 1 1 1 1 2 2 10 1 3 1 4...
Page 92: ...92 1 5 2 2 1 4 35 10 50 30 95 2 10...
Page 93: ...93 2 2...
Page 94: ...94 3 3 1 3 2 3 3 C C 3 4...
Page 95: ...95 4 4 1 20 20 20h 5 5 5h 5 5 20 20 24 4 1 1 4 1 2 I 2 G 1 3 I 1 I 2...
Page 101: ...101 2 2 2 P 1 5 11 3 1 5 D 6 F 7 3 5 12 AC 230V AC230 AC 230V...
Page 103: ...103 5 14 5 14 1 5 14 2 3 1 3 1 5 14 3 6 13 5 14 4 6 13 6 14 3 5 14 5 6 11 6 6 1 50...
Page 104: ...104 6 2 M 3 6 3 6 4 6 5 6 6 6 7...
Page 105: ...105 6 8 6 8 1 6 8 2 6 8 3 6 9 7 7 1 1 C 7 2 5 7 3...
Page 106: ...106 7 4 7 5 7 6 7 7 7 8 7 9 7 10 100 20 30 8 12...
Page 107: ...107 8 1 2013 56 EU 8 2 2012 19 EU 2012 19 EU...
Page 124: ...124...
Page 125: ...125...
Page 126: ...126...
Page 127: ...127...
Page 128: ...128...
Page 129: ...129...
Page 130: ...130...
Page 131: ...131...
Page 238: ...238 1 1 1 1 2 2 10 1 3 a 1 4...
Page 239: ...239 1 5 2 2 1 4 C 35 C 10 C 50 C 30 95 2 10...
Page 240: ...240 2 2 3 3 1 3 2 3 3...
Page 241: ...241 3 4 4 4 1 Ah 20 C20 20h 5 C5 5h C5 C20...
Page 247: ...247 50 C N 4 N 3 2 N 2 2 L Q 1 5 11 N 3 0 1 B 6 D 6 F 7 0 3 5 12 230V 230V AC 230V...
Page 249: ...249 5 14 2 C 3 E 1 C 3C E 1C 5 14 3 6 13 5 14 4 6 13 6 14 3 5 14 5 6 11 6 6 1 50 6 2 3...
Page 250: ...6 3 250 6 4 6 5 X X X X X X X X X X X X X X X X X X...
Page 251: ...251 6 6 BPb 3 AGM 6 6 7 6 8 6 9 7 7 1 ON 7 2 5 7 3...
Page 252: ...252 7 4 7 5 7 6 7 7 7 8 7 9 7 10 100 20 30 8 12...
Page 253: ...253 8 1 2013 56 8 2 WEEE 2012 19 2012 19 EU...
Page 255: ...255 1 1 1 1 2 2 2 10 1 3 1 4...
Page 256: ...256 1 5 2 2 1 4 C 35 C 10 C 50 C 30 95 2 10...
Page 257: ...257 2 2 134 3 3 1 3 2 3 3...
Page 258: ...258 3 4 4 4 1 4 1 1 Ah 20 C20 20h 5 C5 5h C5 C20...
Page 263: ...263 5 4 M 6 6 M 3 5 5 M 6 5 6 6 5 M 4 M 6 M 4 M 6 6 4 5 7 7 2 45 M 2 M 7 5 8 5 9 1 cm 1 cm...
Page 264: ...264 5 10 50 C N 4 N 3 G 2 N 2 2 cm 5 11 N 3 1 B 6 D 6 F 7 3 5 12 E AC 230V E AC 230V...
Page 267: ...6 2 M 3 6 3 267 X X X X X X X X X X X X X X X X X X...
Page 268: ...268 6 4 6 5 6 6 3 AGM 6 6 7 6 8 6 9 7 7 1 7 1 1 1...
Page 269: ...269 30 7 1 2 5 7 1 3 7 1 4 7 1 5 7 1 6...
Page 270: ...270 7 1 7 7 1 8 7 1 9 7 1 10 100 20 30 8 12 8 1...
Page 271: ...271 2013 56 E 8 2 2012 19 2012 19...

