background image

507768-04P

Page 16 of 56

Issue 1933

6.  Promptly  apply  solvent  cement  to  end  of  pipe  and 

inside  socket  surface  of  fitting.  Cement  should  be 

applied lightly but uniformly to inside of socket. Take 

care  to  keep  excess  cement  out  of  socket.  Apply 

second coat to end of pipe.

7.  Immediately after applying last coat of cement to pipe, 

and while both inside socket surface and end of pipe 

are wet with cement, forcefully insert end of pipe into 

socket  until  it  bottoms  out.  Turn  PVC  pipe  1/4  turn 

during assembly (but not after pipe is fully inserted) to 

distribute cement evenly. Do not turn ABS or cellular 

core pipe.

NOTE: 

Assembly  should  be  completed  within  20 

seconds  after  last  application  of  cement.  Hammer 

blows should not be used when inserting pipe.

8.  After assembly, wipe excess cement from pipe at end 

of fitting socket. A properly made joint will show a bead 

around  its  entire  perimeter.  Any  gaps  may  indicate 

an  improper  defective  assembly  due  to  insufficient 

solvent.

9.  Handle joints carefully until completely set.

Venting Practices

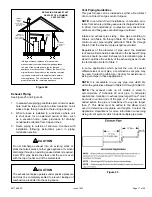
Figure 21. 

Removal of the Furnace from Common Vent

In  the  event  that  an  existing  furnace  is  removed  from 

a  venting  system  commonly  run  with  separate  gas 

appliances, the venting system is likely to be too large to 

properly vent the remaining attached appliances.

Conduct the following test while each appliance is operating 

and the other appliances (which are not operating) remain 

connected to the common venting system. If the venting 

system has been installed improperly, you must correct the 

system as indicated in the general venting requirements 

section.

CARBON MONOXIDE POISONING HAZARD

Failure  to  follow  the  steps  outlined  below  for  each 

appliance  connected  to  the  venting  system  being 

placed into operation could result in carbon monoxide 

poisoning or death.
The following steps shall be followed for each appliance 

connected  to  the  venting  system  being  placed  into 

operation, while all other appliances connected to the 

venting system are not in operation.

 WARNING

1.  Seal  any  unused  openings  in  the  common  venting 

system.

2.  Inspect  the  venting  system  for  proper  size  and 

horizontal pitch. Determine that there is no blockage, 

restriction,  leakage,  corrosion,  or  other  deficiencies 

which could cause an unsafe condition.

3.  Close  all  building  doors  and  windows  and  all  doors 

between the space in which the appliances remaining 

connected to the common venting system are located 

and  other  spaces  of  the  building.  Turn  ON  clothes 

dryers  and  any  appliances  not  connected  to  the 

common venting system. Turn ON any exhaust fans, 

such as range hoods and bathroom exhausts, so they 

will  operate  at  maximum  speed.  Do  not  operate  a 

summer exhaust fan. Close fireplace dampers.

4.  Follow the lighting instructions. Turn ON the appliance 

that is being inspected. Adjust the thermostat so that 

the appliance operates continuously.

5.  After the main burner has operated for 5 minutes, test 

for leaks of flue gases at the draft hood relief opening. 

Use the flame of a match or candle.

6.  After  determining  that  each  appliance  connected  to 

the common venting system is venting properly, (step 

3)  return  all  doors,  windows,  exhaust  fans,  fireplace 

dampers,  and  any  other  gas  burning  appliances  to 

their previous mode of operation.

7.  If  a  venting  problem  is  found  during  any  of  the 

preceding tests, the common venting system must be 

modified to correct the problems.

Resize the common venting system to the minimum vent 

pipe  size  determined  by  using  the  appropriate  tables  in 

Appendix  G.  (These  are  in  the  current  standards  of  the 

National Fuel Gas Code ANSI Z223.1.

Summary of Contents for GUH96C

Page 1: ...onal injury or loss of life Installation and service must be performed by a licensed professional installer or equivalent service agency or the gas supplier WARNING As with any mechanical equipment pe...

Page 2: ...ther side 23 3 4 603 25 635 3 3 8 86 D 1 NOTE C 5 5 Ton size units installed in upflow applications that require air volumes of 1800 cfm 850 L s or greater must have one of the following 1 Single side...

Page 3: ...507768 04P Page 3 of 56 Issue 1933 Figure 1 Parts Arrangement...

Page 4: ...diameter debris screen 1 3 4 Threaded street elbow NOTE The required bellows grommet is field provided See the Gas Piping section for relevant diagrams Check equipment for shipping damage If you find...

Page 5: ...peration of either the heating or the cooling unit unless it is in the full HEAT or COOL setting When installed this furnace must be electrically grounded according to local codes In addition in the U...

Page 6: ...on and unsafe operation When the furnace is installed in non direct vent applications do not block the furnace combustion air opening with clothing boxes doors etc Air is needed for proper combustion...

Page 7: ...ombustion and ventilation depend largely on whether the furnace is installed in an unconfined or a confined space Unconfined Space An unconfined space is an area such as a basement or large equipment...

Page 8: ...ey shall be of the same cross sectional area as the free area of the openings to which they connect The minimum dimension of rectangular air ducts shall be no less than 3 inches 75 mm In calculating f...

Page 9: ...lated Crawl Space and Outlet Air to Outside Shipping Bolt Removal Units with 1 2 hp 3 4 hp blower motor are equipped with three flexible legs and one rigid leg The rigid leg is equipped with a shippin...

Page 10: ...ystem The base must provide a stable support and an airtight seal to the furnace Allow absolutely no sagging cracks gaps etc For no reason should return and supply air duct systems ever be connected t...

Page 11: ...ngs are provided on both sides of the furnace cabinet for installations that require side return air Cut the furnace cabinet at the maximum dimensions shown on Page 2 Furnace applications which includ...

Page 12: ...ir Flow Right Hand Discharge Left End Right End Air Flow Air Flow Bottom Floor Left Hand Discharge Top Plenum 1 in 25 mm Front 0 Back 0 Sides 0 Vent 0 Floor 0 Front clearance in alcove installation mu...

Page 13: ...Filters This unit is not equipped with a filter or rack Afield provided filter is required for the unit to operate properly Table 1 lists recommended filter sizes A filter must be in place whenever th...

Page 14: ...either PVC or CPVC Low temperature solvent cement is recommended during cooler weather Metal or plastic strapping may be used for vent pipe hangers Uniformly apply a liberal coat of PVC primer for PVC...

Page 15: ...ic kit is provided with a 1 1 2 accelerator which must be installed on the exhaust outlet when this kit is used with the 45 000 and 70 000 furnaces When using 1 1 2 in piping the pipe must be transiti...

Page 16: ...ce connected to the venting system being placed into operation could result in carbon monoxide poisoning or death The following steps shall be followed for each appliance connected to the venting syst...

Page 17: ...ed to prevent leakage of combustion products into the living space CAUTION Vent Piping Guidelines This gas furnace can be installed as either a Non Direct Vent or a Direct Vent gas central furnace NOT...

Page 18: ...Capacity Min Vent Length 045 070 090 110 15 ft or 5 ft plus 2 elbows or 10 ft plus 1 elbow Any approved termination may be added to the minimum length listed 045 070 090 110 Standard or Concentric Se...

Page 19: ...78 78 9 36 21 70 55 23 92 92 73 73 10 31 16 65 50 18 87 87 68 68 Standard Termination at Elevation 4 501 10 000 ft Number of 90 Elbows Used 1 1 2 Pipe 2 Pipe 2 1 2 Pipe 3 Pipe Capacity Capacity Capac...

Page 20: ...81 74 74 9 28 13 60 45 19 76 76 69 69 10 23 8 55 40 14 71 71 64 64 Concentric Termination Elevation 4501 10 000 ft Number of 90 Elbows Used 1 1 2 Pipe 2 Pipe 2 1 2 Pipe 3 Pipe Capacity Capacity Capac...

Page 21: ...73 72 53 53 10 21 6 50 50 28 68 67 48 48 Standard Termination Elevation 4 501 10 000 ft Number of 90 Elbows Used 1 1 2 Pipe 2 Pipe 2 1 2 Pipe 3 Pipe Capacity Capacity Capacity Capacity 045 070 090 110...

Page 22: ...N 1 1 2 2 6 MINIMUM Figure 25 TYPICAL EXHAUST PIPE CONNECTIONS IN HORIZONTAL DIRECT OR NON DIRECT VENT APPLICATIONS RIGHT HAND DISCHARGE SHOWN SIDE VIEW 45 MAX 45 MAX 2 2 2 2 or 2 12 max EXHAUST TRANS...

Page 23: ...talled in either direct vent or non direct vent applications In non direct vent applications when intake air will be drawn into the furnace from the surrounding space the indoor air quality must be co...

Page 24: ...ng or a platform Ensure that the intake air inlet will not be obstructed by loose insulation or other items that may clog the debris screen 2 If intake air is drawn from a ventilated attic Figure 31 o...

Page 25: ...nation care must be taken to maintain protective coatings over building materials prolonged exposure to exhaust condensate can destroy protective coatings It is recommended that the exhaust outlet not...

Page 26: ...16 1 Refer to 99 Minimum Design Temperature table provided in the current edition of the ASHRAE Fundamentals Handbook 2 Poly Propylene vent pipe PP by Duravent and Centrotherm 3 Vent length in table...

Page 27: ...ance under veranda porch deck or balcony 12 Equal to or greater than soffit depth 3 feet 9m 12 3 feet 9m within a height 15 feet 4 5m above the meter regulator assembly 3 feet 9m 6 inches 152mm for ap...

Page 28: ...152mm for appliances 10 000 pliances 10 000 Btuh 3kw and 50 000 pliances 50 000 Btuh 15kw 6 inches 152mm for appliances 10 000 Btuh 3kw 12 inches 305mm for appliances 10 000 Btuh 3kw and 100 000 Btuh...

Page 29: ...e Figure 38 2 Intake and exhaust pipes should be placed as close together as possible at termination end refer to illustrations Minimum separation is 3 76 mm on roof terminations and 6 152 mm on sidew...

Page 30: ...ance above grade or average snow accumulation B Horizontal separation between intake and exhaust C Minimum from end of exhaust to inlet of intake D Exhaust pipe length E Wall support distance from top...

Page 31: ...46 US 44W92 or 44W93 Canada Minimum Above Average Snow Accumulation SHEET METAL STRAP Clamp and sheet metal strap must be field installed to support the weight of the termination kit FLASHING Not Furn...

Page 32: ...irect Vent Field Supplied Wall Termination SIZE TERMINATION PER EXHAUST PIPE TERMINATION SIZE REDUCTION TABLE FIELD PROVIDED REDUCER MAY BE REQUIRED TO ADAPT DIFFERENT VENT PIPE SIZE TO TERMINATION 3...

Page 33: ...ermination Drain Trap assembled Figure 49 Kit 51W18 USA 15Z70 Canada Parts Identification and Assembly Exhaust from Furnace To Termination Exhaust from Furnace To Termination Kit 51W18 is shown Figure...

Page 34: ...nd Figure 56 show the furnace and evaporator coil using a separate drain If necessary the condensate line from the furnace and evaporator coil can drain together See Figure 57 and Figure 58 Upflow fur...

Page 35: ...ng from furnace must slope down a minimum of 1 4 per ft toward trap Figure 54 Condensate Trap with Optional Overflow Switch When combining the furnace and evaporator coil drains together the A C conde...

Page 36: ...e must slope down a minimum of 1 4 per ft toward trap Figure 56 Unit with Cooling Coil Using Separate Drain Figure 57 Evaporator Coil Using a Common Drain Figure 58 Evaporator Coil Using a Common Drai...

Page 37: ...507768 04P Page 37 of 56 Issue 1933 Figure 59 Trap Drain Assembly Using 1 2 PVC or 3 4 PVC...

Page 38: ...ing suitable hangers or straps Install a drip leg in vertical pipe runs to serve as a trap for sediment or condensate 5 A 1 8 N P T plugged tap or pressure post is located on the gas valve to facilita...

Page 39: ...507768 04P Page 39 of 56 Issue 1933 Figure 61 Gas Piping Upflow Applications Figure 62 Gas Piping Horizontal Applications...

Page 40: ...16 42 530 15 01 490 13 87 460 13 03 430 12 18 400 11 33 1 1 2 38 1 1 610 40 894 2100 59 46 460 41 34 1180 33 41 990 28 03 900 25 48 810 22 94 750 21 24 690 19 54 650 18 41 620 17 56 2 50 8 2 067 52 5...

Page 41: ...at check to make sure the wires will be long enough for servicing at a later date Make sure that thermostat wire is long enough to facilitate future removal of blower for service Complete the wiring c...

Page 42: ...no cooling or heating demand See Table 14 for allowable continuous circulation speeds 2 When the furnace is running in the heating mode the indoor blower will run on the heating speed 3 When there is...

Page 43: ...507768 04P Page 43 of 56 Issue 1933 045B3 070B3 090C4 110C5 Figure 67 Typical Wiring Diagram...

Page 44: ...r gas Be sure to smell next to the floor because some gas is heavier than air and will settle on the floor The gas valve on the unit is equipped with a gas control switch lever Use only your hand to m...

Page 45: ...supplier s instructions If you do not smell gas go to next step 8 Move gas valve switch to ON See Figure 69 9 Replace the upper access panel 10 Turn on all electrical power to the unit 11 Set the the...

Page 46: ...n result in permanent damage to gas valve or overfire On multiple unit installations each unit should be checked separately with and without other units operating Supply pressure must fall within rang...

Page 47: ...ry set and require no adjustment Table 12 Burner Orifice Conversion Kits at Varying Altitudes Capacity 0 7 500 ft 0 2 286m 7 501 10 000 ft 2 286 3 048 m Natural to LP Propane LP Propane to Natural Hig...

Page 48: ...d and other spaces of the building 4 Close fireplace dampers 5 Turn on clothes dryers and any appliances not connected to the venting system Turn on any exhaust fans such as range hoods and bathroom e...

Page 49: ...at Anticipation Set the heat anticipator setting if adjustable according to the amp draw listed on the wiring diagram that is attached to the unit Electrical 1 Check all wiring for loose connections 2...

Page 50: ...75 0 10 1445 335 1275 230 1170 180 905 94 860 80 0 20 1415 345 1240 240 1125 190 870 101 800 85 0 30 1380 355 1205 250 1090 200 830 109 760 95 0 40 1345 370 1175 265 1055 210 790 117 710 105 0 50 131...

Page 51: ...2110 720 1850 495 1680 380 1560 320 1350 230 2085 745 1825 510 1655 390 1535 325 1335 230 0 40 2080 735 1810 520 1650 405 1515 330 1310 245 2060 760 1795 530 1625 405 1495 340 1295 245 0 50 2045 755...

Page 52: ...to empty condensate water 3 Remove the clean out cap from the condensate trap and empty water Inspect the trap then reinstall the clean out cap Cleaning Heat Exchanger If cleaning the heat exchanger...

Page 53: ...the 2 pin plug to the wire harness 38 Reconnect drain tubes between flue collar and cold end header box 39 Secure burner assembly to vestibule panel using four existing screws Burners are self alignin...

Page 54: ...vide a seal between the return air and the room where the furnace is installed Return air duct Must be properly attached and provide an air seal to the unit Operating performance Unit must be observed...

Page 55: ...t burner operation 1 Flash Reverse line voltage polarity 2 Flashes Improper earth ground 3 Flashes Burner failed to light or lost flame during heat demand 4 Flashes Low flame signal check flame sensor...

Page 56: ...height of eight 8 feet above grade directly in line with the exhaust vent terminal for the horizontally vented gas fueled heating appliance or equipment The sign shall read in print size no less than...

Reviews: