


7
106197
OWNER’S MANUAL
LIGHTING
INSTRUCTIONS
OPERATING
APPLIANCE
FOR YOUR SAFETY
READ BEFORE
LIGHTING
WARNING: If you do not fol-
low these instructions exactly, a
fire or explosion may result caus-
ing property damage, personal
injury, or loss of life.
BEFORE LIGHTING smell all around the
appliance area for gas. Be sure to smell next
to the ground because some gas is heavier
than air and will settle on the ground.
WHAT TO DO IF YOU SMELL GAS
• Do not try to light any appliance.
• Do not touch any electric switch; do
not use any phone in your building.
• Immediately call your gas supplier
from a neighbor’s phone. Follow the
gas supplier’s instructions.
• If you cannot reach your gas supplier,
call the fire department.
BATTERY CHECK
Lighting Using the Electronic
Spark Ignition System
1.
Open equipment shutoff valve.
2.
If you smell gas, STOP! Turn the
equipment shutoff valve to OFF. Check
gas connections for leaks. Do not con-
tinue until gas leaks are corrected.
3.
After correcting leaks, wait five (5)
minutes to clear out any gas. If you
then smell gas, STOP! Follow the
safety information in column 1. If you
do not smell gas, go back to step 1.
4.
Push in and hold the electronic spark
ignitor button (see Figure 7).
Note:
You should be able to hear a rapid
clicking sound from the burner bowl
when the ignitor button is depressed.
If you do not hear anything, see Bat-
tery Check, this page, and Trouble-
shooting, pages 8 and 9.
5.
Slightly depress and turn control
valve knob counterclockwise
to LOW. Push in and hold
control valve knob.
Lighting Manually with a Match
1.
Open equipment shutoff valve.
2.
If you smell gas, STOP! Turn the
equipment shutoff valve to OFF. Check
gas connections for leaks. Do not con-
tinue until gas leaks are corrected.
3.
Wait five (5) minutes to clear out any
gas. If you then smell gas, STOP! Fol-
low the safety information in column
1. If you do not smell gas, go back to
step 1.
4.
Light a match and lay it on top of
the lava rock just above the burner.
WARNING: Do not use this
appliance if any gas control parts
have been under water. Immedi-
ately call a qualified service per-
son to inspect the Patio Fire and
replace any part of the control
system and any gas control that
has been under water.
WARNING: All gas burning
appliances may produce smoke,
soot, or carbon monoxide during
operation. These fumes can be
harmful if the appliance is used
anywhere other than in an open
air, fully-vented area.
WARNING: Close equipment
shutoff valve when appliance is
not in use.
WARNING: Close equipment
shutoff valve when appliance is
not in use.
WARNING: Do not hold match.
Lay burning match on top of lava
rock.
5.
Turn control valve knob counterclock-
wise
to LOW (see Figure 7).
Push in and hold control valve knob.
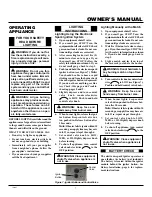
Figure 7 - Ignitor Button and Control Valve
WARNING: Keep face and
hands away from burner area.
6.
When burner lights, release the igni-
tor button. Keep control valve but-
ton pushed in. Release button after
30 seconds.
Note:
If heater fails to ignite within 10
seconds, gas supply line may have air
in it. If so, repeat steps 1 through 6.
7.
Set control valve knob to LOW,
MED, or HI. Slightly depress knob
before turning.
8.
To shut off appliance, turn control
valve knob clockwise
to the
OFF position.
WARNING: Keep face and
hands away from burner area.
6.
When burner lights, keep control
valve button pushed in. Release but-
ton after 30 seconds.
Note:
If heater fails to ignite within 10
seconds, gas supply line may have air
in it. If so, repeat steps 1 through 6.
7.
Set control valve knob to LOW,
MED, or HI. Slightly depress knob
before turning.
8.
To shut off appliance, turn control
valve knob clockwise
to the
OFF position.
Ignitor
Button
Control
Valve
The electronic spark ignitor operates on
one alkaline AA battery (not included).
The battery is located within the ignitor
module behind the ignitor button. See
Battery Installation, page 6, for replace-
ment instructions.


