


3
3
1
2
3
4
5
6
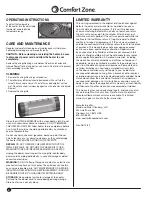
WARNING:
This heater has a voltage rating of 120 volts. The cord
has a 3-prong grounding-type plug (A) which fits the 3-slot grounded
receptacle (A2). DO NOT remove the grounding prong (A1) if only a
2-slot receptacle (B) is available.
For connecting 3-prong grounding-type plug to 2-slot receptacle, use
an ADAPTER (C). The grounding lug (C1) extending from the adapter
must be connected to a permanent ground with the Metal Screw (D)
such as a properly grounded outlet box (E).
The adapter should not be used if a 3-slot grounded receptacle is
available.
DO NOT DEFEAT THE SAFETY PURPOSE OF EITHER
A GROUNDED PRONG OR A GROUNDED LUG.
(A)
(A2)
(B)
(A1)
(C)
(D)
(E)
(C1)
Adapter is not included
WARNING:
ELECTRICAL SHOCK HAZARD
Do not use with damaged cord or plug. Use with adequate
electrical system that is up to code.
CAUTION:
PREVENT LECTRICAL SHOCK
This product has a three prong grounded plug that must be
inserted into a matching properly grounded outlet to reduce
the risk of electrical shock. Do not attempt to defeat this safety
feature.
DO NOT
operate any heater with a damaged cord or plug or
after heater malfunctions, has been dropped or damaged in any
manner. Do not operate heater with a broken heating element
or ceramic cone or any visual imperfections. Disconnect power
before servicing. For repairs covered under warranty, see
warranty statement. For all other repairs contact Comfort Zone
®
Customer Service by telephone or mail for information and
assistance.
PET OWNERS NOTE
The health of birds and some small pets are extremely
sensitive to the fumes given off during the initial use of many
appliances. Although these fumes are not harmful to humans,
it is recommended that this heater not be used around birds and
small pets during its initial use until the manufacturing corrosion
coatings burn off.
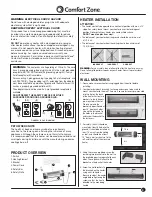
HEATER INSTALLATION
ATTENTION!
• The heater must only be operated in a horizontal position with max. ± 15°
slope. For safety, do not mount your heater in a vertical or diagonal
position. Never install your heater on a combustible surface.
DO NOT mount on plastic or vinyl.
• The distance of your heater from the ground should be a minimum of
6 ft (1.8 m).
• The distance of your heater from the ceiling should be a minimum of
1.5 ft (0.5 m).
WARNING:
For your safety, do not attempt to alter this heater in any way.
Do not attempt to perform repairs on your heater. Consult a professional
electrician.
WALL MOUNTING
1. Please make sure your heater is unplugged from the outlet before
installing.
2. Your heater includes 4 brackets, fasteners and screws to be used to
mount your heater to the wall. There are 4 square fasteners pre- mounted
into the slot on the back
of the heater. Fasten two
brackets to the fasteners
pre-mounted in the slot.
We recommend the
brackets be positioned at
least 6" from each other.
Line up the fasteners to
the holes in the bracket
and screw the bracket to
the fasteners.
5. Screw the wall brackets to
the brackets on the heater,
using a nut to tighten.
Be sure to adjust the heater
angle before tightening the
screws so that the heat is
directed to the area being
heated.
CORRECT
INCORRECT
INCORRECT
PRODUCT OVERVIEW
1. Switch
2. Heating Element
3. Bracket
4. Power Cord
5. Safety Bar
6. Safety Grille
3. For safety, the unit should be
mounted at least 6 ft above the
ground. It should be installed at
least 18" away from the ceiling
or roof, and should be at least
18" from a wall or structure to the
left and the right of the mounted
heater.
4. Using the screws provided, screw the
remaining two brackets into the wall so
the protruding parts are parallel to each
other. These parts will attach to the
brackets on the back of the heater.
6 ft.
18 in.
18 in.


