Installation Notes—Room-to-Room-Direct Flow Application
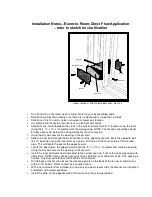
– refer to sketch for clarification
•
Do not install in a fire rated wall or ceiling. Refer to your local building code.
•
Determine wall location making sure there are no obstructions inside the stud wall.
•
Determine if the fan unit is to be in an upper or lower wall location
•
It is preferred to locate the Geni 4x near an electrical wall outlet.
•
Determine the center between the studs in the wall and mark the 4”x10” location using the level.
Using the 4 ½ ” x 10 ¼ ” template mark the wall opening. NOTE: The location should be at least
6” above floor or 6” below the ceiling whichever the case may be.
•
Using the dry wall saw cut the opening in the dry wall.
•
Slide the inner duct through the wall and locate at the opposite dry wall. Mark the opposite wall
(4”x10” opening) using the inner duct as a guide. Drill holes in the four corners of the marked
area. This will locate the duct at the opposite wall.
•
Locate the opening on the opposite wall, align the 4 ½ ” x 10 ¼ ” template and mark the opening.
Using the dry wall saw cut the opening in the dry wall.
•
Install the inner and outer duct and adjust to the correct spacing. Trim to the correct spacing with
utility knife. NOTE: It may not be necessary to use both the inner and outer ducts if the spacing is
narrow. One duct will interface with both the fan and grille
•
On the back of the Geni 4x locate the mounting points on the back of the fan cover and drill out
with a 3/16” drill bit. Refer to Geni 4x instruction sheet.
•
With inner and outer duct installed (or using only one duct sleeve) slide the Geni 4x fan into place
and attach with screws provided.
•
Install the grille on the opposite side of the wall using the screws provided.
Room-to-Room Direct Flow
Application Geni 4x
Geni 4x
Inner Duct
O
u
t
e
r
D
u
ct
Grille
Existing Drywall
W
all Studs
Wall Studs
Summary of Contents for Geni 4x
Page 5: ......


