background image

16 


Safety warnings 


 Please  read  this  manual  carefully  before  installing  and  using  the  solar  panel,  and  follow  all 

instructions. Keep this manual for future use.  


Warning!  Position  the  solar  panel  so  that  it  does  not  provide  an  access  for  children  into  the 

swimming pool.  


Warning!  The  solar  panel  is  intended  for  installation  on  the  ground,  next  to  your  pool  and  filter 

pump. Installation on a roof or any other structure is at your own risk. A defect caused by   

         installation on the roof or any other structure is therefore not covered by warranty.  


*  Failure  to  follow  the  safety  instructions  may  result  in  damage  to  the  product,  serious  injuries  to  you  and 

others, or death.  

*  This is not a TOY. Do not leave children alone and unsupervised around the solar panel. Children are not 

allowed to operate this product.  

*  Do not walk, sit or lean on the solar panel.


*  Make sure the pump is switched off before installing, cleaning or maintaining the solar panel.  

*  When  loosening  any  threaded  connections  on  your  filter,  pump  or  pool,  be  sure  that  the  filter  hoses  are 

closed or blocked to prevent water flow. 


*  Please try to keep all the connection hoses straight 

*  Above warnings and cautions are not intended to incorporate all possible instances for risks and/or severe 

injuries.  Owners  and  users  of  the  solar  panel  should  always  exercise  caution  and  common  sense  when 

utilizing the product. 


Summary of Contents for CP-80021

Page 1: ...SOLAR PANEL Installatie gebruikershandleiding SOLAR PANEL Installation Operation Manual...

Page 2: ...WINTERKLAAR MAKEN 13 5 PROBLEEMOPLOSSING 13 6 GARANTIE 14 Bedankt voor uw aankoop van het Comfortpool Solar Panel Het solar panel is ontworpen en gefabriceerd volgens onze hoogste normen voor betrouw...

Page 3: ...n kan leiden tot schade aan het product ernstige verwondingen bij u of anderen of de dood tot gevolg hebben Dit is geen SPEELGOED Laat kinderen niet alleen in de buurt van dit product Kinderen mogen d...

Page 4: ...stroomt uit het zwembad komt de filterpomp binnen en stroomt van daaruit naar het paneel waar het rond stroomt Het solar paneel absorbeert de warmte van de zon waardoor de interne waterstroom wordt ve...

Page 5: ...7 Zorg bij het losdraaien van de filter de pomp of andere verbindingen dat de filterslang gesloten of geblokkeerd is 8 Alle verbindingsslangen moeten open worden gehouden om ervoor te zorgen dat de sl...

Page 6: ...nels Wanneer u meerdere solar panels wilt plaatsen dan kunt u deze eenvoudig achter elkaar installeren Hoe meer panelen u installeert hoe sneller uw zwembadwater opwarmt Hoeveel uw zwembadwater per pa...

Page 7: ...7 2 Onderdelen Nr Omschrijving Aantal 1 Solar paneel 1 2 Connector 2 3 38 mm zwembadslang 1 4 Aluminium poot 2 5 38 mm rvs slangklem 2 6 Teflon tape 1 7 Lekkage reparatiekit 1...

Page 8: ...wikkelen 1 Haal het solar panel en de accessoires uit de verpakking 2 Omwikkel de connector met teflontape en schroef deze in de waterinlaat en uitlaat 3 Installeer de aluminium poten in de sleuf op...

Page 9: ...afsluiter op de filterpomp om ervoor te zorgen dat er geen water naar buiten stroomt wanneer u de slang loskoppelt van het zwembad 6 Verwijder de originele zwembadslang uit de terugstroom naar het zwe...

Page 10: ...ingen loopt 9 Steek de stekker in het stopcontact en start het filtersysteem zodat het water begint te circuleren het solar panel begint te werken en het zwembadwater wordt verwarmd OPMERKING Zorg erv...

Page 11: ...gklem op de inlaat naar het zwembad Installatie van meerdere solar panels Voor het verwarmen van grote zwembaden kunnen meerdere panelen in serie worden ge nstalleerd zodat het zwembadwater sneller op...

Page 12: ...troom 1 is verbonden met het solar panel Bij een filterpomp van 0 25 0 75 pk kunt u het beste de hendel in de 2 positie plaatsen Bij een filterpomp van meer dan 0 75 pk kunt u het beste de hendel in d...

Page 13: ...stroomt door de stroming bij de inlaat van het zwembad te checken Kijk naar het weer is het bewolkt of regenachtig geweest Gebruik s nachts een solar cover op het zwembad om warmteverlies te voorkomen...

Page 14: ...tie gebruikershandleiding die geleverd is bij dit product 2 Het vakmanschap van elke installateur van dit product 3 Misbruik aanpassingen ongevallen brand overstroming blikseminslag knaagdieren ongedi...

Page 15: ...three way valve 25 4 WINTERIZATION 26 5 TROUBLESHOOTING 26 6 WARRANTY 27 Thank you for purchasing a Comfortpool Solar Panel The solar panel has been engineered and manufactured according to our highe...

Page 16: ...s may result in damage to the product serious injuries to you and others or death This is not a TOY Do not leave children alone and unsupervised around the solar panel Children are not allowed to oper...

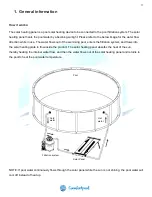
Page 17: ...imming pool enters the filtration system and flows into the solar heating plate to flow inside the product The solar heating panel absorbs the heat of the sun thereby heating the internal water flow a...

Page 18: ...n off the filtration system when installing operating or servicing the solar heating panel 7 When loosening the filter pump or other connections make sure the filter hose is closed or blocked 8 All co...

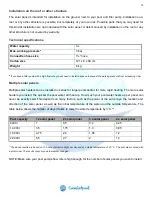
Page 19: ...talled in series for larger pools and or for more rapid heating The more solar heaters you install the quicker the pool water will heat up How much your pool water heats up per panel can never be exac...

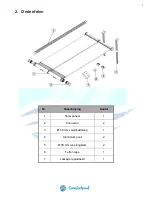
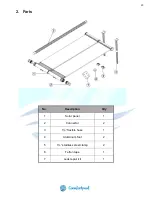
Page 20: ...20 2 Parts No Description Qty 1 Solar panel 1 2 Connector 2 3 1 flexible hose 1 4 Aluminium foot 2 5 1 stainless steel clamp 2 6 Teflon tape 1 7 Leak repair kit 1...

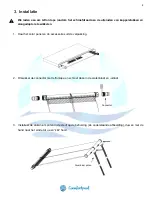
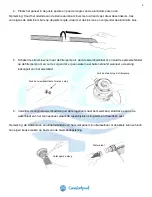
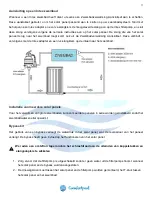
Page 21: ...cessories from the box 2 Wrap the joint of the connector with the Teflon tape and screw it into the water inlet and outlet 3 Install aluminium feet Install the aluminium legs in the card slot on the m...

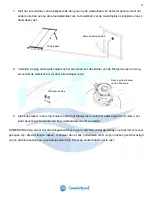
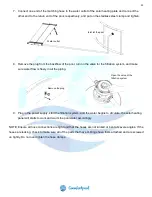
Page 22: ...with a screw plug and close the system valve to ensure that no water flows out when disconnecting the hose from the back end of the pool 6 Remove the original hose from the backflow of the swimming po...

Page 23: ...all the piping 9 Plug in the power supply start the filtration system and the water begins to circulate the solar heating panel will starts to work and warm the pool water accordingly NOTE Ensure all...

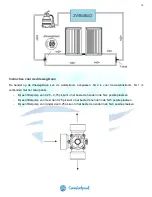
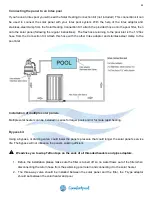
Page 24: ...o the pool inlet Installation of multiple solar panels Multiple solar heaters can be installed in series for larger pools and or for more rapid heating Bypass kit Using a bypass or dividing valve coul...

Page 25: ...s for the water inlet and No 1 is connected with solar heater If the using 0 25HP to 0 75HP pump the handle is better sitting on No 2 position If the using more than 0 75HP pump the handle is better s...

Page 26: ...low at the pool return Note the weather Has it been cloudy or raining Use your pool cover at night to reduce heat loss The size of the pool may require additional solar panels Water from the solar hea...

Page 27: ...lished Installation and Operation Manual provided with the product 2 The workmanship of any installer of the product 3 Abuse alterations accidents fire flood lightning rodents insects negligence or fo...

Reviews: