background image

11.Warranty Policy

30

- Our goal is to ensure that you are delighted with your purchase.
- According to our warranty agreement, all new products have a limit-
ed warranty. All batteries have a six month warranty. Spare parts have
a one year warranty. The limited warranty does not include: labor or
device failure due to the owner's misuse or negligence, non-durable
components and components subject to normal wear and tear that
need replacement from time to time (for example rubber materials,
accessories, wheels or brakes, and plastic parts). All warranty claims
require proof of purchase and the serial number.

Note that your warranty does not cover these conditions:

- Functional problems: Issues related to normal use and aging such 
as surface coating and plating, natural fading of resins
- Replacement of consumable materials due to wear and tear, such as
tires, fuses, plastic parts, glass parts, lubricates etc.
- Any fees for Inspection, adjustment, adding oil, cleaning, etc.
- Fees for service and maintenance performed dealers as specified by
our factory
- Any unauthorized modifications
- Maintenance costs at any unauthorized service centers
- If you fail to regularly check the issues as specified in this manual
section 7
- Improper or wrong maintenance
- If unauthorized maintenance has been performed
- Operating differently than what is described in our manual or if you
overload the wheelchair
- Any unauthorized modifications to the wheelchair
- External factors such as: soot, pharmaceuticals, bird droppings, acid
rain, flying stone, metal powder, etc.
- Natural disasters such as: typhoons, floods, fires, earthquakes etc.
damaging the unit

Protect the Environment

- Please do not dispose of this wheelchair or its components and es-
pecially the batteries. Instead, please return them to our service cente 
or follow your local disposal regulation.

Summary of Contents for Majestic IQ-8000

Page 1: ...User Manual Warranty IQ 8000...

Page 2: ...video explanation for the Usage and Operations and Remote Pairing can be found by visiting our Youtube Channel This information is found on page 9 For all of your spare parts needs please visit www C...

Page 3: ...e continuously improve and upgrade our components and design If you are uncertain about any operational process please contact your dealer immediately to clarify Improper use of this vehicle may lead...

Page 4: ...5 x 18 445x460mm Net Weight 55 lbs 25 5kgs Speed 0 62 mph 3 7 mph 1 6km h Max 4 mph Seat height 18 5 460mm Armrest height 11 290mm Backrest height 18 5 460mm Max loading weight 286 lbs 130 kgs Front...

Page 5: ...e 20 x 18 510x460mm Net Weight 61 lbs 27 5kgs Speed 0 62 mph 3 7 mph 1 6km h Max 4 mph Seat height 18 5 460mm Armrest height 11 290mm Backrest height 18 5 460mm Max loading weight 286 lbs 130 kgs Fron...

Page 6: ...plication Range This electric wheelchair is engineered specifically to serve disabled or elderly people weighing less than 130 kg 286 lbs intended for use for operation at walking speed Please do not...

Page 7: ...plication Range This electric wheelchair is engineered specifically to serve disabled or elderly people weighing less than 140 kg 310 lbs intended for use for operation at walking speed Please do not...

Page 8: ...or input part Safety of any non permanent equipment installed 2 2 Riding Notice General Riding Cautions Keep your hands on the armrest in order to fully be able to control the wheelchair We recommend...

Page 9: ...wnhill Avoid riding on steep hills places with uneven roads high steps channels and any other steep incline surfaces Avoid riding on steep slopes the slope range should be less than 9 degrees Please c...

Page 10: ...than the approved accessories to this chair as this may cause an imbalance and impact the wheelchairs function Keep Your Wheelchair Dry at All Times Do not store or use your wheelchair in wet places...

Page 11: ...all and use the electric wheelchair based on the electromagnetic compatibility information provided Portable and mobile RF communication devices will affect perfor mance of the electric wheelchair The...

Page 12: ...ight Foldable Electric Wheelchair Model IQ8000 on YouTube or scan the QR code with your smartphone s camera Please visit YouTube for a detailed Remote Control Pairing explanation Simply search ComfyGO...

Page 13: ...other hand pull the seat and fold it Picture 4 Picture 1 Hold the backrest with one hand and use your other hand to hold the seat and unfold the chair Picture 1 Picture 2 Fully unfold the wheelchair...

Page 14: ...rew Picture 6 Dismantle the battery by first disconnecting the battery plug and the controller plug Picture 7 and then loosening the screw on the bat tery case Picture 8 Install the battery by putting...

Page 15: ...ipper Press the button to install dismantle the anti tipper Picture 10 11 Flipping up Your Armrest Using one hand press the armrest button using the other hand flip up your armrest Picture 12 Press do...

Page 16: ...14 15 Electric mode Spin the red clutch and put it back into its groove lightly push the wheelchair until you hear a click sound Picture 16 When switching from manual to electric mode please confirm t...

Page 17: ...ll shorten the life cycle of your battery When battery is fully charged the power indicator will turn green Do not stop charging before fully charged this indicator is lit After charging is complete e...

Page 18: ...pply and battery box plug Follow the instructions below to complete the charging process Step 1 Make sure the charger groove is not blocked Step 2 Make sure the electric wheelchair s power is turned o...

Page 19: ...explosion Only use batteries that are provided with this unit Contact your seller if you need replacement batteries While inserting the battery ensure that the battery poles are placed correctly Alwa...

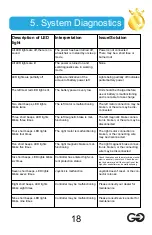
Page 20: ...the following parts the motor brakes battery wire connec tions Use the table below to troubleshoot the particular technical issue Technical issues can usually be detected without other service tools b...

Page 21: ...nctioning The left magnetic brake connec tion is broken or the wire may be disconnected Four short beeps LED lights blinks four times The right motor is malfunctioning The right motor connection is br...

Page 22: ...oystick is not used for more than 20 minutes the power will turn off automatically and the system will enter sleep mode System can be reactivated by pressing the power button Speed adjustment The whee...

Page 23: ...rking on a long distance ride please ensure that your battery is fully charge Do not use the unit if only the red light is shown as this means the unit requires charging Using the Joystick To control...

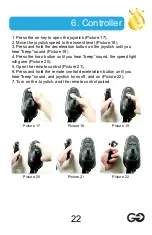
Page 24: ...airing video explanation please visit our Youtube Channel Detailed information is found on on page 9 Speed Deceleration Speed Acceleration Power On Off Button Horn Button Controller Power On Off Butto...

Page 25: ...until you hear beep sound Picture 19 4 Press the horn button until you hear beep sound the speed light will gone Picture 20 5 Open the remote control Picture 21 6 Press and hold the remote control dec...

Page 26: ...se refrain from using organic abrasive solvents to clean as these might damage the surface The wheelchair should be cleaned about once per week If the wheel chair is used by an infectious patient it s...

Page 27: ...monitor the controller and motor Any malfunction of these parts is indicated by the controller For more details please kindly refer to chapter of audio signal indica tion 7 6 Maintenance Checking You...

Page 28: ...8 Reclining 25...

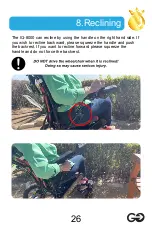
Page 29: ...00 can recline by using the handle on the right hand side If you wish to recline backward please squeeze the handle and push the backrest If you want to recline forward please squeeze the handle and d...

Page 30: ...line up the holes Insert the two provided bolts into the headrest frame and use the pro vided nuts to secure the headrest to the backrest The headrest is height adjustable To adjust the height of the...

Page 31: ...10 Headlight 28 To install the headlight and USB charger simply insert the headlight into the joystick charging port Power On Off Button USB Charger...

Page 32: ...ting professional help https www comfygomobility com warranty or return request Simply scan QR code with your phone for the Warranty Link Here are a Few Ways to Keep Your Batteries Healthy Keep your b...

Page 33: ...materials due to wear and tear such as tires fuses plastic parts glass parts lubricates etc Any fees for Inspection adjustment adding oil cleaning etc Fees for service and maintenance performed dealer...

Page 34: ...www ComfyGoMobility com...

Reviews: