background image

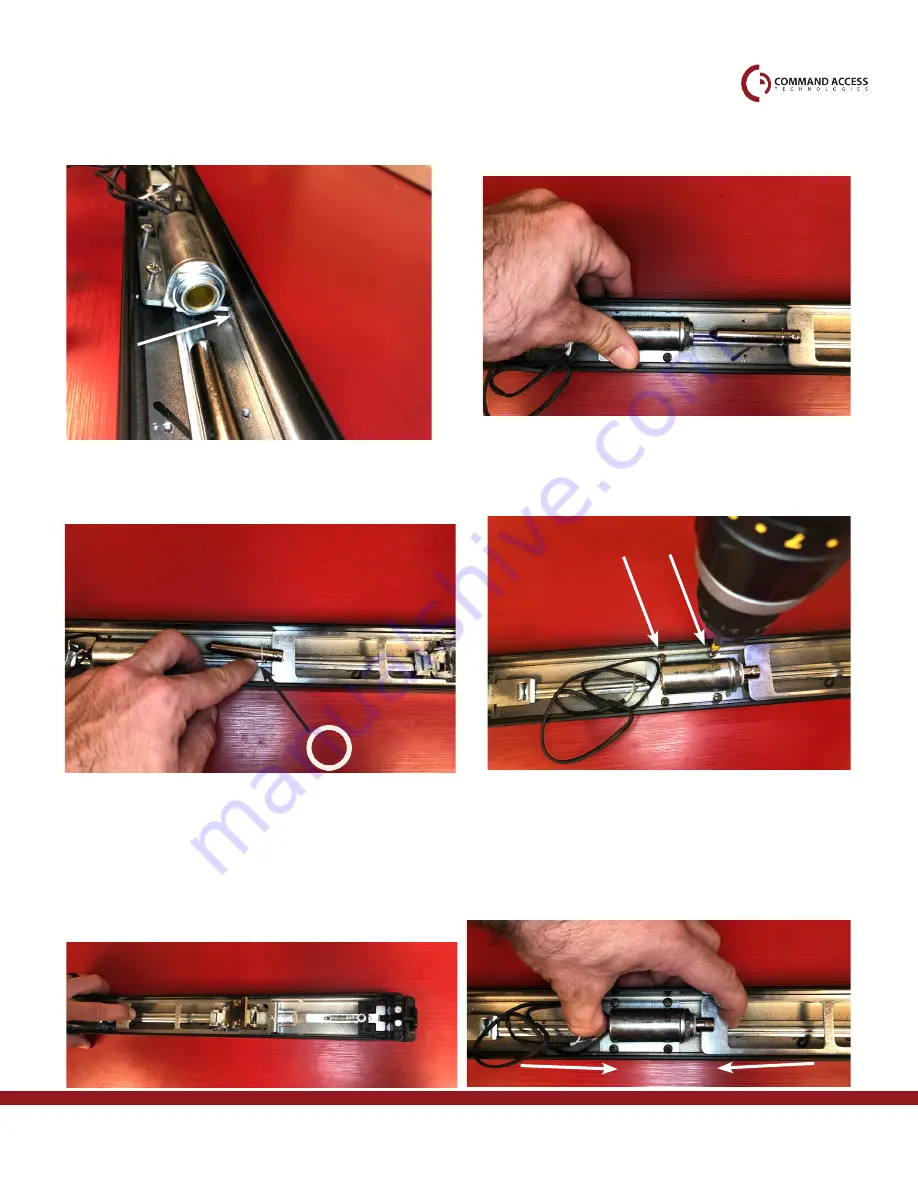
Press down on the solenoid mount to pop in the oth-

er side of the solenoid mount into the middle groove.

7.

Behind plunger bracket, install solenoid mount by 

sliding one side into the middle groove.

8.

9.

Add Silicon washer to the plunger.

U S   c u s t o m e r   s u p p o r t   1 - 8 8 8 - 6 2 2 - 2 3 7 7   |   w w w. c o m m a n d a c c e s s . c o m   |   C A   c u s t o m e r   s u p p o r t   1 - 8 5 5 - 8 2 3 - 3 0 0 2

10.

Move solenoid mount up towards plunger & install 

remaining (2) screws to mount. DO NOT TIGHTEN!

11.

To find correct solenoid position, pull back on the plunger bracket & confirm starwheel is free to rotate. 

Once starwheel moves freely, this is the correct position. Release plunger bracket & hold solenoid in place.

Summary of Contents for ARLP88-KIT

Page 1: ...s a field installable solenoid latch pullback kit for the Adams Rite 8800 series devices 2 0 4 3 1 _ A U S c u s t o m e r s u p p o r t 1 8 8 8 6 2 2 2 3 7 7 w w w c o m m a n d a c c e s s c o m C A c u s t o m e r s u p p o r t 1 8 5 5 8 2 3 3 0 0 2 B C D Install Video SPECIFICATIONS Input Voltage 24VDC 10 Wire gauge Minimum 18 gauge Direct wire run no relays or access control units in between ...

Page 2: ...ALLATION EXAMPLE Recommended Power Supplies All Command Access exit devices field installable kits have been thoroughly cycle tested with Command Access power supplies at our factory For more information click here or go to our website U S c u s t o m e r s u p p o r t 1 8 8 8 6 2 2 2 3 7 7 w w w c o m m a n d a c c e s s c o m C A c u s t o m e r s u p p o r t 1 8 5 5 8 2 3 3 0 0 2 ...

Page 3: ...rop plunger bracket over the front activitaing arm 4 Make sure the plunger bracket slides all the way to the back where the screw is past the tab 5 6 Once plunger bracket is past tab tighten screw all the way to prevent the bracket from moving forward U S c u s t o m e r s u p p o r t 1 8 8 8 6 2 2 2 3 7 7 w w w c o m m a n d a c c e s s c o m C A c u s t o m e r s u p p o r t 1 8 5 5 8 2 3 3 0 0 ...

Page 4: ... t o m e r s u p p o r t 1 8 8 8 6 2 2 2 3 7 7 w w w c o m m a n d a c c e s s c o m C A c u s t o m e r s u p p o r t 1 8 5 5 8 2 3 3 0 0 2 10 Move solenoid mount up towards plunger install remaining 2 screws to mount DO NOT TIGHTEN 11 To find correct solenoid position pull back on the plunger bracket confirm starwheel is free to rotate Once starwheel moves freely this is the correct position Rel...

Page 5: ...it works properly Add wire tie strain relief pad to secure power cable U S c u s t o m e r s u p p o r t 1 8 8 8 6 2 2 2 3 7 7 w w w c o m m a n d a c c e s s c o m C A c u s t o m e r s u p p o r t 1 8 5 5 8 2 3 3 0 0 2 15 Add power connector to power wires push them into the connector make sure the tabs on the wire pins are facing up The tabs will lock pins into the connector TOP TAB ...

Reviews: