background image

5

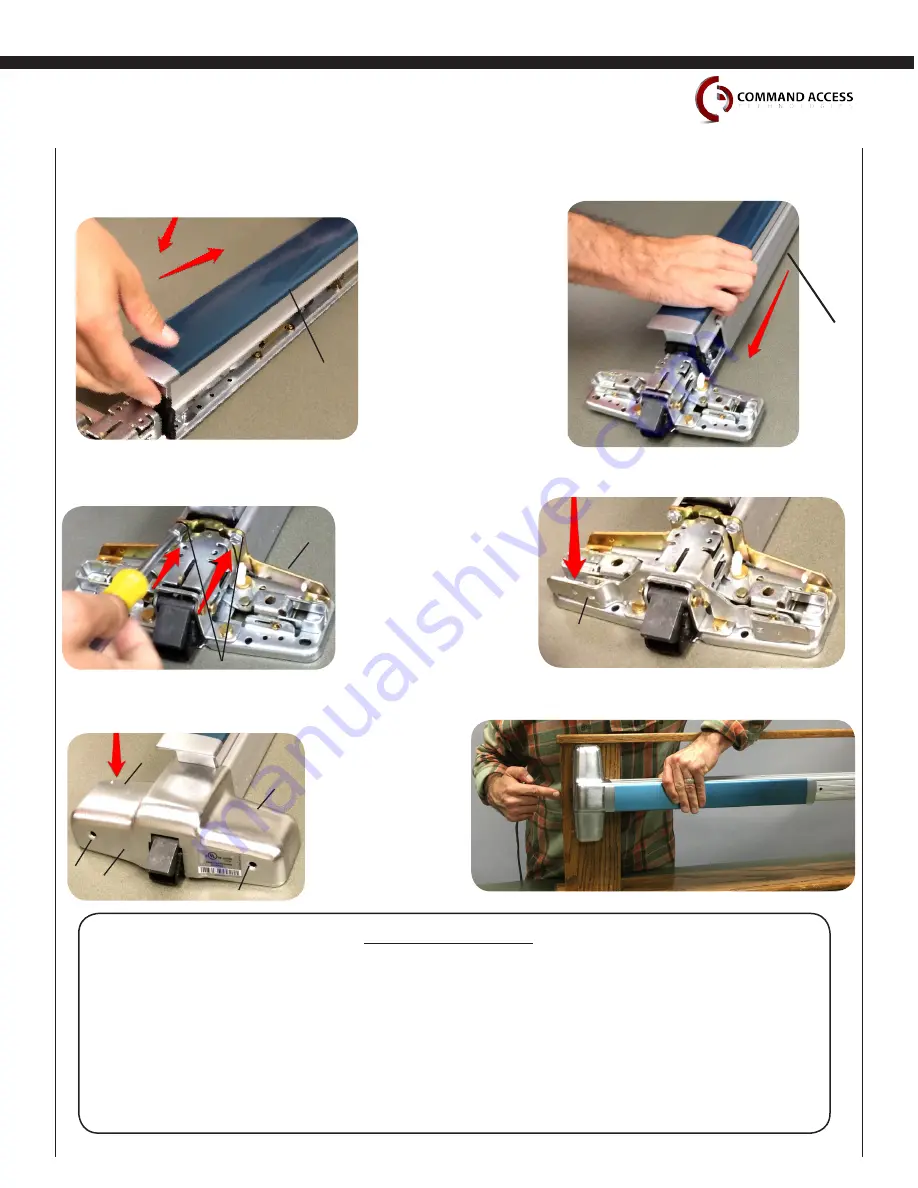
Push pad

Case

Bracket

Screws

Bracket

Head cover

1

4

2

3

•  Replace bracket & attach (2) screws with 5/16 

nut drive or flat head screw driver.

•  Replace push pad by placing over 

activating arms & pushing down then 

back towards end of device.

•  Slide baseplate back into case being 

careful of motor wires.

•  Replace mounting bracket.

•  Replace head cover & (4) head 

cover screws if present. 

• Depress push pad & set PTS adjustment. 

Step 1

-

Press the device push pad to the desired setting. (this can be fully 
depressed or less than fully depressed).

Step 2

-

 While depressing the push pad, apply power. (i.e. presenting the 
credential to the reader).

Step 3

-

 Continue to keep pad depressed, the device will beep 6 times. After the 
beeps have stopped, release the pad and now the adjustment is complete. 
If not to your liking repeat the three steps. That’s all there is to it. 

S

etting

 PtS

Summary of Contents for VLP-M-KIT

Page 1: ...99 series devices Visit our website for more details www CommandAccess com U S Customer Support 1 888 622 2377 Canada Customer Support 1 855 823 3002 Kit Includes 1 VLP M KIT Baserail Kit 1 6 Lead 1 Dogging Hole Cap B A C Tools Required Cordless Drill 5 16 Nut driver recommended or Flat head screwdriver 2 Phillips head screwdriver 02 16Doc 20272_E A B C Additional Information ...

Page 2: ...ase Push pad is depressed Device is re adjusting Over travel or mechanical obstruction 28V unit will shut down Check voltage adjust to 24 V 22V unit will shut down Check voltage adjust to 24 V Device will automatically re engage within 5 seconds Check to make sure the push pad is not stuck or catching on anything Troubleshooting Diagnostics 4 Beeps Failed Sensor Verify all 3 sensor wires are insta...

Page 3: ...baserail with 5 16 nut driver or flat head screw driver Remove push pad by pulling pad guides up then moving push pad forward then upward Remove mounting bracket Remove case for device 1 4 2 3 Detach the head assembly form the base rail by removing both screws on the backside of the baserail Screws ...

Page 4: ...e the C clip and pin attaching the latch to the baserail Swap your mechanical baserail for the electrified baserail Re install the pin into the first hole Re install C clip attaching the latch to the new baserail Re install both screws attaching the new baserail back to head assembly Screws ...

Page 5: ...place head cover 4 head cover screws if present Depress push pad set PTS adjustment Step 1 Press the device push pad to the desired setting this can be fully depressed or less than fully depressed Step 2 While depressing the push pad apply power i e presenting the credential to the reader Step 3 Continue to keep pad depressed the device will beep 6 times After the beeps have stopped release the pa...

Reviews: