background image

Page 6

INSTALLATION GUIDE

1.  Carefully unpack the toaster oven.

2.  Remove all labels and tags from the products.

3.  Wipe the exterior of the toaster with a clean, damp cloth. Allow to dry 

thoroughly. Do not use harsh detergents or abrasive cleansers on any part of the 
toaster oven.

NOTE

:


Do not immerse the toaster, cord or plug housing in water or any other liquid.

OPERATION INSTRUCTIONS

SELECTING TOAST COLOR

1. 

The Shade Selector Dial is located at one end of your Toaster. Simply turn the 
Dial to the desired toast colour, (1) for light toasting, (6) for dark toasting.

2. 

For your first toasting, it is best to position the Shade Selector Dial at the lowest 
setting and then adjust each subsequent toasting to your preference.

TOASTING

1. 

Place your Toaster on a flat, level surface. Insert one slice of bread into each slot.

2. 

Press the Toasting Lever located on one end of your Toaster downward until it 
locks into place. This will lower the bread into position and automatically begin 
toasting. The toast will pop up when it has reached the selected colour. (For 
best results, allow toaster to cool for one or two minutes between toasting 
cycles.)

3. 

The Toaster will be ready to toast again when the toasting lever locks into place 
when pushed downward.

4.  Should you desire to stop the toasting before reaching the selected colour, turn 

the Shade Selector Dial to the Cancel ( ) function, and the toast will pop up.

5. 

When you press the Toasting Lever down at the start of the toasting cycle, or 
when you use the Cancel Function to raise the toast, you may notice a small 
flash of light in the toast slot at the end opposite the toasting control. This flash 
of light, caused when the power switch opens and closes, is normal with any 
high-wattage appliance.

SET UP & USE

IF

Summary of Contents for CCT2201B

Page 1: ...appliance Keep them for further reference 2 Record in the space below the SERIAL MODEL NUMBER found on the back or bottom of your appliance and retain this information for future reference SERIAL NUM...

Page 2: ...uctions 3 Electric Requirements 4 Power Supply Cord 4 SET UP USE Parts Features 5 Installation Guide 6 Operation Guide 6 7 CLEANING CARE 8 9 TROUBLE SHOOTING WARRANTY Before You Call For Service 10 Cu...

Page 3: ...nation repair or electrical or mechanical adjustment 7 The use of accessory attachments not recommended or sold by the appliance manufacturer may cause fire electric shock or injury and voids warranty...

Page 4: ...fully into the outlet reverse the plug If it still does not fit contact a qualified electrician Do not attempt to modify the plug in any way POWER SUPPLY CORD A short power supply cord should be used...

Page 5: ...Page 5 PARTS FEATURES CCT2201B Cancel Feature Shade Selector Cool Touch Housing Pull Down Crumb Tray Extra Lift Feature SET UP USE...

Page 6: ...nsert one slice of bread into each slot 2 Press the Toasting Lever located on one end of your Toaster downward until it locks into place This will lower the bread into position and automatically begin...

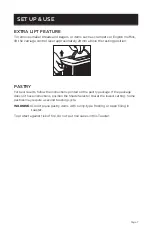
Page 7: ...position PASTRY For best results follow the instructions printed on the pastry package If the package does not have instructions position the Shade Selector Dial at the lowest setting Some pastries m...

Page 8: ...ed with a damp cloth thoroughly dried and replaced Crumbs that accumulate in the Crumb Tray could catch fire if not removed periodically WARNING Never operate the Toaster without the Crumb Tray proper...

Page 9: ...arm water and dry with a soft cloth Do not use harsh chemicals abrasives ammonia chlorine bleach concentrate detergents solvents or metal scouring pads SOME of these chemicals may dissolve damage and...

Page 10: ...CUSTOMER SERVICE IMPORTANT DO NOT RETURN THIS PRODUCT TO THE STORE If you have a problem with this product please contact the W Appliance Co Customer Satisfaction Center at 1 855 855 0294 DATED PROOF...

Page 11: ...ce repair or replacement 14 Service calls to instruct you how to use your toaster oven 15 Service calls to repair or replace the house fuse reset the circuit breaker or correct the wiring in the house...

Page 12: ...Page 12 091718 2018 Commercial Chef is a W Appliance Company All Rights Reserved...

Reviews: