6
User manual Audiostreamer (NO_EN_F_D_NL_ES_SE_DK_SU) 1m
NO
EN
F
D
NL
ES
SE
DK
SU
EN
A removable device is included that allows you to charge the
CIBS products with or without clips. If you wish to charge the CIBS
products without clips,they must be placed in the charging cradle,
as shown in the picture on page A of the assembly instructions.
If you wish to fix the Audiostreamer to the wall, you can use
the accompanying brackets. Assembly instructions on page A.
Connecting audio devices and alert system
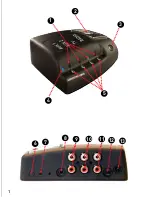
The Audiostreamer has 4 audio sockets:
AUX 1 socket
•
12
has a 3.5mm jack. It is best suited to iPod/ MP3
players but you can connect other audio devices to this socket.
AUX 2 socket
•
11
has 2 phono plugs. You can connect your desired
audio equipment here.
The TV socket
•
10
has 2 phono plugs. It is best suited to TV and
tuners but you can connect other devices to this socket.
The radio socket
•
9
has 2 phono plugs. It is best suited to radio/
stereos but you can connect other audio equipment to this socket.
The Audiostreamer has a socket for the alerting system:
The alerting socket
8
has a 3.5mm jack. To this you can connect all
alerting systems which have audio output. This can be done with
a cable (accessory).
Pairing the Audiostreamer with the Maestro
Your Audiostreamer must be programmed to communicate with
another device, e.g. Maestro. This is done by connecting these together
wirelessly. (pairing).
NOTE: It is important that the Audiostreamer and the device it is paired
with are within a distance of 1 meter while paired and the unit it is
paired with is fully charged.
How to set the the Audiostreamer to pairing mode!
1.
Press and hold the pairing button
•
6
until you see
the communication lamp
4
flash alternately red and blue.
The Audiostreamer is now ready for pairing.
Summary of Contents for Audiostreamer
Page 1: ...AUDIOSTREAMER User manual...
Page 2: ...1 1 2 3 4 5 6 9 10 8 11 12 13 7...
Page 3: ...2 AUDIOSTREAMER...

