7
User manual Tango VII 1e
NO
EN
NO
EN
8
User manual Tango VII 1e
NO
EN
NO
EN
The functions of Tango VII
Tango VII is an amplifier for desk telephones without Bluetooth.
It gives you a wireless communication between the desk telephone and
Blues II/Maestro or other Bluetooth compatible products. Tango VII can
also be used to amplify the sound in your exsiting handset.
Installing the Tango VII
Connect the accompanying power supply to the power socket
14
.
Tango VII will switch itself on automatically. This will be indicated by all
the lights will illuminate for some seconds. Tango does not have an on/
off switch, but will automatically go into stand-by mode when not in use.
Find the cable that connects the telephone handset to the desk
1.
phone. Detach the cable from the desk phone and connect it to the
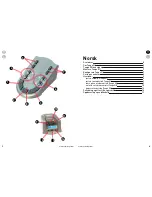
input for telephone handset on the Tango VII
9
Then, connect the accompanied cable (60cm) to the desk phone
2.
where the above cable was detached (1), and to the input for desk
phone on Tango VII
10
.
Handset lifter (accessory) can be connected to the input for handset
3.
lifter
11
.
Configure Tango VII
Configuration means adapting the Tango VII to your desk phone.
See the Configuration list on page 1.
If your desk phone is listed on the attached Configuration list, apply the
configuration digit that corresponds with your phone, and continue to
alternative a.
If your desk phone is not listed, continue to alternative b.
Alternative a.
Use a pen or similar pointed object to press and hold configuration
button
4
d. The configuration number is indicated by a light in the
indicator bar
4
c, with configuration number 01 at the bottom and 08 at
the top. Press
4
a or
4
b repeatedly to select the configuration digit of
your phone. When the correct digit is selected, release the button
4
d.
Make sure that you can hear the dialling tone in your phone and check
the microphone by blowing on it. Tango VII is now successfully confi-
gured.
Alternative b.
Press button
1
to activate the telephone receiver. Use a pen or similar
pointed object to press and hold configuration button
4
d.
The configuration number is indicated by a light in the indicator bar
4
c,
with configuration number 01 at the bottom and 08 at the top.
Lift the telephone handset and press
4
a or
4
b repeatedly until you hear
the dialling tone clearly through the receiver. Check that the microphone
works by blowing on it. If not, step to the next configuration number and
repeat the microphone test. When you both hear the dialling tone and the
microphone works, your Tango VII is successfully configured.
The configuration button
1
d can then be released.
If too much time elapses, the dialling tone will cease and you must
replace the handset and lift it again in order to continue configuration.
Configuration of microphone sensitivity (loudness of your voice)
Use a pen or similar pointed object to press and hold button
6
d, while
adjusting the sensitivity up or down by pushing button
6
a or
6
b.
The light bar
6
c indicated the level of microphone sensitivity.
Pairing of the units
The units in must be programmed to be able to communicate
with each other. This is done by connecting them wirelessly (pairing).
NOTE: It is important that the Tango VII and the other neck loop
are within one meter distance of each other pairing and that the other
neck loops is fully charged.
Pair the Tango VII with the neck loop
Switch on the nack loop (Blues II/Maestro)
•
Put the neck loop (Blues II/Maestro) into pairing mode.
•
Press and hold the pairing button
4
e on Tango VII until the
communication lamp
8
flashes alternately red and blue.
Tango VII is now ready for pairing.
•
When the Tango VII are paired with the neck loop (Blues II/
•
Maestro), the communication lamp will light solid blue.
If the pairing is unsuccessful, repeat the procedure.
•


