background image

Era

 Medium Power Carrier Access Point Installation Guide

M0201AJB

Page 8

© October 2018 CommScope, Inc.

 CAP M Overview


Dual Mounting Bracket 

The Dual Mounting Bracket (CommScope PN 7821955-xx) provides the mounting brackets required to 
mount two CAP Ms back-to-back in a single bracket, which is then mounted to a wall or other vertical, flat 
surface. See 

"Mount Two CAP Ms Using a Dual Mounting Bracket” on page 31

.

Pole Mounting Kit for Up to 18" Poles

The CAP M Pole Mounting Kit for Up to 18" Poles (CommScope PN 7692096-XX) is used to mount a CAP M to 
a pole with a circumference of 4" to 18" (10.2 cm to 45.8 cm). See 

"Mount the CAP M to a 4" to 18" Pole” on 

page 39

.

Hybrid Fiber Splice Box 

The Hybrid Fiber Splice Box (CommScope PN 7693816-xx) separates the power from the fiber signals on a 
hybrid fiber feed from the Classic CAN or TEN. It feeds power to the CAP M through a composite cable that 
includes both fiber and copper power wires. Fiber and copper terminate at the Splice Box, which allows you 
to separate the DC wires and fiber at the remote end. For CAP Ms, you will typically use composite cable to 
transport signal and power, and then use the Hybrid Fiber Splice Box to terminate the fiber at the CAP M. See 

"Wire an Optional Hybrid Fiber Splice Box” on page 19

.

OCTIS Kits

All CAP Ms include one OCTIS

1

 Kit for the primary interface to the Classic CAN or TEN that CAP M plugs into 

the CAP M Optical Port 1. You can order an additional OCTIS Kit, which would allow you to cascade two 
CAP Ms via Optical Port 2, or to attach an auxiliary Ethernet device via the AUX Port. 

Table 3

 identifies the two 

OCTIS Kit options.

1 OCTIS is a trademark of RADIALL.

Table 3. 

CAP M


OCTIS Kits

Kit Name

CommScope PN Description

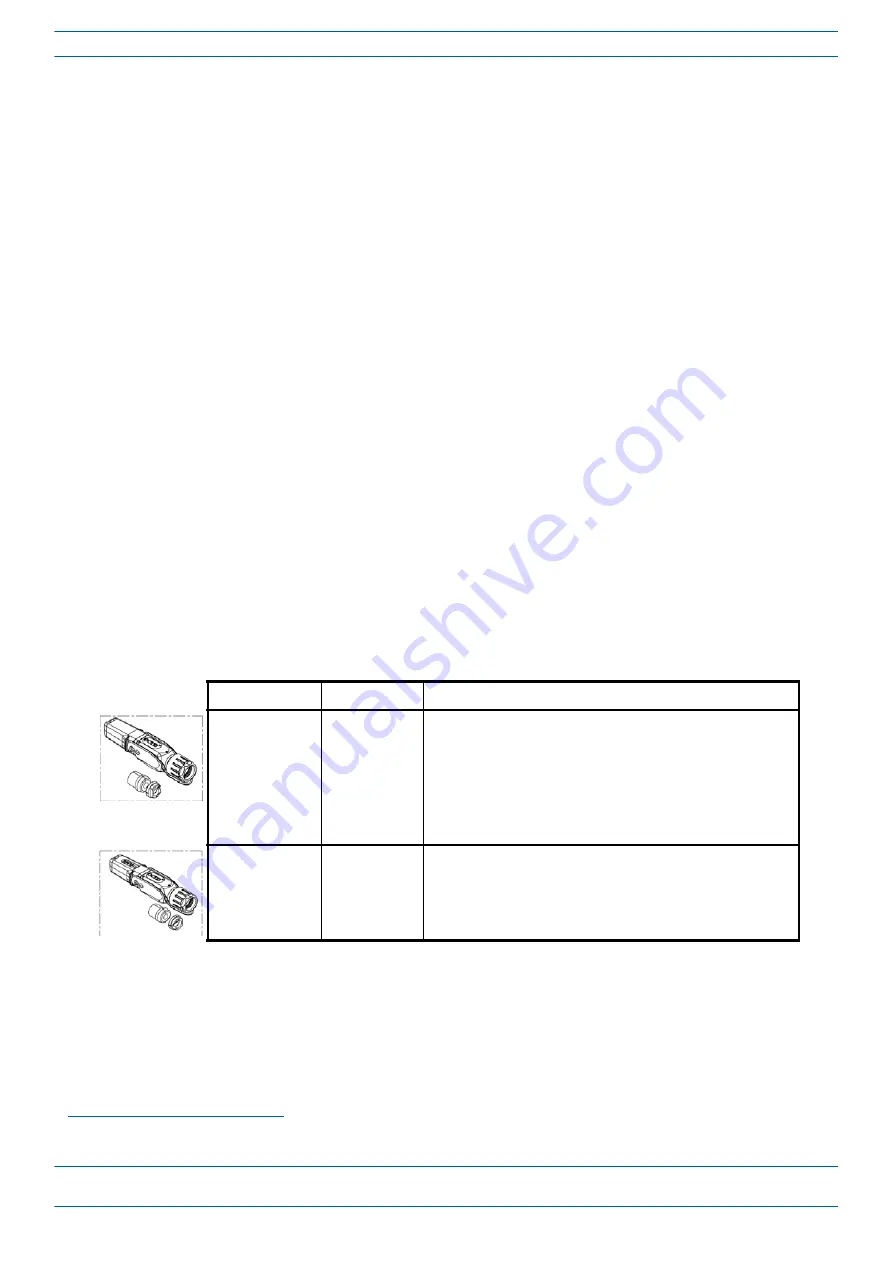
Optical OCTIS Kit

7770612

This is the SFP+ connector that you use to cascade a Secondary Fiber 
CAP L; one Optical OCTIS Kit ships with each Fiber CAP L. Use as 
follows:

• Optical Port 1—to connect the CAP M to a Classic CAN or TEN.

• Optical Port 2—to cascade a second CAP M.

• SFP+ Module must be ordered separately, it is not included as 

part of the Optical OCTIS Kit.

Ethernet OCTIS Kit 7760652

This is the RJ-45 connector that you use to attach an auxiliary 
Ethernet device. The Ethernet OCTIS Kit must be ordered 
separately.

Summary of Contents for Era CAP M 17E

Page 1: ...Era Medium Power Carrier Access Point Installation Guide M0201AJB October 2018 ...

Page 2: ...urbed conditions Should further information be desired or should particular problems arise which are not covered sufficiently for the purchaser s purposes contact CommScope CommScope reserves the right to change all hardware and software characteristics without notice COPYRIGHT 2018 CommScope Inc All Rights Reserved This document is protected by copyright No part of this document may be reproduced...

Page 3: ... 15 Recommended Tools and Material 15 Determine the Power Consumption of the CAP M 16 Determine the Mounting Site 16 Unpack and Inspect the CAP M and Optional Accessories 19 Wire an Optional Hybrid Fiber Splice Box 19 Mount the CAP M 23 General Mounting Cautions 23 Mounting Orientation 24 Mount the CAP M to a Wall or Vertical Surface 25 Mount a CAP M Using a Single Mounting Bracket 25 Mount Two CA...

Page 4: ...er 2018 CommScope Inc Contacting CommScope 53 DCCS Global Technical Support 53 Telephone Helplines 53 Online Support 53 Waste Electrical and Electronic Equipment Recycling 53 Hardware to Software Mapping Information 54 DCCS Technical Training 54 Accessing Era User Documentation 55 ...

Page 5: ...mended Tools and Material on page 15 updates General Mounting Cautions on page 23 updates Mount a CAP M Using a Single Mounting Bracket on page 25 and Mount Two CAP Ms Using a Dual Mounting Bracket on page 31 the M6x12 screw now requires an M6 plain washer and an M6 split lock washer adds Pole Mounting Kit for Up to 18 Poles on page 8 and Mount the CAP M to a 4 to 18 Pole on page 39 Table 1 Suppor...

Page 6: ... device destroy or corrupt information or interrupt or stop services The icon to the left indicates a caution or warning that pertains to laser equipment The icon to the left indicates a caution or warning that pertains to Radio Frequency RF The icon to the left indicates that the hardware is susceptible to Electro Static Discharge ESD damage The icon to the left indicates a caution or warning tha...

Page 7: ...tion Science and Economic Development Canada CAP H Carrier Access Point High Power kg Kilogram CAP L Carrier Access Point Low Power LED Light Emitting Diode CAP M Carrier Access Point Medium Power MHz Megahertz Cat Category mm Millimeter CAT Copper Transport MMF Multi Mode Fiber dB Decibel OPT Optical Transport dBm Decibel milliwatts PN Part Number DC Direct Current RAN Regional Area Network DC Di...

Page 8: ...bs All operator Baseband signals analog BTS and BBU CPRI are supplied to the Switching CAN by the WINs so no RFD or CDD Cards can be installed in the Switching CAN The Switching CAN then combines the signals from all WINs and distributes those signals to the TENs and the TENs provide the signals to the APs APs are not directly connected to a Switching CAN Users have full and flexible control of al...

Page 9: ...o data streams which are sent back to the Classic CAN or TEN Each CAP M can provide RF coverage for up to four specific frequency bands Figure 1 shows how a CAP M can be deployed in an Era system Figure 1 CAP M in an Era System using a Classic CAN The CAP M is passively cooled and operates within the following temperature ranges 33 C to 52 C 27 4 F to 125 6 F is rated for indoor and outdoor IP66 i...

Page 10: ...Secondary CAP M via the Optical OCTIS Kit PN 7770612 which ships with the unit to provide the main signal interface Optical transport occurs over Single Mode Fiber SMF or Multi Mode Fiber MMF Port 2 ships with factory installed EMI weatherproof plug and must remain plugged if not in use Graphic shows the OCTIS connector in blue 3 1 Optical Port 1 Connects to a Classic CAN or TEN possibly through a...

Page 11: ...otective cover or interfere with the jumper Figure 3 Notch Filter Connector on the CAP M 7E 80 85 17E 19 CAP M Hardware Options The following sections describe hardware options for the CAP M Single Mounting Bracket The Single Mounting Bracket CommScope PN 7821954 xx provides the mounting brackets required to mount an CAP M to a wall or other vertical flat surface See Mount a CAP M Using a Single M...

Page 12: ... wires and fiber at the remote end For CAP Ms you will typically use composite cable to transport signal and power and then use the Hybrid Fiber Splice Box to terminate the fiber at the CAP M See Wire an Optional Hybrid Fiber Splice Box on page 19 OCTIS Kits All CAP Ms include one OCTIS1 Kit for the primary interface to the Classic CAN or TEN that CAP M plugs into the CAP M Optical Port 1 You can ...

Page 13: ...ration Do not stare into the laser beam do not view the laser beam directly or with optical instruments High frequency radiation in operation Risk of health hazards associated with radiation from the antenna s connected to the unit Implement prevention measures to avoid the possibility of close proximity to the antenna s while in operation Keep operating instructions within easy reach and make the...

Page 14: ...ng electrically powered equipment To prevent electrical shock never install or use electrical equipment in a wet location or during a lightning storm This system is a RF Transmitter and continuously emits RF energy Maintain a minimum 8 inch 20 cm clearance from the antenna while the system is operating Whenever possible shut down the RAN before servicing the antenna Do not remove caps from any of ...

Page 15: ...quipment is in full responsibility of the installer who has also the responsibility that cables and couplers are calculated into the maximum gain of the antennas so that this value which is filed in the FCC Grant and can be requested from the FCC data base is not exceeded The industrial boosters are shipped only as a naked booster without any installation devices or antennas as it needs for profes...

Page 16: ... expositions RF 5 Notice The unit complies with Overvoltage Category II It also complies with the surge requirement according to EN 61000 4 5 fine protection however installation of an additional medium via local supply connection and or coarse protection external surge protection is recommended depending on the individual application in order to avoid damage caused by overcurrent For Canada and U...

Page 17: ...Compliance Meaning FCC For industrial Part 20 signal booster WARNING This is NOT a CONSUMER device It is designed for installation by FCC LICENSEES and QUALIFIED INSTALLERS You MUST have an FCC LICENSE or express consent of an FCC Licensee to operate this device Unauthorized use may result in significant forfeiture penalties including penalties in excess of 100 000 for each continuing violation IS...

Page 18: ...evenly that is with more bandwidth going to either the Primary or Secondary CAP M either CAP M can transmit all the 320 MHz RF bandwidth or any subset of it The Primary and Secondary CAP Ms power up as soon as power is applied to them In a cascade the GUI discovers and readies the Primary CAP M for RF first and then the Secondary CAP M will be discovered and readied for RF For information on the P...

Page 19: ...plan Identify the equipment installation site which must be able to support the weight of the CAP M see Determine the Mounting Site on page 16 Review the power requirements to make sure the site can support this installation Map out all cable runs Identify and obtain all tools and materials required to complete the installation see Recommended Tools and Material on page 15 Recommended Tools and Ma...

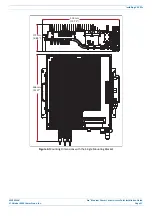
Page 20: ...cket minus the weight of the external cables and connectors that the mounting site must be able to support Use the dimensions shown in Figure 4 on page 17 for Single Mount and Figure 5 on page 18 for Dual Mount Table 5 CAP M Power Consumption Configuration Voltage Range V Typical Power W Maximum Power W DC 1 36 60 Vdc 140 150 AC 1 100 264 Vac 140 150 1 Does not include SFP Module consumption Can s...

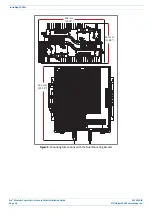
Page 21: ... Era Medium Power Carrier Access Point Installation Guide October 2018 CommScope Inc Page 17 Installing CAP Ms Figure 4 Mounting Dimensions with the Single Mounting Bracket 502 mm 19 74 175 mm 6 88 566 mm 22 27 ...

Page 22: ...um Power Carrier Access Point Installation Guide M0201AJB Page 18 October 2018 CommScope Inc Installing CAP Ms Figure 5 Mounting Dimensions with the Dual Mounting Bracket 502 mm 19 74 302 mm 11 88 565 mm 22 26 ...

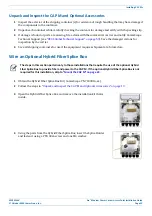
Page 23: ...ns for inspection by the carrier 4 Save all shipping containers for use if the equipment requires shipment at a future date Wire an Optional Hybrid Fiber Splice Box 1 Obtain the Hybrid Fiber Splice Box Kit CommScope PN 7693816 xx 2 Follow the steps in Unpack and Inspect the CAP M and Optional Accessories on page 19 The steps in this section pertain only to those installations that require the use ...

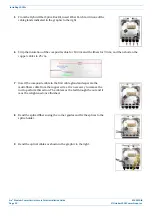
Page 24: ... cable for 100 cm and the fibers for 90 cm and then shorten the copper cables to 25 cm 7 Insert the composite cable in the first cable gland and separate the multi fibers cable from the copper wires It is necessary to remove the nut to perform this action The cable must be fed through the nut and it must be retightened once finished 8 Bend the spliced fibers using the corner guides and fix the spl...

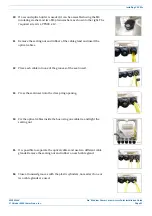
Page 25: ...ling nut and rubber of the cable gland and insert the optical cables 12 Place each cable into one of the grooves of the seal insert 13 Press the seal insert into the clamp ring opening 14 Fix the optical cables inside the box using one cable tie and tight the sealing nut 15 It is possible to separate the optical cables and use two different cable glands Remove the sealing nut and rubber on each ca...

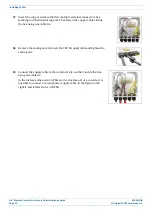
Page 26: ...Then fasten the copper cables inside the box using one cable tie 18 Remove the sealing nut and insert the CAP M supply cable and tighten the sealing nut 19 Connect the supply cable to the terminal strip and fix it inside the box using one cable tie In the instance when two CAP Ms are in a dual mount or a cascade it is possible to connect a second power supply cable In the figure to the right 1 and...

Page 27: ...njury by the weight of the unit falling Ensure there is adequate manpower to handle the weight of the system Risk of serious personal injury by equipment falling due to improper installation Installers must verify that the supporting surface will safely support the combined load of the electronic equipment and all attached hardware and components For wall mounts the screws and dowels wall anchors ...

Page 28: ...01AJB Page 24 October 2018 CommScope Inc Installing CAP Ms Mounting Orientation CAP Ms are passively cooled and must therefore always be mounted with its ANT port pointing down as shown in Figure 6 Figure 6 Mounting Orientation for a CAP M ANT port poin ng down ...

Page 29: ...19 Table 7 lists the parts that ship with the CAP M Single Mounting Bracket 3 Refer to Determine the Mounting Site on page 16 to determine the mounting location which must be able to support the weight and dimensions of the CAP M 4 Refer to Mounting Orientation on page 24 to determine the mounting orientation of the CAP M 5 Refer to and observe all cautions listed in General Mounting Cautions on p...

Page 30: ...ngbracketusing4 M6 screw anchors not included or suitable lag bolts according to the drilling layout b Confirm that the Mounting Bracket is securely fastened to the wall The M6 screw anchors do not ship with the CAP M as the anchor type is dependent on the on site conditions wall structure and materials Use screw anchors that are rated for the mounting surface Single Moun ng Bracket 1 2 3 4 1 thro...

Page 31: ...7 From both sides of the CAP M a Loosen the M6 pins leaving its washer in place b Remove the two M6 screws and their M6 plain and M6 split lock washers reserve the screws and washers as you will later reinstall them M6 plain washer M6 split lock washer M6x12 screw Loosen the M6 pin Remove the M6x12 screw and its washers ...

Page 32: ...AJB Page 28 October 2018 CommScope Inc Installing CAP Ms 8 Use both handles on the CAP M to lift it above the Mounting Bracket and then lower it into place The M6 pins that you loosened in Step 7 on page 27 must align with the Mounting Bracket slots as shown below ...

Page 33: ...cope Inc Page 29 Installing CAP Ms 9 On the right side of the CAP M slide a washer over the threaded M6 pin and then secure the CAP M to the Mounting Bracket by torquing the M6 pin to 11 N m 10 Repeat Step 9 on the left side of the CAP M Align the M6 pins with the Moun ng Bracket slots ...

Page 34: ...he M6 split lock washer over the M6x12 screw b Insert the M6x12 screw through the screw hole shown below and screw it back into the CAP M chassis torque to 11 N m 12 Repeat Step 11 on the left side of the CAP M 13 Do one of the following If this installation requires a Hybrid Fiber Splice Box go to Attach a Hybrid Fiber Splice Box to the CAP M on page 42 If this installation does not a Hybrid Fibe...

Page 35: ...ure 7 Two CAP Ms Back to Back in a Dual Mounting Bracket Do the following to mount two CAP Ms in a Dual Mounting Bracket 1 Obtain the Dual Mounting Bracket CommScope PN 7821954 xx 2 Follow the steps in Unpack and Inspect the CAP M and Optional Accessories on page 19 Table 8 lists the parts that ship with the CAP M Dual Mounting Bracket Table 8 Parts List for CommScope PN 7821954 XX Description Qua...

Page 36: ...g Bracket to the wall or other suitable vertical surface as shown below a Install the mounting bracket using 4 M6 screw anchors not included or suitable lag bolts according to the drilling layout b Confirm that the bracket is securely fastened to the wall Installer must verify that the mounting surface will safely support the combined load of the electronic equipment and all attached hardware and ...

Page 37: ... 7 From both sides of CAP M 1 a Loosen the M6 pins leaving its washer in place b Remove the two M6 screws and their M6 plain and M6 split lock washers reserve the screws and washers as you will later reinstall them M6 plain washer M6 split lock washer M6x12 screw Loosen the M6 pin Remove the M6x12 screw and its washers ...

Page 38: ...ower it into place The M6 pins that you loosened in Step 7 on page 33 must align with the Mounting Bracket slots as shown below The washer for each M6 pin should be next to the CAP M 1 chassis inside the bracket 9 On the right side of the CAP M 1 torque the M6 pin to 11 N m 10 Repeat Step 9 on the left side of the CAP M M6 Pin with its washer on the inside of the bracket against the CAP M1 chasssi...

Page 39: ... and its washers that you removed in Step 7 on page 33 a Slide first the M6 split lock washer and then the M6 plain washer over the M6x12 screw b Insert the M6x12 screw through the screw hole shown below and screw it back into the CAP M 1 chassis torque to 11 N m 12 Repeat Step 11 on the left side of the CAP M 1 M6x12 screw and washer set in hole closest to the moun ng surface ...

Page 40: ...er 2018 CommScope Inc Installing CAP Ms 13 From both sides of CAP M 2 a Loosen the M6 pins leaving its washer in place b Remove the two M6 screws and their washers reserve the screws and washers as you will later reinstall them Loosen the M6 pin Remove the M6 screw and its washer ...

Page 41: ...lower it into place The M6 pins that you loosened in Step 13 on page 36 must align with the Mounting Bracket slots as shown below The washer for each M6 pin should be next to the CAP M 2 chassis inside the bracket 15 On the right side of the CAP M 2 torque the M6 pin to 11 N m 16 Repeat Step 15 on the left side of the CAP M CAP M 2 back of the CAP M 2 chassis faces the back of CAP M 1 M6 Pin with ...

Page 42: ...sher over the M6x12 screw b Insert the M6x12 screw through the screw hole shown below and screw it back into the CAP M chassis torque to 11 N m 18 Repeat Step 11 on the left side of CAP M 2 19 Do one of the following If this installation requires a Hybrid Fiber Splice Box go to Attach a Hybrid Fiber Splice Box to the CAP M on page 42 If this installation does not a Hybrid Fiber Splice Box go to Gr...

Page 43: ...t for Up to 18 Poles CommScope PN 7692096 XX Do the following to assemble the CAP M Pole Mounting Kit for Up to 18 Poles mount the kit to a pole and then mount the CAP M on the mounting kit 1 Obtain the CAP M Pole Mounting Kit for Up to 18 Poles CommScope PN 7692096 XX 2 Obtain either a Single Mounting Bracket Kit CommScope PN 7821955 xx or a Dual Mounting Bracket Kit CommScope PN 7821954 xx as re...

Page 44: ...x to the two screw pins on one of the two Pole Mounting Brackets Attach the M6 nut and washers in the order shown a Slide one M6 plain washer 7A over each screw pin b Slide one M6 split lock washer 7B over each screw pin next to the M6 plain washer c Secure one M6 Hexagon Nut 7A to the end of each screw pin and then torque to 11 N m 8 Repeat Step 7 on the second Pole Mounting Bracket Table 9 Parts...

Page 45: ...ght threaded bolts will protrude to the other side of the pile 12 The second installer should now attach one of the Brackets to the top four threaded bolts that protrude past the pole Install the M8 nut and washers in the order shown a Slide one M8 plain washer 12A to one end of each of the four threaded bolts b Slide an M8 split lock washer 12B next to the M8 plain washer c Use an M8 nut 12C to s...

Page 46: ...x for a Dual Mount Installation on page 44 Attaching a Hybrid Fiber Splice Box for a Single Mount Installation 1 Hang the Splice Box onto the Single Mounting Bracket on the right hand side of the CAP M as shown below The steps in this section pertain only to those installations that require the use of the optional Hybrid Fiber Splice Box to provide fiber and power to the CAP M If the optional Hybr...

Page 47: ...the front cover of the Splice Box 3 Open the Splice Box 4 Attach an M4 x 25 pan head screw to the upper hole and a second M4 x 25 pan head to the hole on the lower right hand side of the Splice Box 5 Close the Splice Box 6 Replace the six neck screws that you removed from the front cover of the Splice Box in Step 2 on page 43 7 Go to Grounding the CAP M on page 46 ...

Page 48: ...AP Ms Attaching a Hybrid Fiber Splice Box for a Dual Mount Installation 1 Break the left hand side hook of the Splice Box bracket This is necessary for proper mounting 2 Hang the Splice Box onto the Dual Mounting Bracket on the left hand side of the CAP M as shown below Dual Moun ng Bracket Hybrid Fiber Splice Box ...

Page 49: ...nt cover of the Splice Box 4 Open the Splice Box 5 Attach an M4 x 25 pan head screw to the upper hole and a second M4 x 25 pan head to the hole on the lower left hand side shown at right of the Splice Box 6 Close the Splice Box 7 Replace the six neck screws that you removed from the front cover of the Splice Box in Step 3 on page 45 8 Go to Grounding the CAP M on page 46 ...

Page 50: ...bonding cable between the two washers as shown to the right 3 Secure the earth bonding cable by tightening the M6hex nut s that you loosened in the preceding step 4 Connect the other end of the earth bonding cable to a suitable permanent ground per local electrical code practices 5 Follow the steps in Connect the CAP M Cables on page 47 The CAP M must be grounded Do not use the grounding bolts to ...

Page 51: ...Single Mode Fiber SMF or Multi Mode Fiber MMF that is of sufficient length to reach from the CAP M to the Classic CAN or TEN Obtain at least one Optical OCTIS Kit PN 7770612 All installations require one Optical OCTIS Kit which is included in the CAP M shipment If cascading a Secondary CAP M a second Optical OCTIS Kit is required Obtain SFP Module pairs that are appropriate for this installation T...

Page 52: ...cal port for each SFP Module 3 Clean the connectors on the SMF or MMF following the fiber supplier s recommendations 4 Install the SFP connector and Optical OCTIS Kit on the end of the SMF or MMF that will connect to the CAP M and then connect that end of the fiber to the CAP M Optical Port 1 connector Refer to the technical data sheet that ships with the OCTIS Kit for further information 5 Use th...

Page 53: ...CAP M For the CAP M to operate the Mains power must be connected to the CAP M Mains connector Either an AC or a DC power cable is delivered with each CAP M the type of power cable delivered is dependent on the type of power supply in the CAP M If you are not connecting an Ethernet device do not remove the plug from Port A Cat6A including all Cat6A cables Cat6A Patch Cords and Patch Panels between ...

Page 54: ...n The AC power cable is shown in Figure 9 Figure 9 CAP M AC Power Cable CAP M DC Power Cable The standard CAP M DC power cable is a 3 2 m 10 5 ft 13 AWG cable with a 4 pin Amphenol C016 series plug on one end to connect to the CAP M Mains connector The other end of the cable is unterminated with 2 end splices to connect to the 48 Vdc power source The standard DC power cable is shown in Figure 10 F...

Page 55: ...page 50 for the AC power cable Figure 10 on page 50 for the DC power cable 4 With the cable s Mains plug disconnected from the CAP M turn the circuit breaker on unscrew the plug s protective cover and carefully test the plug with a voltmeter to ensure that the voltage and polarity are correct 5 Once the testing has been completed turn off the circuit breaker 6 Unscrew the protective cover from the...

Page 56: ...inside the locally mounted CAP M Hybrid Fiber Splice Box Power the CAP M The CAP M is powered on as soon as power is connected to it Under normal operating conditions the Power LED turns on briefly when the unit is first detected It will then go out briefly followed by an initialization period during which the Power LED flashes slowly while the CAP M is configured The Power LED remains a steady bl...

Page 57: ...nk http www commscope com wisupport Enter the preceding URL into your web browser and then press ENTER on your keyboard Waste Electrical and Electronic Equipment Recycling Country specific information about collection and recycling arrangements per the Waste Electrical and Electronic Equipment WEEE Directive and implementing regulations is available on CommScope s website To access information on ...

Page 58: ...eparate course panels for further information on a course click its Full details button Instructor led courses are conducted in North America and Europe Before choosing a course please verify the region 3 To view the course schedule and register click Course Registration at the top of the course page this opens the Partner Learning Center Login page If you have an account enter your Username and P...

Page 59: ...can go to the following web address to access the portal www mycommscope com 2 Access to the Customer Portal requires a user account and password On the Sign In page do one of the following If you have an account enter your Email address and Password and then click Sign In If you don t have an account click New user registration and follow the prompts 3 Click DCCS to open the site 4 Select your si...

Page 60: ......

Reviews: