background image

408- 4457

Rev


J

10

of 16

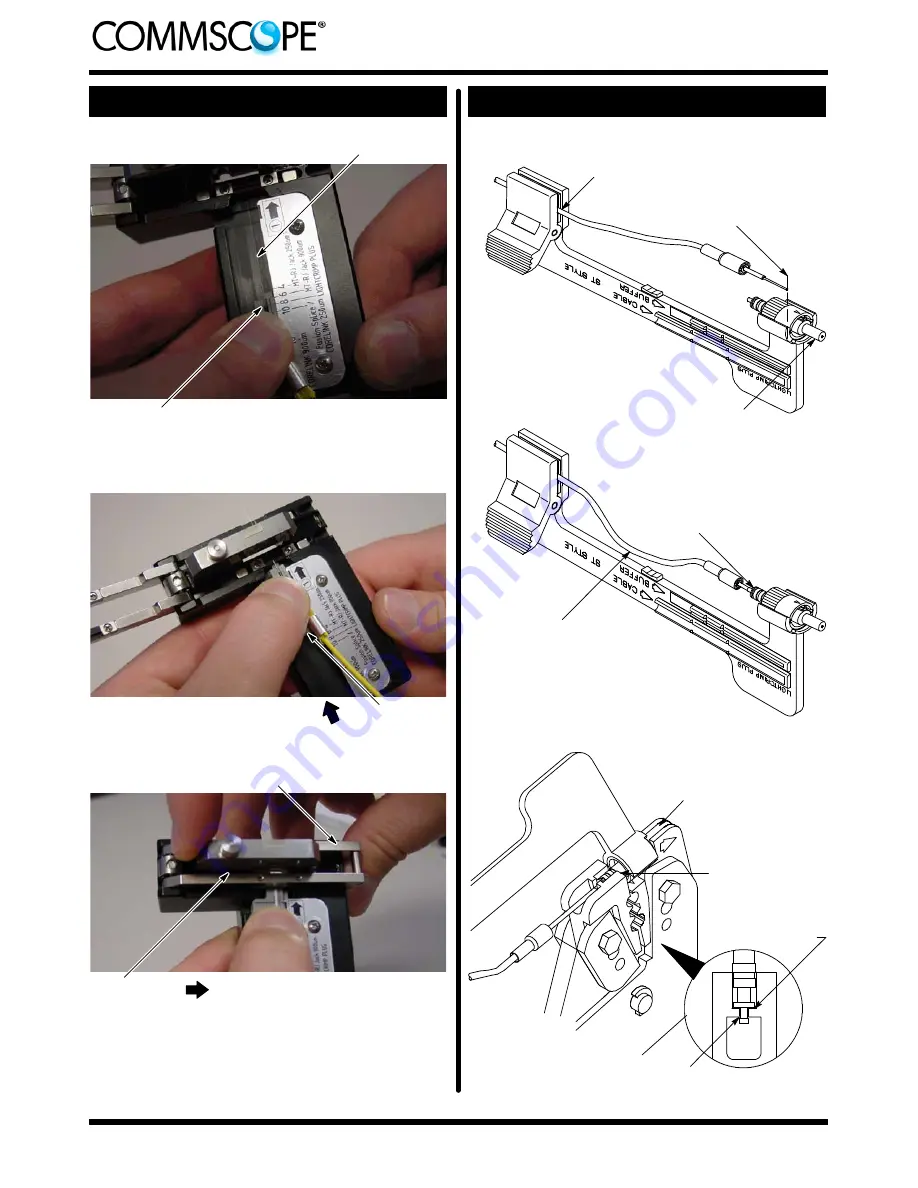
Figure 8: Cleaving

Detail A

Detail B

Detail C

Stripped Fiber in Slot

End of Buffer at

8--mm Marking

Slide Fiber Slide

Forward

Slide Carriage

Forward

Fiber Clamp Closed

Tip in Channel

Disk Flat Against

Wall of Cavity

Ferrule in Upper Cavity of

Front Die and Pointing in

Direction of Arrow

Detail C

Figure 9: Crimping

Plunger in Upper

Cavity of Rear Die

Detail A

Detail B

Fiber Bottomed in

Plunger of Connector

Assembly

Bend Formed to

Hold End of Fiber

in Place

Ferrule Facing

Outward

Buffer Held in

Cable Clamp

Cleaved End of Fiber

Even with Front of Arm

of Cable Holder

Summary of Contents for LightCrimp Plus ST

Page 1: ...ic units Dimensions are in millimeters Figures are not drawn to scale Reasons for reissue of this instruction sheet are provided in Section 6 REVISION SUMMARY 2 DESCRIPTION See Figure 1 Each connector kit consists of a connector assembly strain relief inner eyelet crimp eyelet black tubing and clear tubing Each kit is also supplied with a bare buffer boot and small tubing to compensate for small d...

Page 2: ... tool make sure that the V opening is clean otherwise the fiber could break Only use isopropyl alcohol on the tool B Cleaving Figure 3 1 Open the fiber clamp of the fiber optic cleaver Press the button and slide the carriage back toward the fiber clamp Then move the fiber slide back until it stops 2 Place the stripped fiber into the slot so that the end of the buffer is at the 8 mm marking See Fig...

Page 3: ...oot over the plunger until the boot butts against the connector See Figure 5 Detail C 9 Remove the connector assembly from the cable holder The assembly procedure for 900 mm bare buffered fiber is now complete If connecting connectors inspect the ferrule end face for cleanliness using 200 Microscope Kit 1754767 1 includes 2 5 mm adapter cap 5 2 250 mm Coated Fiber Kit Components Required Discard O...

Page 4: ...om the contact with the internal fiber during the crimping operation 3 Squeeze the tool handles of the hand tool until the ratchet releases Allow the handles to open fully Slowly close the handles until you hear three clicks from the ratchet 4 With the connector assembly in the cable holder position the ferrule protective cover in the upper cavity of the front die and the plunger in the upper cavi...

Page 5: ...f Strip Hold Strip Tool at 45 _ Angle Approx to Fiber Strip Tool Detail C Buffer 900 m m Bare Fiber or Fiber 250 mm Coated Fiber Tip of Buffer 900 mm Bare Fiber or Fiber 250 mm Coated Fiber Against End of Channel Mark Buffer or Fiber at Cross Slots Cable Holder Assembly Detail B Figure 3 Cleaving Detail A Detail B Detail C Stripped Fiber in Slot End of Buffer at 8 mm Marking Slide Fiber Slide Forw...

Page 6: ...End of Fiber Even with Front of Arm of Cable Holder Ferrule in Upper Cavity of Front Die and Pointing in Direction of Arrow Plunger in Upper Cavity of Rear Die Detail A Figure 5 Crimping Tip in Channel Disk Flat Against Wall of Cavity Bare Buffer Boot Over Plunger and Against Connector Detail C Detail B Plunger in First Cavity of Front Die with Ferrule Pointing in Direction of Arrow Shoulder of Pl...

Page 7: ...to the buffer and using the crimp eyelet fold the strength members back over the jacket Continue sliding the crimp eyelet over the jacket until the strength members appear at the front of the crimp eyelet See Figure 7 Detail A 8 Slide the inner eyelet non flanged end first onto the buffer Push the inner eyelet under the strength members until the inner eyelet is flush with the front of the crimp e...

Page 8: ...he direction of the arrows must be observed Refer to Figure 9 Detail C and Figure 10 Detail A 5 Gently push the buffer toward the connector to make sure that the fiber is still bottomed then slowly squeeze the tool handles together until the ratchet releases Allow the handles to open fully and remove the connector assembly from the dies 6 Position the plunger of the connector assembly in the first...

Page 9: ...ng Tip of Jacket Against End of Channel Mark Jacket at Cross Slots Detail B Connector in Holder with Ferrule Facing Outward Cable Holder Assembly Inner Eyelet Under Strength Members Strength Members Folded Over Jacket Detail A Small Diameter End of Crimp Eyelet Detail B Figure 7 Preparing the Cable Detail D Strip Buffer in Sections to First Mark Direction of Strip Hold Strip Tool at 45_ Angle Appr...

Page 10: ...n Channel Disk Flat Against Wall of Cavity Ferrule in Upper Cavity of Front Die and Pointing in Direction of Arrow Detail C Figure 9 Crimping Plunger in Upper Cavity of Rear Die Detail A Detail B Fiber Bottomed in Plunger of Connector Assembly Bend Formed to Hold End of Fiber in Place Ferrule Facing Outward Buffer Held in Cable Clamp Cleaved End of Fiber Even with Front of Arm of Cable Holder ...

Page 11: ...igure 10 Crimping For 2 0 to 2 4 mm Jacketed Cable Black Tubing Detail A Large Diameter End of Crimp Eyelet in Last Cavity of Front Die with Ferrule Pointing in Direction of Arrow Small Diameter End of Crimp Eyelet in Middle Cavity of Front Die with Ferrule Pointing in Direction of Arrow Strain Relief Over Plunger and Against Connector Detail C Detail B Figure 11 Crimping ...

Page 12: ...l See Figure 12 Detail D Also place a mark on the buffer at the end of the channel Remove the fiber from the channel 8 Using the strip tool strip the 250 m m fiber coating and buffer back to the first mark It is recommended holding the tool at an angle to the fiber and stripping the coating in three sections See Figure 12 Detail E Clean the fiber with an alcohol fiber wipe to remove the fiber coat...

Page 13: ...of the cavity If the plunger is not positioned correctly it will be crushed when the tool is actuated See Figure 15 Detail A The arrows marked on the front die indicate the direction that the ferrule protective cover must be pointing when the connector is positioned in that cavity For proper placement and to avoid damage to the fiber the direction of the arrows must be observed Refer to Figure 15 ...

Page 14: ...paring the Fiber Strip Tool Inner Eyelet Clear Tubing Detail D Connector Assembly in Holder with Ferrule Facing Outward Tip of Buffer Tube Break Out Fiber or Fiber Easy Strip or Semi Tight Against End of Channel Mark Fiber at Cross Slots Mark Buffer Tube at End of Channel Detail A Detail B Detail C Stripped Fiber in Slot End of Buffer at 8 mm Marking Slide Fiber Slide Forward Slide Carriage Forwar...

Page 15: ...ace Cleaved End of Fiber Even with Front of Arm of Cable Holder Tip in Channel Disk Flat Against Wall of Cavity Ferrule in Upper Cavity of Front Die and Pointing in Direction of Arrow Detail A Figure 15 Crimping Figure 15 Crimping Plunger in Upper Cavity of Rear Die Detail C Detail B Plunger in First Cavity of Front Die with Ferrule Pointing in Direction of Arrow Shoulder of Plunger Against Edge o...

Page 16: ...f Arrow Small Diameter End of Crimp Eyelet in Middle Cavity of Front Die with Ferrule Pointing in Direction of Arrow Strain Relief Over Plunger and Against Connector Detail C Detail B 6 REVISION SUMMARY Revisions to this instruction sheet include Updated document to corporate requirements DANGER Never View Active Fiber Signals Rebranded to CommScope ...

Reviews: