background image

ADCP-96-040 • Rev D • January 2018

Page 18

© 2018, CommScope, Inc.

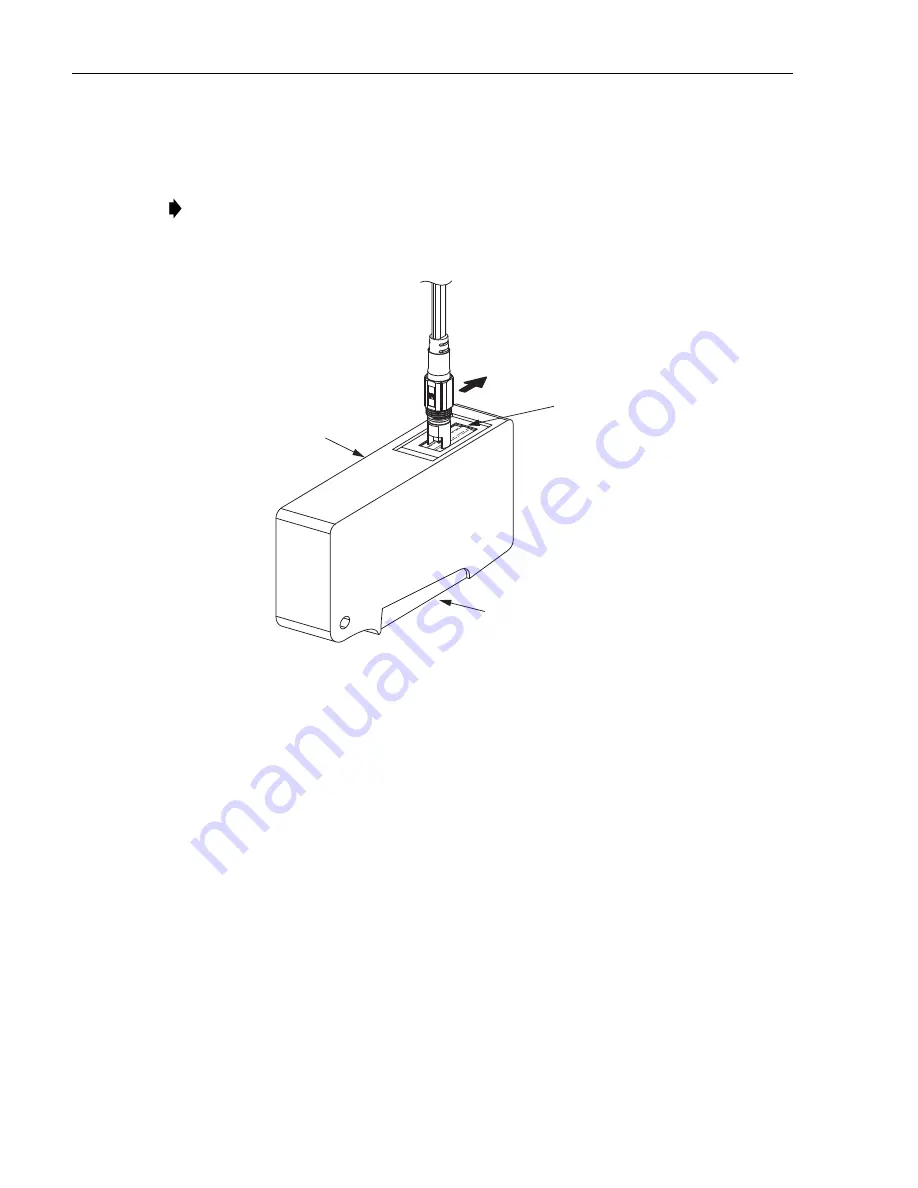
5. Hold the end-face of the drop cable connector perpendicular to the cleaning tape

and with the 

high side

 of the connector pointing in the direction of cleaning as

shown in 

Figure 19

Figure 19. Cleaning Drop Cable Connector

6. With 

light pressure

, slide the connector end-face once across the tape in the

direction shown using a smooth linear motion. Do not press too hard and do not
repeat the cleaning motion with the same tape. 

7. Release the lever on the underside of the cassette to close the tape shutter. 

8. Repeat steps 3 through 6 until the connector has been cleaned three times. 

9. When the connector is clean, reinstall the drop cable dust cap and tighten until

finger tight. 

7.2

MST Adapter/Connector Cleaning Procedure

Cleaning kit (FHD-ACC-CLNKIT1) is required for this procedure. Use the following
procedure to clean the MST optical port adapters and the internal connectors: 

1. Using a 216B key tool, unthread the optical port dust cap from the optical port

adapter. 

2. Locate the dry swabs that are provided with the connector/adapter cleaning kit. 

Note: 

The drop cable connector uses angled SC type connectors. Make sure the

high side of the connector end-face is pointing in the direction of the cleaning
motion. 

DIRECTION

OF CLEANING

RAISED

PLATEN STRIP

BENEATH WIPE

20402-A

CLEANING

CASSETTE

REPEAT CLEANING PROCEDURE
THREE TIMES USING A CLEAN 
TAPE FOR EACH PASS. RELEASE 
AND RE-SQUEEZE LEVER TO 
ADVANCE THE TAPE

LEVER

Summary of Contents for OmniReach FTTX Solutions

Page 1: ...ADCP 96 040 Rev D www commscope com ADCP 96 040 Rev D January 2018 23157 A FTTX Solutions Multiport Service Terminal User Manual OmniReach ...

Page 2: ...hall CommScope Inc be liable for any damages resulting from loss of data loss of use or loss of profits and CommScope Inc further disclaims any and all liability for indirect incidental special consequential or other similar damages This disclaimer of liability applies to all products publications and services during and after the warranty period This publication may be verified at any time by con...

Page 3: ... 6 3 GENERAL INSTALLATION INFORMATION 6 3 1 Cable Handling Recommendations 6 3 2 Fiber and Port Configuration 8 4 MOUNTING THE MULTIPORT SERVICE TERMINAL 8 4 1 MST Mounting Options 8 4 2 Installing the UMB and MST 10 5 USING HARDENED CONNECTORS AND ADAPTERS 13 5 1 Connector Components 13 5 2 Connecting Drop Cable to MST Optical Port 14 5 3 Disconnecting Drop Cable From MST Optical Port 15 6 GROUND...

Page 4: ...ADCP 96 040 Rev D January 2018 Preface Page iv 2018 CommScope Inc TABLE OF CONTENTS Content Page TABLE OF CONTENTS ...

Page 5: ...96 124 Rapid MST Instruction Sheet ADCP 96 168 ADMONISHMENTS Important safety admonishments are used throughout this manual to warn of possible hazards to persons or equipment An admonishment identifies a possible hazard and then explains what may happen if the hazard is not avoided The admonishments in the form of Dangers Warnings and Cautions must be followed at all times These warnings are flag...

Page 6: ...eceiving an electrical shock when installing or using electrically powered equipment To prevent electrical shock never install or use electrical equipment in a wet location or during a lightning storm Caution Fiber optic cables may be damaged if bent or curved to a radius that is less than the recommended minimum bend radius Always observe the recommended bend radius limit when installing fiber op...

Page 7: ...litport Service Terminals The MST uses hardened adapters for the optical ports A hardened adapter consists of a standard SC adapter that is enclosed within a protective housing The housing provides sealed environmental protection for the adapter The opening to each optical port is sealed with a threaded dust cap that prevents the entry of dirt and moisture A standard 216B security tool accessory c...

Page 8: ...ETER SPECIFICATION 2xN Dimensions LxWxD See Figure 2 MST 2 MST 4 MST 6 MST 8 MST 12 Note Includes universal mounting bracket 11 12 x 5 1 x 3 31 Inches 28 24 x 12 95 x 8 41 cm 16 32 x 5 1 x 3 31 Inches 41 45 x 12 95 x 8 41 cm 21 53 x 5 1 x 3 31 Inches 54 69 x 12 95 x 8 41 cm 2xN Weight without cable MST 2 MST 4 MST 6 MST 8 MST 12 Note Includes universal mounting bracket 1 9 lbs 0 86 kg 3 0 lbs 1 36...

Page 9: ... Installed 5 5 INCHES 12 95 CM 11 12 INCHES 28 24 CM 16 32 INCHES 41 45 CM 3 31 INCHES 8 41 CM 3 31 INCHES 8 41 CM 3 31 INCHES 8 41 CM 5 5 INCHES 12 95 CM 5 5 INCHES 12 95 CM 21 52 INCHES 54 69 CM 11 26 INCHES 28 60 3 625 INCHES 9 21 CM 7 4 INCHES 18 8 CM 4X3 4 6 8 12 PORT 2XN 2 4 PORT 2XN 6 8 PORT 2XN 12 PORT 23159 A ...

Page 10: ...T is designed for outdoor applications and can be installed in a hand hole or pedestal mounted on a utility pole or over head cable or secured to any flat surface A universal mounting bracket is included with each MST The MST meets the environmental criteria specified in the referenced specifications and can withstand direct exposure to extreme temperatures and humidity is resistant to water penet...

Page 11: ...nnection with the Rapid outside plant family of products Refer to the appropriate equipment manual for complete information about routing and connecting HMFOC cables Stub Cable Installation and Splicing Stubbed MST cables must be routed to a separate splice enclosure not provided and spliced to the network distribution cable Refer to Section 3 for general cable pulling guidelines and cable install...

Page 12: ...e number of ports on the MST enclosure the MST cable may be coiled up and placed in box or it may be wound on a spool Use the following cable handling procedures when removing the cable from the packaging materials MST In a Box If the MST is placed in a box with other MST s carefully remove the packaging material to expose the cable coil and the MST as shown in Figure 4 Leave the MST on top and in...

Page 13: ...ng the MST cable Standard Flat Drop Cable Maintain a minimum bend radius of 15 cm 6 inches during installation and 10 cm 4 inches when installed Armored Round Drop Cable Maintain a minimum bend radius of 18 2 cm 7 2 inches during installation and 9 1 cm 3 6 inches when installed 23160 B FOUR MST S PER TRAY TWO MST S PER TRAY ONE MST PER TRAY REMOVE 6 32 SCREWS FROM FANOUT ASSEMBIES THAT NEED TO BE...

Page 14: ...rocedures for the MST 4 1 MST Mounting Options The MST may be mounted using anyone of several standard OSP enclosures However the MST does not require any type of OSP enclosure and may be mounted in the open from a pole or strand The following describes the various mounting options for the MST Hand Hole Mounting below ground A hand hole enclosure examples shown in Figure 6 is an OSP below ground m...

Page 15: ...mbly and a top cover The base assembly mounts partly in the ground Cables and conduit enter the base assembly from the bottom Figure 7 Pedestal Mounting Pole Mounting aerial The MST may be mounted on a utility pole as shown in Figure 8 The UMB may be attached to the pole with lag screws or construction screws Other than the fasteners no additional parts are required for pole mounting 21120 B CHANN...

Page 16: ...snaps into the UMB Figure 9 Strand Mount Installation 4 2 Installing the UMB and MST The Universal Mounting Bracket UMB is included with each MST and is used for mounting the MST The UMB may be attached to various mounting surfaces using a variety of fasteners as shown in Figure 10 Multiple holes and slots are provided in the UMB to accommodate different fasteners including screws nails and cable ...

Page 17: ...TH LAG SCREWS USE SIDE HOLES WHEN SECURING UMB WITH CONSTRUCTION SCREWS POLE MOUNT STRAND MOUNTING THE UMB USING Deltec CABLE STRAPS STRAND MOUNT STRAND MOUNT BRACKET KIT MST ACC M02 REFER TO ADCP 96 124 FOR THE BRACKET KIT INSTALLATION PROCEDURES HAND HOLE LEDGE MOUNT HAND HOLE HANGER MOUNT HAND HOLE SWING ARM MOUNT FLAT BRACKET MOUNT HAND HOLE OR PEDESTAL 8 16 X 1 2 INCH THREAD ROLLING SCREWS FO...

Page 18: ...o the UMB with cable ties as shown in Figure 12 Figure 12 Securing Front of Strand Mounted MST With Cable Ties 23155 A 1 1 2 2 2 PUSH ON FRONT OF MST UNTIL LATCH SNAPS SHUT 1 INSERT CABLE END OF MST INTO THE UMB 23156 A DETAIL DRAWING OF CIRCLED AREA INSTALL CABLE TIES IN THE TWO HOLES SHOWN STRAND MOUNT BRACKET KIT MST ACC M02 REFER TO ADCP 96 124 FOR THE BRACKET KIT INSTALLATION PROCEDURES ...

Page 19: ...cable connector are shown in Figure 13 The dust cap threads onto the connector coupling nut A pair of O rings on the connector body provide a tight seal when the dust cap is in place A pulling eye is provided in the end of the dust cap for pulling the drop cable through conduit Figure 13 Drop Cable Connector Components The basic components of the MST optical port hardened adapter are shown in Figu...

Page 20: ...n the drop cable connector with the optical port as shown in Figure 15 The pointer on the drop cable connector should line up with the notch on the optical port Figure 15 Connecting Drop Cable To MST Optical Port 6 Insert the drop cable connector into the optical port If the drop cable connector does not insert all the way to the bottom of the port rotate drop cable connector slightly to either si...

Page 21: ...r coupling nut from the optical port see Figure 15 3 Inspect the optical port dust cap O ring for dryness and apply O ring lubricant MST ACC LUBE1 to the O ring if dry Refer to Section 7 for the required procedure 4 Thread the optical port dust cap into the optical port and tighten using the 216B key tool see Figure 14 5 Inspect the drop cable connector O rings for dryness and apply O ring lubrica...

Page 22: ... to connect a grounding wire to the MST grounding stud 1 Obtain a compression type single hole ring terminal not provided to use for terminating the grounding wire The ring terminal must be the appropriate size for the gauge of the grounding wire and the hole must be at least 1 4 inch in diameter 2 Trim the grounding wire to the appropriate length and terminate it with the ring terminal requires c...

Page 23: ...or 2 Examine the end of the drop cable connector and determine which is the high side which is the low side of the connector end face as shown in Figure 18 Figure 18 Angled Connector End Face Detail 3 Locate the cleaning tape cassette that is provided with the cleaning kit 4 Open the tape shutter by squeezing the lever on the underside of the cassette and then keep the shutter open by continuing t...

Page 24: ...es 9 When the connector is clean reinstall the drop cable dust cap and tighten until finger tight 7 2 MST Adapter Connector Cleaning Procedure Cleaning kit FHD ACC CLNKIT1 is required for this procedure Use the following procedure to clean the MST optical port adapters and the internal connectors 1 Using a 216B key tool unthread the optical port dust cap from the optical port adapter 2 Locate the ...

Page 25: ...cal port dust cap are lubricated when shipped from the factory to prevent damage during installation If the O rings become excessively dry they may require additional lubrication to prevent damage Remove the O rings from the connector or dust cap and apply a small amount of lubricant directly to each ring Then reinstall the O rings on the connector or dust cap Apply only the recommended O ring lub...

Page 26: ...nstructions for replacing a damaged internal optical connector 8 CUSTOMER INFORMATION AND ASSISTANCE To find out more about CommScope products visit us on the web at www commscope com For technical assistance customer service or to report any missing damaged parts visit us at http www commscope com SupportCenter ...

Reviews: