background image

2

communityplaythings.co.uk

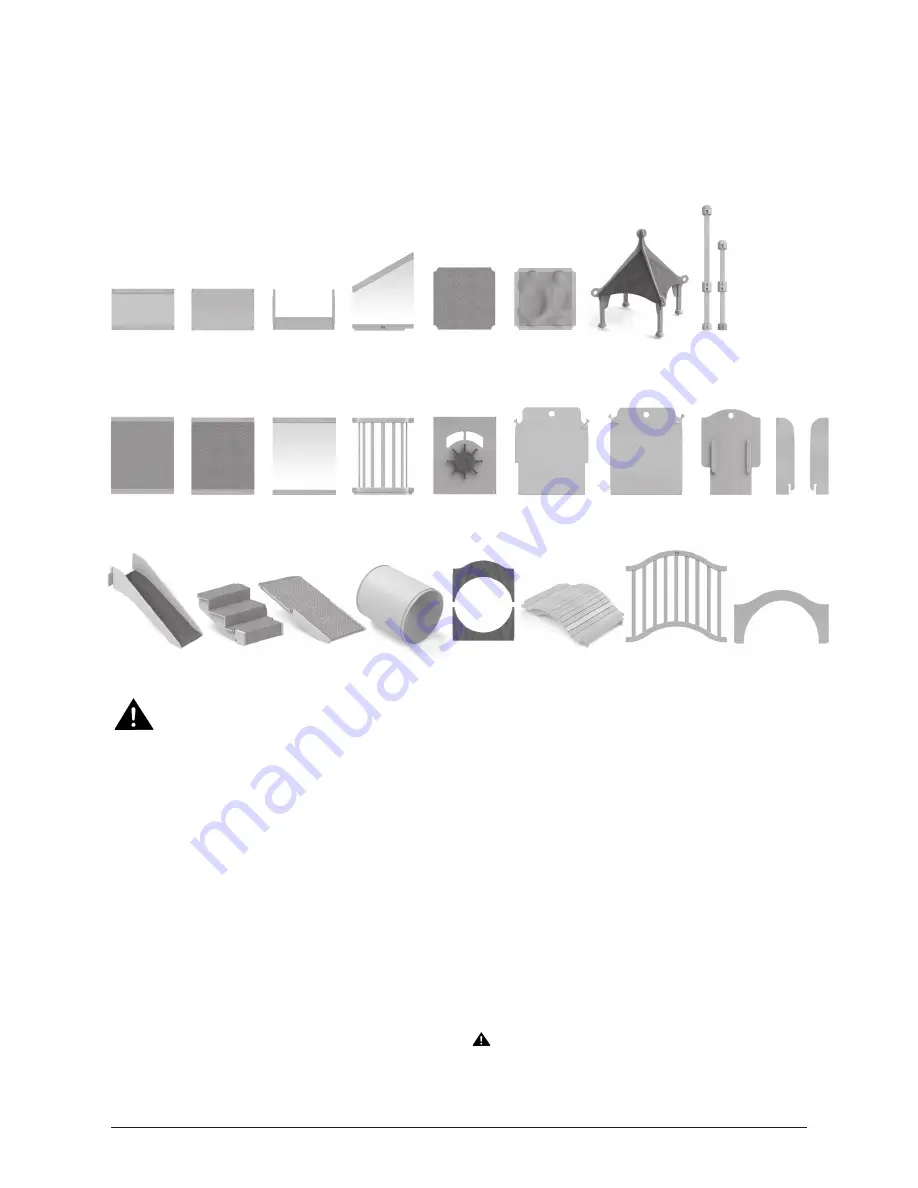
Stairs

Ramp

Roof

Tunnel cradles

Bridge railing

Bridge brace

Slide gate  Slide handles

Steering wheel

Mirror panel

Carpet panel

Ramp gate

Stair gate

Clear panel

Balcony

Small plywood

Carpet platform

Small mirror

Banister brace

Terrain platform

Banister panel

Bridge

Lay the pieces of your Nursery gym on the floor. You will see which parts you 

need to build the kit you have using the chart on the facing page. The short 

panels are for the first layer of the gym; the tall ones are for the second layer. 

Make sure you have all the parts before beginning to build your gym. If any 

parts are broken or missing, call customer service  at 0800 387 457. 

Getting started

Long post (with cap and 
four connector rings)

Short post (with 
cap and four 
connector rings)

Warnings

Failure to follow these warnings and the assembly 

instructions could result in serious injury or death.


S

This product is intended for use by children of immature judgment; 
therefore supervision is required at all times.


S

The Nursery Gym is appropriate for ages 6 to 36 months.


S

Do not attempt to build or take apart your gym by yourself. You 
need at least two adults working together to do this safely.


S

Children should not be in the room during setup.


S

Test the joints for stability before allowing children to play on the 
structure.


S

Use the layouts supplied in this product guide. We cannot take 
responsibility for free-form structures. How ever, you may exchange 
panels of like size and shape within your set.


S

Do not provide anything on the top level of your gym which 
children can use to climb over the sides.


S

When the youngest children are using the Nursery gym, the slide is 
the area requiring the most adult supervision. Use the gate at the 
top of the slide when there is insufficient supervision.


S

Your Nursery gym must be directly against the wall of your room, 
or more than 50 cm away. Any gym with a tunnel must be 50 cm 
minimum from the wall. This is to avoid dangerous gaps and to 
provide adult access around the gym. 


S

When placing nursery gym, ensure a one metre clearance zone all 
around  the gym unless against a wall as above. Keep doorways 
and other traffic zones in mind.


S

Ensure that the clearance zone is free from sharp edged objects or 
projections.


S

Do not use with the balcony against the wall as this creates a 
dangerous gap. 


S

Do not place the stairs alongside the slide as this creates a 
dangerous gap.


S

To change a lower level panel you must disassemble your gym.

This product complies with BS EN 1176-1.     


CAUTIONS


S

This product is intended for indoor use only.

Tunnel

Slide

Summary of Contents for Nursery gym

Page 1: ...ty techniques you need to build your gym The best part is next choosing which one of the patterns fits your room and your ideas Getting started 2 Maintaining your gym 3 Basic skills 4 Up and over 6 Sand dune 7 Climb and crawl 8 Climb and slide 8 Billy goat s bridge 9 Knightsbridge 10 Tower bridge 11 Mole hole 12 Gnome home 13 Rapunzel s tower 14 Windsor 15 The palace 16 Nursery gym IMPORTANT Retai...

Page 2: ...dren should not be in the room during setup S STest the joints for stability before allowing children to play on the structure S SUse the layouts supplied in this product guide We cannot take responsibility for free form structures How ever you may exchange panels of like size and shape within your set S SDo not provide anything on the top level of your gym which children can use to climb over the...

Page 3: ... without our supervision testing or evaluation Ordering parts To order replacement parts contact customer service with a description of the part s needed and the ID code from the product Use only replacement parts supplied by Community Playthings Stairs Ramp Banister panel Banister brace Slide with gate Bridge with rails Tunnel Carpet platform Terrain platform Roof Balcony Steering wheel Mirror pa...

Page 4: ...ld your gym To add the next panel lift one of the connector rings and use it to capture the new panel Assemble the first layer of your gym by following the pattern you have chosen The banister brace is used between 2 short posts under the stairs and ramp Go slowly it is hard to replace a panel after a layer is placed on top To add the stairs or ramp you will need to unscrew the caps and slide off ...

Page 5: ... and bottom cradles are interlocked and positioned in the barrel grooves Once the bridge braces are in place lay the bridge surface on top Install the bridge railings with the brand facing out Insert the balcony the same way as any other upper panel To add the slide make sure both sides are captured by the connector rings Then add the two slide handles on top locking them in place with the top con...

Page 6: ... 1 4 m 1 8 m 0 7 m 2 5 m 1 8 m 1 4 m Up and over G801 and G806 Up and over with roof G802 and G807 Up and over Choose lower mirror locations before you start Choose lower mirror locations before you start Remove four top caps to install roof ...

Page 7: ...m 2 5 m Up and over with balcony G803 and G808 Up and over continued Choose lower mirror locations before you start Sand dune Sand dune with slide G820 and G825 Choose lower mirror locations before you start Sand dune with slide ramp G821 and G826 Choose lower mirror locations before you start Basic skills on page 4 ...

Page 8: ...17 Climb and slide with roof G811 and G816 Climb and crawl Climb and crawl G800 and G805 Basic skills on page 4 Choose lower mirror locations before you start Climb and slide Choose lower mirror locations before you start Choose lower mirror locations before you start Remove four top caps to install roof Choose lower mirror locations before you start Remove four top caps to install roof ...

Page 9: ...s bridge with ramp G831 and G836 Choose lower mirror locations before you start Consider two mirrors under the bridge Positioning the gym next to the wall creates a little den under the bridge Spacing it at least 50 cm away makes a crawl through space under the bridge Choose lower mirror locations before you start Consider two mirrors under the bridge ...

Page 10: ...g the gym next to the wall creates a little den under the bridge Spacing it at least 50 cm away makes a crawl through space under the bridge Remove four top caps to install roof Choose lower mirror locations before you start Consider two mirrors under the bridge Remove four top caps to install roof Choose lower mirror locations before you start Consider two mirrors under the bridge ...

Page 11: ...7 Tower bridge with balcony steering G843 and G848 Basic skills on page 4 Remove four top caps to install roof Choose lower mirror locations before you start Consider two mirrors under the bridge Remove four top caps to install roof Choose lower mirror locations before you start Consider two mirrors under the bridge ...

Page 12: ... m 1 8 m 2 5 m Mole hole with slide G850 and G855 Mole hole with ramp G851 and G856 WARNING Any gym with a tunnel must be 50 cm minimum from the wall Mole hole Choose lower mirror locations before you start Choose lower mirror locations before you start Basic skills on page 4 ...

Page 13: ...ide G852 and G857 Gnome home with ramp G853 and G858 Gnome home Remove four top caps to install roof Choose lower mirror locations before you start Remove four top caps to install roof Choose lower mirror locations before you start WARNING Any gym with a tunnel must be 50 cm minimum from the wall ...

Page 14: ...m 2 3 m 0 9 m 3 0 m 0 9 m 3 0 m Rapunzel with slide G823 and G828 Rapunzel with ramp G822 and G827 Rapunzel s tower Remove four top caps to install roof Choose lower mirror locations before you start Choose lower mirror locations before you start Remove four top caps to install roof ...

Page 15: ... 5 m 1 8 m 1 8 m Windsor with terrain G840 and G845 Windsor with balcony G841 and G846 Windsor Choose lower mirror locations before you start Choose lower mirror locations before you start Remove four top caps to install roof Remove four top caps to install roof Basic skills on page 4 ...

Page 16: ... Remove four top caps to install roof Choose lower mirror locations before you start Consider two mirrors under the bridge Stairs Remove four top caps to install roof Choose lower mirror locations before you start Consider two mirrors under the bridge WARNING Any gym with a tunnel must be 50 cm minimum from the wall Stairs ...

Page 17: ...zelnen Teile aussehen und wie viele Teile bei jedem Set dabei sind Dann geht s zur Sache und der Zusammenbau wird genau beschrieben Das Beste am Schluss Sie suchen sich aus welche Aufbaumöglichkeit am besten zu Ihren Räumlichkeiten und Ihren Ideen passt Das Bewegungscenter Erste Schritte D2 Pflege und Wartung D3 Grundlegende Aufbauregeln D4 Türmchen D6 Sand Düne D7 Krabbelberg D8 Klettern und Ruts...

Page 18: ... Sie die Stabilität der Verbindungen bevor Sie Kindern erlauben auf dem Bewegungscenter zu spielen S SBenutzen Sie die bitte die Aufbauweisen die in diesem Heft ange geben sind Für selbstgestaltete Varianten können wir leider keine Haftung übernehmen Gleich große Paneele können innerhalb des Sets beliebig ausgetauscht werden S SAchten Sie darauf dass sich auf der oberen Ebene des Bewegungs centers...

Page 19: ...rringern Sie die Zeitabstände zwischen den Inspektionen entsprechend Das Produkt muss außer Dienst gestellt werden wenn sich ein Zustand entwickelt der die sichere Benutzung nicht mehr zulässt Wenn Sie vorhaben das Bewegungscenter einzulagern denken Sie bitte daran dass es aus Holz ist und deshalb an einem trockenen Ort aufbewahrt werden muss Konstruktion Aus Holz bestehende Teile sind aus Birken ...

Page 20: ...Verbindung Jedes Paneel muss durch 4 Verbindungsringe gehalten werden Wiederholen Sie diesen Vorgang für jedes Paneel Um das nächste Element einzusetzen heben Sie einen der Verbindungsringe an um dieses im Ring zu fixieren Stecken Sie zuerst alle unteren Elemente entsprechend dem ausgesuchten Muster zusammen Das Verbindungsstück für Treppengeländer wird zwischen 2 kurzen Pfosten unter der Treppe u...

Page 21: ...in und setzen Sie dann die oberen Hälften der Halterungen auf Prüfen Sie dass die Halterungen vollständig ineinander greifen und sicher in den Nuten des Tunnels sitzen bevor die Schraubkappen montiert werden Ist der Brücken Unterbau installiert kann die Brücke aufgelegt werden Bauen Sie die Brückengeländer so ein dass das Logo nach außen zeigt Der Balkon wird wie jedes andere hohe Paneel eingebaut...

Page 22: ...G801 und G806 Türmchen mit Dach G802 und G807 Türmchen Bestimmen Sie die Platzierung der niedrigen Spiegelpaneele bevor Sie mit dem Aufbau beginnen Bestimmen Sie die Platzierung der niedrigen Spiegelpaneele bevor Sie mit dem Aufbau beginnen Zur Dachmontage vier Schraubkappen abnehmen ...

Page 23: ... Sie die Platzierung der niedrigen Spiegelpaneele bevor Sie mit dem Aufbau beginnen Sand Düne Sand Düne mit Rutsche G820 und G825 Bestimmen Sie die Platzierung der niedrigen Spiegelpaneele bevor Sie mit dem Aufbau beginnen Sand Düne mit Rutsche und Rampe G821 und G826 Bestimmen Sie die Platzierung der niedrigen Spiegelpaneele bevor Sie mit dem Aufbau beginnen Aufbau regeln auf Seite D4 ...

Page 24: ...ln auf Seite D4 Bestimmen Sie die Platzierung der niedrigen Spiegelpaneele bevor Sie mit dem Aufbau beginnen Klettern und Rutschen Bestimmen Sie die Platzierung der niedrigen Spiegelpaneele bevor Sie mit dem Aufbau beginnen Bestimmen Sie die Platzierung der niedrigen Spiegelpaneele bevor Sie mit dem Aufbau beginnen Zur Dachmontage vier Schraubkappen abnehmen Bestimmen Sie die Platzierung der niedr...

Page 25: ...igen Spiegelpaneele bevor Sie mit dem Aufbau beginnen Tip Montieren Sie zwei Spiegel unter der Brücke Beim Aufbau an einer Wand entsteht unter der Brücke ein kleiner Rückzugsraum Beim Aufbau in mindestens 50 cm Entfernung von der Wand entsteht ein Tunnel zum Durchkrabbeln Bestimmen Sie die Platzierung der niedrigen Spiegelpaneele bevor Sie mit dem Aufbau beginnen Tip Montieren Sie zwei Spiegel unt...

Page 26: ...en Tip Montieren Sie zwei Spiegel unter der Brücke Bestimmen Sie die Platzierung der niedrigen Spiegelpaneele bevor Sie mit dem Aufbau beginnen Tip Montieren Sie zwei Spiegel unter der Brücke Beim Aufbau an einer Wand entsteht unter der Brücke ein kleiner Rückzugsraum Beim Aufbau in mindestens 50 cm Entfernung von der Wand entsteht ein Tunnel zum Durchkrabbeln Zur Dachmontage vier Schraubkappen ab...

Page 27: ...auf Seite D4 Bestimmen Sie die Platzierung der niedrigen Spiegelpaneele bevor Sie mit dem Aufbau beginnen Tip Montieren Sie zwei Spiegel unter der Brücke Zur Dachmontage vier Schraubkappen abnehmen Bestimmen Sie die Platzierung der niedrigen Spiegelpaneele bevor Sie mit dem Aufbau beginnen Tip Montieren Sie zwei Spiegel unter der Brücke Zur Dachmontage vier Schraubkappen abnehmen ...

Page 28: ...ampe G851 und G856 Grabowski Bestimmen Sie die Platzierung der niedrigen Spiegelpaneele bevor Sie mit dem Aufbau beginnen Bestimmen Sie die Platzierung der niedrigen Spiegelpaneele bevor Sie mit dem Aufbau beginnen Aufbau regeln auf Seite D4 ACHTUNG Ein Bewegungscenter mit einem Tunnel muss mindestens 50 cm von einer Wand entfernt stehen ...

Page 29: ...Dachmontage vier Schraubkappen abnehmen Bestimmen Sie die Platzierung der niedrigen Spiegelpaneele bevor Sie mit dem Aufbau beginnen Zur Dachmontage vier Schraubkappen abnehmen Bestimmen Sie die Platzierung der niedrigen Spiegelpaneele bevor Sie mit dem Aufbau beginnen ACHTUNG Ein Bewegungscenter mit einem Tunnel muss mindestens 50 cm von einer Wand entfernt stehen ...

Page 30: ...G823 und G828 Rapunzelturm mit Rampe G822 und G827 Rapunzelturm Zur Dachmontage vier Schraubkappen abnehmen Bestimmen Sie die Platzierung der niedrigen Spiegelpaneele bevor Sie mit dem Aufbau beginnen Zur Dachmontage vier Schraubkappen abnehmen Bestimmen Sie die Platzierung der niedrigen Spiegelpaneele bevor Sie mit dem Aufbau beginnen ...

Page 31: ... Frau Holle mit Balkon G841 und G846 Frau Holle Aufbau regeln auf Seite D4 Zur Dachmontage vier Schraubkappen abnehmen Bestimmen Sie die Platzierung der niedrigen Spiegelpaneele bevor Sie mit dem Aufbau beginnen Zur Dachmontage vier Schraubkappen abnehmen Bestimmen Sie die Platzierung der niedrigen Spiegelpaneele bevor Sie mit dem Aufbau beginnen ...

Page 32: ... der niedrigen Spiegelpaneele bevor Sie mit dem Aufbau beginnen Tip Montieren Sie zwei Spiegel unter der Brücke Treppe Zur Dachmontage vier Schraubkappen abnehmen Bestimmen Sie die Platzierung der niedrigen Spiegelpaneele bevor Sie mit dem Aufbau beginnen Tip Montieren Sie zwei Spiegel unter der Brücke Treppe ACHTUNG Ein Bewegungscenter mit einem Tunnel muss mindestens 50 cm von einer Wand entfern...

Reviews: