background image

Page 7

SB-2-540

*Most common problem.

Left or right side horn holes plugged.
Dirt on left or right side of fluid tip.

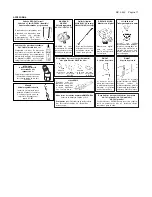
Remedies for the top-heavy, bottom-heavy, right-heavy, and left-heavy patterns:

1. Determine if the obstruction is on the air cap or the fluid tip. Do this by making a test

spray pattern. Then, rotate the cap one-half turn and spray another  pattern. If the defect
is inverted, obstruction is on the air cap. Clean the air cap as previously instructed.

2. If the defect is not inverted, it is on the fluid tip. Check for a fine burr on the edge of the

fluid tip. Remove with #600 wet or dry sand paper.

3. Check for dried paint just inside the opening; remove by washing with solvent.

Fluid flow too high for atomization air.

Material flow exceeds air cap's capacity. 
Spreader adjustment valve set too low.
Atomizing pressure too low.
Material too thick.

Atomization air pressure too high.
Fluid flow too low.
Spreader adjusting valve set too high.

*Loose or damaged fluid tip/seat.
Baffle seal installed incorrectly.
Material level too low.
Container tipped too far.
Obstruction in fluid passage.
Dry or loose fluid needle packing nut.

Spreader adjustment screw not seating
properly.
Air cap retaining ring loose.

No air pressure at gun.

Fluid needle adjusting screw not open
enough.
Fluid too heavy for gravity feed.

Fluid tip not tight.

Cup lid loose.
Dirty threads on cup or lid.
Cracked cup or lid.

Inadequate material flow.

Low atomization air pressure.

Too much atomization air pressure.
Gun too far from work surface.
Improper stroking (arcing, gun motion too
fast).

Too much or too fast-drying thinner.
Too much atomization air pressure.

Air pressure too high.
Gun tip too far from work surface.
Gun motion too fast.
Gun out of adjustment.

Packing nut loose.
Packing worn or dry.

Packing nut too tight.
Dry packing.
Fluid tip or needle worn or damaged.
Foreign matter in tip.
Fluid needle spring broken.
Wrong size needle or tip.

Clean. Ream with non-metallic point.
Clean.

Clean.

Clean. Ream with non-metallic point.
Clean.

Horn holes plugged.
Obstruction on top or bottom of fluid tip.
Cap and/or tip seat dirty.

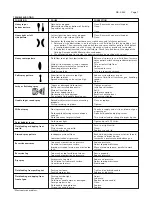
TROUBLESHOOTING

CONDITION

CAUSE

CORRECTION

Heavy top or 
bottom pattern

Heavy right or left 
side pattern

Heavy center pattern

Split spray pattern

Jerky or fluttering spray

Unable to get round spray

Will not spray

Paint bubbles in cup

Fluid leaking or dripping from 
cup lid

Starved spray pattern

Excessive overspray

Excessive fog

Dry spray 

Fluid leaking from packing nut

Fluid leaking or dripping from
front of gun

Balance air pressure and fluid flow. Increase
spray pattern width with spreader adjustment
valve.
Thin or lower fluid flow.
Adjust.
Increase pressure.
Thin to proper consistency.

Reduce at transformer or gun.
Increase fluid flow (increases gun handling
speed).
Adjust.

Tighten or replace.
Install per directions.
Refill.
Hold more upright.
Backflush with solvent.
Lubricate or tighten.

Clean or replace.

Tighten.

Check air supply and air lines, blow out gun
air passages.
Open fluid needle adjusting screw.

Thin material and/or change to larger tip size.

Tighten tip to 12-15 ft-lbs.

Push in or tighten lid.
Clean.
Replace cup and lid.

Back fluid adjusting screw out to first thread,
or change to larger tip size.
Increase air pressure and rebalance gun.

Reduce pressure.
Adjust to proper distance.
Move at moderate pace, parallel to work
surface.

Remix properly.
Reduce pressure.

Reduce air pressure.
Adjust to proper distance.
Slow down.
Adjust.

Tighten, do not bind needle.
Replace or lubricate.

Adjust.
Lubricate.
Replace tip and needle.
Clean.
Replace.
Replace.

Summary of Contents for TRANS-TECH

Page 1: ...Service Bulletin SB 2 540 OPERATION MANUAL TRANS TECH GRAVITY FEED SPRAYGUN English Pages 2 9 MANUAL DE OPERACI N COMPACT PISTOLA PULVERIZADORA POR GRAVEDAD TRANS TECH Espa ol P ginas 10 17...

Page 2: ...areas This equipment as supplied is NOT suitable for use with Halogenated Hydrocarbons Static Electricity can be generated by fluid and or air passing through hoses by the spraying process and by clea...

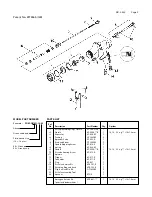
Page 3: ...K5 1 9 Needle SP 300S K 1 14 18 22 e g 14 1 4 mm 10 Airvalve housing seal SP 612 K 1 11 Spindle 1 12 Trigger SP 617 K 1 13 Connector SP 611 K 1 14 Plug SP 637 1 16 Air Valve Service Kit SPK 101 K 1 1...

Page 4: ...h stroke a minimum of 50 Move gun at a constant speed 14 Always turn off air supply and relieve pressure when gun is not in use PREVENTATIVE MAINTENANCE 1 Turn off air and relieve pressure in the supp...

Page 5: ...Service Tool SPN 7 engage groove behind the Valve Seat 6 Remove Valve Seat 7 Push out the Front Airvalve Seal with a finger 8 Turn the Gun upside down and let the Seal fall out 9 Fit New Front Seal t...

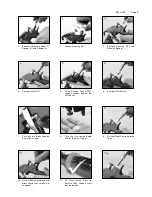
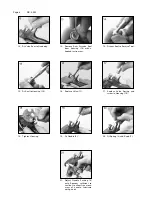
Page 6: ...ent 14 Fit new Seal to Service Tool 15 Fit Seal to Housing 10 16 Replace Valve 11 17 Replace Valve Spring and screw in Housing 10 18 Tighten Housing 19 Fit Needle 9 20 Fit Spring 8 and Knob 7 21 Adjus...

Page 7: ...om work surface Gun motion too fast Gun out of adjustment Packing nut loose Packing worn or dry Packing nut too tight Dry packing Fluid tip or needle worn or damaged Foreign matter in tip Fluid needle...

Page 8: ...paint manufacturer s mixing instrs Properly clean and prepare Cup loose on gun Cup gasket worn or missing below cup Cup threads dirty Too much material flow Material too thin Gun tilted on an angle or...

Page 9: ...s are a pre moistened hand cleaner towel for painters body men and mechanics that go where you go and no water is needed 29 3100 K6 Scrubs Hand Cleaner Towels HC 4700 1 4 NPT F HC 1166 1 4 NPT M HC 46...

Page 10: ...precauciones contraincendios operaci n y mantenimiento de las zonas de trabajo Este equipo tal y como se suministra NO es adecuado para su uso con Hidrocarburos Halogenados La Electricidad Est tica p...

Page 11: ...14 1 4 mm 10 Alojamiento de la v lvula de aire SP 612 K 1 junta 11 V stago 1 12 Gatillo SP 617 K 1 13 Conector SP 611 K 1 14 Tap n SP 637 1 16 Kit de mantenimiento de la SPK 101 K 1 v lvula de aire 17...

Page 12: ...150 200 mm 13 Pulverice primero los bordes Solape cada pasada el 50 como m nimo Mueva la pistola a una velocidad constante 14 Cierre siempre el suministro de aire y alivie la presi n cuando la pistol...

Page 13: ...de la v lvula 6 Retire el asiento de la v lvula 7 Haga salir la junta delantera de la v lvula de aire empu jando con el dedo 8 Ponga la pistola boca abajo y deje que se caiga la junta 9 Instale una j...

Page 14: ...ta de manten imiento 15 Coloque la junta en el alojamiento 10 16 Vuelva a colocar el husillo 11 17 Vuelva a colocar el muelle de la v lvula y el tornillo en el alojamiento 10 18 Apriete el alojamiento...

Page 15: ...r pido Pistola desajustada Tuerca de la empaquetadura floja Empaquetadura gastada o seca Tuerca de la empaquetadura muy apretada Empaquetadura seca Punta de fluido o aguja gastada o da ada Materias fo...

Page 16: ...ante de la pintura Limpie y prepare debidamente Cubeta floja en la pistola Guarnici n de la cubeta gastada o falta debajo de la cubeta Roscas de la cubeta sucias Demasiado flujo de material Material d...

Page 17: ...Scrubs son toallas prehumedecidas para que pintores encargados de carrocer a y mec nicos se limpien las manos Van donde usted vaya y no se necesita agua 29 3100 K6 Scrubs Toallas para limpiarse las m...

Page 18: ...Page 18 SB 2 540 NOTES...

Page 19: ...P gina 19 SB 2 540 NOTAS...

Page 20: ...S Canada Technical Service Office 195 Internationale Blvd Glendale Heights IL 60139 Toll Free Telephone 1 888 992 4657 U S A and Canada only Toll Free Fax 1 800 368 8401 DeVilbiss Worldwide Sales and...

Reviews: