background image

Identifying External Hardware

Getting Started

4–5

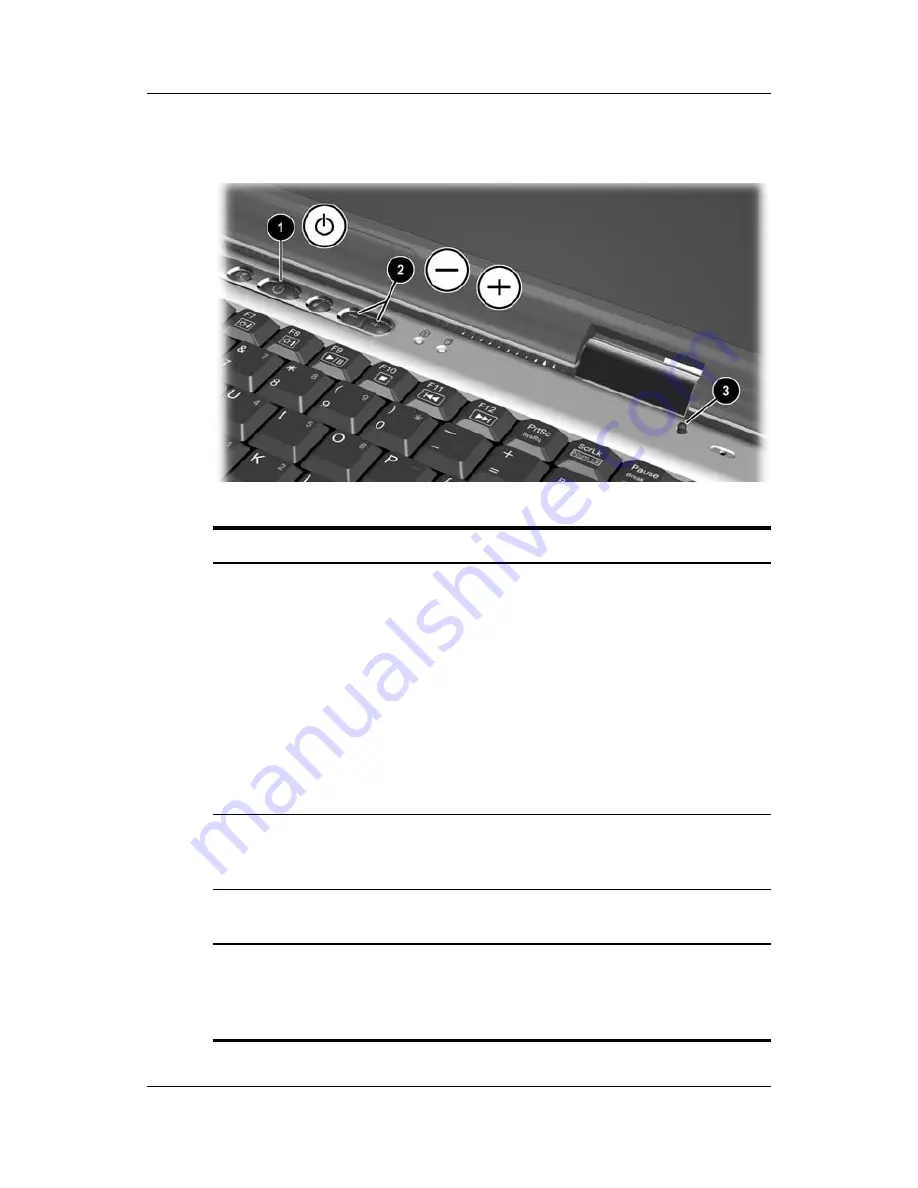
Power and Volume Controls

Top Components: Power and Volume Controls

1

Power 
button*

When the notebook is:

Off, briefly press to turn on the notebook.

On, briefly press to initiate Hibernation.

In Standby, briefly press to exit Standby.

In Hibernation, briefly press to exit 
Hibernation. 

If the system has stopped responding and 
Windows shutdown procedures cannot be used, 
press and hold for 4 seconds to turn off the 
notebook.

2

Volume 
buttons (2)

Adjust, mute, or restore system volume. To mute 
or restore volume, press both volume buttons at 
the same time.

3

Display 
switch*

Turns off the notebook display if the notebook is 
closed while it is on.

*This table describes default settings. For information about changing 
the function of the power button, display switch, or 

Fn+F3

 hotkeys, 

refer to the 

Documentation Library CD, Software Guide, Chapter 1,

“Power Management.”

Summary of Contents for 272637-001

Page 1: ...rt Number 272637 001 June 2002 This guide explains how to set up your hardware and software begin using the notebook troubleshoot problems and contact Compaq if you need assistance The last chapter introduces you to the exterior features of the notebook ...

Page 2: ... trademarks of their respective companies Compaq shall not be liable for technical or editorial errors or omissions contained herein The information is provided as is without warranty of any kind and is subject to change without notice The warranties for Compaq products are set forth in the express limited warranty statements accompanying such products Nothing herein should be construed as constit...

Page 3: ...ain additional information about a topic Some notes provide basic information for inexperienced users Others provide technical information for advanced users The following icons identify warnings cautions and notes ÅWARNING The information in a warning protects against bodily harm or loss of life ÄCAUTION The information in a caution protects against damage to your work your notebook or an optiona...

Page 4: ...een 2 or more keys indicates that they are a key combination To use most key combinations Briefly press the first key then briefly press each succeeding key or Press and hold the first key press and hold each succeeding key then release all the keys simultaneously Unless you are instructed to do so do not press the keys in a key combination simultaneously commands Identifies characters you are ask...

Page 5: ... documentation Explain whether to look for an icon a tab or a button on the screen Tabs are displayed along the top edge of individual windows Are based on the notebook pointing device functions set at the factory To select press the left TouchPad button 1 once To double click press the left TouchPad button twice To right click press the right TouchPad button 2 once Most paths to Windows destinati...

Page 6: ...Category view default mode Classic view similar to Windows 2000 operating system view mode As installed Windows XP Home or Windows XP Professional runs in Category view To compare Category view with Classic view or to select either view 1 Right click the Start button Properties Start Menu tab 2 Select the Classic or Category radio button The views are displayed in the illustration on the Start Men...

Page 7: ... Safely 1 7 2 Beginning to Use the Notebook Selecting Regional Settings 2 1 Selecting Screen Settings 2 1 Protecting the Notebook Against Viruses 2 2 Installing Optional Software 2 3 Installing Software in Windows XP Professional 2 3 Installing Software in Windows XP Home 2 4 Accessing Notebook Documentation 2 5 Opening the Documentation Library CD 2 6 Using the Documentation Library CD 2 7 3 Trou...

Page 8: ...rnal Hardware Display Components 4 1 Pointing Device Components 4 2 Top Components 4 3 Power Lights 4 3 Keyboard and Drive Lights 4 4 Power and Volume Controls 4 5 Easy Access Buttons and Keyboard Keys 4 6 Function and Keypad Keys 4 7 Front Panel Components 4 8 Rear Panel Components 4 9 Connectors 4 9 Vents and Jacks 4 10 Left Side Components 4 11 Right Side Components 4 12 Underside Components 4 ...

Page 9: ... need the notebook the AC Adapter 1 the power cord 2 and the battery pack 3 During the hardware setup you will install the battery pack connect the computer to external power open the display and turn on the computer Identifying the AC Adapter the power cord and the battery pack AC Adapters and power cords vary by region ...

Page 10: ... Pack To install the battery pack 1 Place the notebook upside down on a flat surface preferably on top of a clean cloth 2 Slide the battery pack 1 into the battery compartment until it clicks into place The battery will install only one way Installing the battery pack ...

Page 11: ... on a flat surface near an electrical outlet 2 Plug the AC Adapter cable into the DC power connector 1 3 Plug the power cord into the AC Adapter 2 and into an electrical outlet 3 When the notebook receives AC power the AC Adapter light 4 turns on Connecting the notebook to external power AC Adapters power cords and electrical outlets vary by region ...

Page 12: ...1 4 Getting Started Setting Up the Notebook Opening the Notebook To open the notebook briefly press the display release latch 1 as you raise the display 2 Opening the notebook ...

Page 13: ...ook To turn on the notebook briefly press the power button 1 When the notebook is on the power standby light 2 turns on and you are prompted to begin software setup If the notebook does not turn on see Chapter 3 Troubleshooting in this guide Turning on the notebook ...

Page 14: ...e process without interruption Setup time varies If you are prompted to select a language choose carefully The languages that you do not choose are deleted from the system and cannot be restored during the installation When you are prompted to accept the End User License Agreement you must choose Accept to continue the software setup Turning Off the Notebook Whenever possible shut down the noteboo...

Page 15: ...ok Read the following warning ÅWARNING This is a Class B digital device pursuant to Part 15 of the FCC Rules For more Class B information see Regulatory and Safety Notices on the Documentation Library CD To reduce the risk of personal injury electric shock fire or damage to the equipment Do not disable the power cord grounding plug It is an important safety feature Plug the equipment into a ground...

Page 16: ...1 8 Getting Started Setting Up the Notebook ...

Page 17: ...onal Options window then use context sensitive Help To use context sensitive Help select the question mark button in the upper right corner of the window then select an item A definition explanation or procedure is displayed Selecting Screen Settings If you would like to see more items on your screen or to see the items on your screen displayed larger change the screen resolution setting in your o...

Page 18: ...To use context sensitive Help select the question mark button in the upper right corner of the window then select an item A definition explanation or procedure is displayed Protecting the Notebook Against Viruses When you use the notebook for email network or Internet access you expose the notebook to computer viruses Computer viruses can disable the operating system your applications or your util...

Page 19: ...r Do not install software while the notebook is running on battery power During the installation Do not unplug the notebook from external power Do not shut down the notebook Do not remove or insert a drive To install an application or a utility from a CD see the documentation included with the CD In most cases installation instructions are included in the CD package or are displayed on the screen ...

Page 20: ...ware icon does not display on the Desktop select Start Run then On the command line type c cpqapps setup exe preload programs s The Setup Compaq Software icon is displayed in the All Programs menu Select Start All Programs then follow the instructions on the screen To view the descriptions and space requirements of preloaded Compaq utilities without installing them select the Setup Compaq Software...

Page 21: ... 2 Press the media release button 1 on the drive bezel to release the media tray then pull the tray outward until it is fully extended 2 3 Holding the CD by the edges position the CD in the tray with the label side up If the tray is not fully extended the CD may need to be tilted to be inserted 4 Gently press the CD onto the spindle 3 until it snaps into place 5 Push the media tray back in until i...

Page 22: ... x where X is your CD drive designation 3 Select the file that includes an exe extension for example Filename exe 4 Select the OK button A drive designation is a letter of the alphabet that the notebook uses to identify a drive To display the drive designation of your CD drive double click the My Computer icon on the desktop Responding to an Acrobat Reader Prompt Adobe Acrobat Reader is an applica...

Page 23: ...al Hardware of this guide Running the notebook on a battery pack Upgrading memory Power and environmental specifications Hardware Guide Playing creating or copying CDs or DVDs Using Standby and Hibernation and selecting power preferences Using security features such as passwords to protect against unauthorized access to the notebook Updating or restoring Compaq software Using the MultiBoot Compaq ...

Page 24: ...eadings such as lights which may be helpful if you do not know the name of an item Index listings direct you to the first page of a topic You may find more information about the topic by scrolling through a few of the pages that follow Caring for the notebook and drives Preparing the notebook for transport Traveling with the notebook including air and international travel Maintenance Shipping and ...

Page 25: ...bleshooting To solve a problem 1 See Quick Solutions Checklist next in this chapter 2 See the Troubleshooting guide on the Documentation Library CD 3 If the problem persists see the last section in this chapter Contacting Compaq ...

Page 26: ... an electrical outlet Make sure the power cord and AC Adapter cable connections are secure Verify that the electrical outlet is providing adequate power by plugging another electrical device into the outlet When the AC Adapter light turns on the notebook is receiving adequate power If the notebook turns on when connected to external power but not when running on battery power recharge the battery ...

Page 27: ...ng features that may initiate while the notebook is turned on but not in use When Hibernation is initiated the power standby light 1 turns off and the notebook saves your work to the hard drive then shuts down To exit Hibernation briefly press the power button 2 When Standby is initiated the power standby light 1 blinks and the notebook saves your work in random access memory RAM then clears the s...

Page 28: ... A rug pillow or thick clothing could block the underside vent Be sure that the rear panel and left side vents are not blocked by hard surfaces such as an adjoining optional printer or by fabrics such as bedding or thick or loose clothing Is the System Unresponsive If the system has stopped responding and you are unable to use normal Windows shut down procedures 1 Press ctrl alt delete 2 Select th...

Page 29: ...le Documentation To access the current procedures for using the hardware and software on your notebook See Chapter 2 Beginning to Use the Notebook in this guide for information about using the Documentation Library CD The CD provides information about Compaq hardware and software and about connecting or installing optional devices or software See Windows Help for information about the operating sy...

Page 30: ...ncluded with the antivirus software Reinstall the software To reinstall the operating system or a Compaq application or utility follow the instructions with the Restore CDs included with the notebook For more information about the Restore CDs see the Software Guide Chapter 3 Software Updates and Restorations on the Documentation Library CD To reinstall software that was not preloaded or preinstall...

Page 31: ...iness support in English only visit http www compaq com support If the notebook is not connected to the Internet refer to the Worldwide Telephone Numbers booklet included with the notebook to contact a support technician or a Compaq authorized dealer reseller or service provider Preparing to Call Technical Support To provide the fastest possible resolution of your problem have the following items ...

Page 32: ...mation about using Compaq Diagnostics to report configuration or diagnostic information see the Software Guide Chapter 4 Setup Utilities and Diagnostics on the Documentation Library CD Taking the Notebook to a Service Provider In addition to providing the items listed in the preceding section Preparing to Call Technical Support be sure to Delete all passwords or Disclose all passwords to the servi...

Page 33: ...ay Components Display Components 1 Display release latch Opens the notebook 2 MultiPort Inputs single channel sound Supports an optional USB enabled wireless device such as a Bluetooth MultiPort 802 11b Wireless LAN MultiPort and future wireless technologies ...

Page 34: ...double click 2 Left and right TouchPad buttons Function like the left and right buttons on an external mouse 3 Scroll button Scrolls up down left or right through most application and Internet browser windows For information about modifying pointing device functions refer to the Documentation Library CD Hardware Guide Chapter 2 Pointing Device and Keyboard in the section Setting Pointing Device Pr...

Page 35: ... Components Power Lights 1 AC Adapter light On AC power is being supplied through the AC Adapter 2 Power standby light On Power is turned on Blinking Notebook is in Standby 3 Battery light On The battery pack is charging Blinking The battery pack has reached a low battery condition ...

Page 36: ...e internal keypad is on 2 Caps lock light On Caps lock is on 3 IDE Integrated Drive Electronics drive light On The hard drive CD or DVD drive is being accessed For more information about using num lock the internal keypad or an external keypad refer to the Documentation Library CD Hardware Guide Chapter 2 Pointing Device and Keyboard in the section Keypads ...

Page 37: ...topped responding and Windows shutdown procedures cannot be used press and hold for 4 seconds to turn off the notebook 2 Volume buttons 2 Adjust mute or restore system volume To mute or restore volume press both volume buttons at the same time 3 Display switch Turns off the notebook display if the notebook is closed while it is on This table describes default settings For information about changin...

Page 38: ...s Buttons 4 Provide quick access to Internet or network destinations or to software applications or data files on a drive The icon on each button represents the default destination Buttons can be programmed to different destinations 2 Microsoft logo keys 2 Display Windows Start menu 3 Applications key Displays shortcut menu for item beneath the pointer ...

Page 39: ...ction keys F2 through F4 and F7 through F12 perform additional tasks as hotkeys 2 Fn key Combines with other keys to perform system tasks For example pressing the Fn F7 hotkeys decreases screen brightness and pressing the Fn F8 hotkeys increases screen brightness 3 Keypad keys 15 Can be used like the keys on an external numeric keypad For more information about using hotkeys or keypad keys refer t...

Page 40: ...4 8 Getting Started Identifying External Hardware Front Panel Components Front Panel Components Stereo speakers 2 Produce stereo sound ...

Page 41: ...power connector Connects an AC Adapter 2 USB connectors 2 Connect optional USB devices 3 External monitor connector Connects an optional external monitor or overhead projector 4 Keyboard mouse connector Connects an optional PS 2 keyboard or mouse 5 Parallel connector Connects an optional parallel device such as a printer ...

Page 42: ...ideo device such as a television or VCR 3 Vents for fan 2 Allows airflow to cool internal components ÄTo prevent overheating do not obstruct the vent Do not allow a hard surface such as an adjoining optional printer or a fabric such as bedding or clothing to block airflow 4 S video out jack Connects an optional S video device such as a television VCR or camcorder 5 RJ 45 network jack Connects a ne...

Page 43: ... internal components ÄTo prevent overheating do not obstruct the vent Do not allow a hard surface such as an adjoining optional printer or a fabric such as bedding or clothing to block airflow 3 PC Card eject button Ejects an optional PC Card from the PC Card slot 4 PC Card slot Supports an optional Type I or Type II 32 bit CardBus or 16 bit PC Card 5 Diskette drive Slot for a standard 3 5 inch di...

Page 44: ...ight Side Components 1 Battery bay Holds the battery pack 2 Optical drive bay Holds CD ROM CD RW DVD or DVD CD RW drive 3 Infrared port Provides wireless communication between the notebook and an optional IrDA compliant device 4 1394 Connector Connects an optional 1394 device ...

Page 45: ... and Mini PCI Compartments 1 Mini PCI personal computer interface compartment Supports an optional mini PCI board such as a modem board A modem board is included with some notebook models 2 Memory compartment Contains 2 memory slots for PC2100 compliant memory boards As shipped the memory compartment may contain 1 or 2 memory boards ...

Page 46: ...ate or troubleshoot the operating system 3 MultiPort agency approvals label models that ship with a wireless device only Lists the countries in which the wireless device has been approved for use You may need this information to use the wireless device while traveling 4 Serial number Identifies the notebook You will need this number if you call Compaq customer support or download software from the...

Page 47: ...onents included with most notebook models Documentation and Restore CDs Additional Standard Components Documentation and Restore CDs 1 Documentation Library CD Includes the following guides Hardware Guide Software Guide Modem and Networking Modem Command Guidelines Advanced Users Only Maintenance Shipping and Travel Troubleshooting Regulatory and Safety Notices 2 Restore CDs Contain the software p...

Page 48: ...cal outlet 2 Modem cable Connects the modem to an RJ 11 telephone jack or to a country specific modem adapter The modem cable has a 6 pin RJ 11 telephone connector at each end 3 Network cable select models only Connects the notebook to an Ethernet network jack The network cable has an 8 pin RJ 45 network connector at each end Power cords vary in appearance by region ...

Page 49: ...s and Accessories 1 AC Adapter Converts AC power to DC power 2 Country specific modem adapter included by region as required Adapts the modem cable to a non RJ 11 telephone jack 3 Japan specific outlet adapter Japan only Connects the AC Adapter to a 2 prong electrical outlet AC Adapters vary in appearance by region ...

Page 50: ...4 18 Getting Started Identifying External Hardware ...

Page 51: ...udio out jack 4 10 autorun 2 6 B battery light 4 3 battery power 1 7 button power 4 5 C cable AC Adapter 1 3 modem 4 16 modem vs network 4 16 network 4 16 power cord 4 9 surge protection 1 7 caps lock light 4 4 CD drive optional IDE drive light 4 4 inserting a CD 2 5 CD s displaying contents of 2 6 installing software from 2 3 Restore 3 6 Compaq customer support contacting Compaq 3 7 notebook docu...

Page 52: ... 4 1 switch 4 5 Documentation Library CD 4 15 displaying contents of 2 6 finding information within a guide 2 8 selecting a guide 2 7 drives designations 2 6 inserting or removing while installing software 1 6 DVD drive optional drive light 4 4 E electrical storm safety issues 1 7 End User License Agreement 1 6 external monitor connector 4 9 F FCC Federal Communications Commision 1 7 freeze system...

Page 53: ...electing keyboard 2 1 latch display release 1 4 4 1 light AC Adapter 1 3 4 3 battery 4 3 caps lock 4 4 num lock 4 4 power standby 4 3 lockup system 4 5 M Maintenance Shipping and Travel guide 2 8 4 15 microphone jack 4 10 Microsoft logo keys 4 6 modem cable 4 16 country specific adapter 4 17 Modem and Networking guide 2 7 4 15 Modem Command Guidelines Advanced Users Only 2 7 4 15 surge protection ...

Page 54: ...y information Class B designation FCC 4 15 MultiPort agency approvals label 4 14 Regulatory and Safety Notices guide 2 8 system label 4 14 reset emergency shutdown 4 5 resolution setting screen 2 1 Restore CDs 3 6 4 15 RJ 11 telephone jack identifying 4 10 modem cable 4 16 RJ 45 network jack identifying 4 10 network cable 4 16 S screen resolution setting 2 1 serial number 4 14 Setup Compaq Softwar...

Page 55: ...q 3 7 external device problems 3 5 Hibernation or Standby problems 3 3 overheating problems 3 4 power problems 3 2 Quick Solutions checklist 3 2 response problems 3 4 software problems 3 6 Troubleshooting guide 2 8 4 15 turning off the notebook emergency procedures 3 4 standard procedures 1 6 turning on the notebook standard procedure 1 5 troubleshooting 3 2 U USB connectors 4 9 utilities Compaq S...

Page 56: ...Index 6 Getting Started Index ...

Reviews: