background image

36

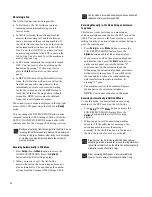
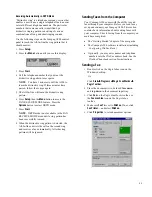
Control Form

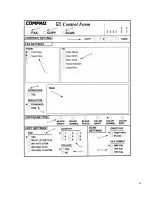
Boxes and Functions

No.

Box

Function

1.

ý

Fax

Check to send a Fax.

2.

ý

Copy

Check to make a Copy.

3.

ý

Scan

Check to Scan.

4.

ý

Contrast

Sets contrast lighter or darker for faxes, copies, or scans.

5.

ý

Fax From

Check to identify the Fax sender (select one only).

6.

ý

Fax To

Check to identify the Fax recipients (select one or more).

7.

ý

Default Mark

Identifies settings used if nothing is checked.

8.

ý

Fax Cover Page

Automatically generates a cover sheet.

9.

ý

Fax Note

If you choose YES for cover page, the note box and anything you've written in it will be copied

onto the cover page.

10.

ý

Fax Resolution

Sets the Fax Resolution.

11.

ý

Copy/Scan Type

Sets the type of Copy or Scan to be performed.

12.

ý

Copy Size (Scaling)

Reduces or enlarges your copies.

NOTE

:  This will be ignored if scan or fax options are also checked.

13.

ý

Copy Quantity

Sets number of copies.

14.

ý

Copy Collate

Puts pages of multiple copies in order.

15.

ý

Scan To Directory

Determines the directory to which your scanned image will be saved.

16.

ý

Scan To File Format

Determines the format in which your scanned image will be saved.

Summary of Contents for Presario A900

Page 1: ... Computer 18 Changing Print Cartridges from the A900 Control Panel 19 Aligning Print Cartridges 19 Aligning Print Cartridges from the Computer 19 Aligning Print Cartridges from the A900 Control Panel 20 Cleaning Print Cartridges 21 Printing the Cartridge Clean and Nozzle Test from the Computer 21 Printing the Cartridge Clean and Nozzle Test from the Control Panel 21 Checking the Clean Nozzle Print...

Page 2: ... Copying or Printing Faxes 55 Error Messages 55 Correcting Problems 62 REGULATORY AND SAFETY NOTICES 68 Electromagnetic Interference Compliance Notices 68 Modifications 68 Cables 68 Declaration Of Conformity For Products Marked With The FCC Logo United States Only 68 Canadian Notice 68 Avis Canadien 68 Safety 68 Power Cords 68 U S Regulations Governing the Use of Modems 69 Ringer Equivalence Numbe...

Page 3: ...ing in this guide Text set off in this manner presents helpful hints for using your computer IMPORTANT Text set off in this manner presents specific instructions commentary sidelights or interesting points of information CAUTION Text set off in this manner indicates that failure to follow directions could result in equipment damage or loss of information WARNING Text set off in this manner indicat...

Page 4: ... Application Help Many software programs or applications have Help files To access Help for a specific application you need to be using that program Click Help on the menu bar or press the F1 key IMPORTANT If you are using a program and you open Help with the Start button you will get the general Windows Help ...

Page 5: ... All In One use the All In One for all of your printing faxing copying and scanning needs One document input tray extension supports the original document when faxing copying or scanning One document exit tray supports the original document when faxing copying or scanning is complete One AC power electrical cord plugs into the rear of the All In One to supply electrical power One telephone cord pl...

Page 6: ...drivers and application software required to operate the A900 One copy scan sleeve for faxing copying and scanning Protects photographs to be scanned Also allows you to scan irregular size paper Not shown Required Additional Purchases Printer cable The Compaq A900 uses a standard bidirectional IEEE 1284 Compliant parallel printer cable This cable is not included with your All In One You may need t...

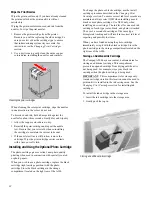
Page 7: ... materials NOTE For instructions on removing the packing material see the Compaq A900 All In One setup poster Step 4 Install the Document Trays The A900 uses several trays to support your paper documents NOTE The A900 ships with the paper exit tray already installed Extending the paper exit tray Document Exit Tray To install the document exit tray 1 ý Align the latches on the trays with the slots ...

Page 8: ...ting an extension telephone or other optional equipment to the A900 see Appendix A To connect the telephone line cord 1 ý Plug one end of the telephone line cord into a standard telephone wall jack 1 2 ý Plug the telephone line cord into the socket marked LINE on the left side of the A900 2 Connecting the telephone line cord Step 6 Connect the Printer Cable IMPORTANT The printer cable does not com...

Page 9: ...ected the telephone line press Start You should hear a dial tone If you hear a dial tone you are properly connected Press Stop to hang up If you do not hear a dial tone the following message may appear on the LCD panel Verify that the telephone line cord is securely connected into the wall and into the socket of the A900 marked LINE Step 8 Load Paper You can load up to 100 sheets of plain paper in...

Page 10: ...arriage will automatically center itself Lifting the ink cartridge access door 4 ý Remove the new ink cartridge from its packaging Hold the ink cartridge by the black areas or colored top only 5 ý Carefully remove the tape covering the print head Be sure to remove all of the tape Do not touch the copper area on the bottom of the cartridge 6 ý Insert the bottom of the black ink cartridge into the r...

Page 11: ...lowing displays on the LCD panel 9 ý Press Start IMPORTANT Before you use the A900 you should properly align the ink cartridges This will be done when you install the Compaq A900 software For standalone use see the Aligning Print Cartridges section of the Common Procedures chapter Installing the Ink Cartridges for Standalone Operations If you intend to use the A900 as a standalone fax machine or c...

Page 12: ...aging MS Paint For information on how to use the scan options see the Scanning chapter WinFax Basic Edition This fax program allows you to fax and receive documents from your computer Pagis ScanWorks With Pagis ScanWorks you can easily scan documents and photographs into your computer and maintain them as electronic documents You can also use Pagis ScanWorks to quickly transmit scanned documents b...

Page 13: ... x setup exe where x is the drive letter for your CD ROM drive Then click OK 4 ý The Welcome screen displays Click Next 5 ý The Software License Agreement screen displays Read the Software License Agreement Click Yes 6 ý The A900 Software Setup screen displays Click Next 7 ý The Compaq Software License Agreement screen displays Not shown 8 ý Click Yes to agree 9 ý The Install New Cartridge Set scr...

Page 14: ...d Down arrow buttons to select the numbers Click OK when finished Installing WinFax Basic Edition 12 ýThe Welcome to the WinFax Basic Edition Setup screen displays Click Next to install WinFax Basic Edition 13 ýThe Software License Agreement screen displays Not shown Read the Software License Agreement Click Yes to agree to the terms 14 ýThe User Information screen displays Type the information in...

Page 15: ...ady installed on your computer you may be asked to insert your Windows CD Do not insert your Windows CD Click Next 17 ýThe Start Copying Files screen displays Click Next WinFax Basic Edition installs 18 ýThe File Copy Complete screen displays Not shown Click Finish Installing Pagis ScanWorks 19 ýThe Welcome Screen displays Click Next 20 ýThe Software License Agreement screen displays Not shown Cli...

Page 16: ...p screen displays These are programs that scanned images may be sent from within Pagis ScanWorks To shorten the list and select only applications where you plan to send scanned images click Select None Then select the applications 25 ýClick OK when you are finished 26 ýThe Pagis ScanWorks Registration screen displays Not shown Click Next 27 ýThe first Pagis ScanWorks User Information screen displa...

Page 17: ...q All In One User Information screen displays Type the information in the fields and click Next when finished NOTE Use Tab and Shift Tab to move between fields 34 ýThe third Compaq All In One User Information screen displays Select the options on the screen then click Finish The registration begins 35 ýThe Registration Complete screen displays Click OK 36 ýThe A900 Software Setup Complete screen d...

Page 18: ... Properties screen displays Select the Compaq A900 Fax and click Next 3 ý The Ready to Test Modem screen displays Click Next 4 ý The WinFax Testing Modem screen displays Not shown Click Next when testing is complete 5 ý The Winfax Ready To Configure System Screen displays Not shown Click Finish to configure the system 6 ý Select Yes or No if you want to view the Read Me file The configuration is f...

Page 19: ... computer 1 ý Run the Compaq A900 Settings Utility Click StartÆ Æ Æ ÆProgramsÆ Æ Æ ÆCompaq A900Æ Æ Æ ÆA900 Settings Utility 2 ý Select the Fax tab 3 ý Click the More Fax Settings button 4 ý Select the check box to Set A900 time to computer time Alternately if this box is not checked you can enter the date and time 5 ý Click OK to update the time in the A900 display See the More Fax Settings sectio...

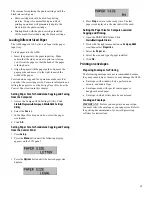
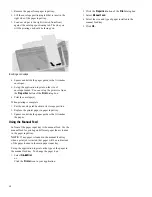
Page 20: ...ll To print a report use the following procedure 1 ý Press Setup 2 ý Press the Menu button until Print Report is displayed in the top of the display 3 ý Press the Options button to select the Self Test 4 ý Press Start to print the self test Changing Print Cartridges The system can keep track of the ink level in each of the three cartridge types black color and photo When you tell the system that a...

Page 21: ...s button until the correct answer displays Left color Right black or photo or Both Then press Start 6 ý If you select Left or Both cartridges in Step 5 the following displays on the LCD panel 7 ý If you installed a new color cartridge press Start 8 ý If you are reinstalling the old color cartridge press the Options button until Old Color displays Then press Start The following displays on the LCD ...

Page 22: ...ontrol Panel To print the alignment pattern 1 ý Press Setup 2 ý Press the Menu button until the following display appears on the LCD panel 3 ý Press the Options button until the following displays 4 ý Press Start The Cartridge Alignment page prints 5 ý Enter the Cartridge Alignment information Depending on the cartridge combination you have installed in your printer a test page with one or more al...

Page 23: ...ý Access the Compaq A900 Printer Control Program by clicking StartÆ Æ Æ ÆProgramsÆ Æ Æ ÆCompaq A900Æ Æ Æ Æ A900 Printer Control or by a double click on the Q icon in the system tray 2 ý Click the Cartridge tab then on the Clean Print Nozzles button The cleaning pattern prints Printing the Cartridge Clean and Nozzle Test from the Control Panel 1 ý Press Setup 2 ý Press the Menu button until the fol...

Page 24: ...tridge replace the black cartridge right carriage position with the photo cartridge Store the black cartridge in the storage compartment located on the right rear of the A900 To change the photo or black cartridge use the install cartridge procedure described in the Changing Print Cartridges section To ensure correct ink level records are maintained always select OLD when installing a used black o...

Page 25: ...ÆCompaq A900Æ Æ Æ ÆA900 Settings Utility 2 ý Select the Fax tab 3 ý In the Paper Size drop down box select the paper size loaded 4 ý Click OK Setting Paper Size for Standalone Copying and Faxing from the Control Panel 1 ý Press Setup 2 ý Press the Menu button until the following display appears on the LCD panel 3 ý Press the Options button until the desired paper size displays 4 ý Press Stop to re...

Page 26: ...ts storage position 2 ý Replace the printer paper in paper input tray 3 ý Squeeze and slide the paper guide so that it touches the paper Using the Manual Feed In front of the paper input tray is the manual feed Use the manual feed for printing on different paper than is loaded in the paper input tray NOTE If any paper is loaded in the manual feed tray when a print job is started that paper will be...

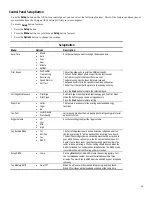
Page 27: ... the Self Test page shows a clogged nozzle Press the Start button to initiate setting Paper Size xý Letter xý Legal xý A4 This feature is used only for fax printing and standalone copy functions Fax Print xý Letter Quality xý Draft Quality Letter quality provides the best quality print Draft quality prints faster and uses less ink Ringer Volume xý Off xý Low xý Mid xý High Use these settings to ad...

Page 28: ...t settings of the A900 1 ý Click Start Æ Æ Æ Æ Programs Æ Æ Æ Æ Compaq A900 Æ Æ Æ Æ Pagis ScanWorks Toolbar 2 ý From the toolbar press the A900 button 3 ý The All In One Settings screen displays Not shown Print Settings This section describes the Print tab Print Settings Field Description Options Printer Control Program Allows you to access the Printer Control Program Click this button to access t...

Page 29: ...d Description Options Fax From Setup Add names from the Winfax Phonebook to the Fax From section on Control Form Press this button to set up names that will appear in the Fax From section of the Control Form For more information see the Control Form chapter Fax To Setup Add names from your WinFax Phonebook to the Fax To section on Control Form Press this button to set up the names that will appear...

Page 30: ...me from the Compaq Control Form Fax From list Press this button to delete the highlighted name from the Compaq Control Form Fax From list Fax To Setup This section describes Fax To Setup To access this screen click Fax To Setup on the Fax tab of the A900 Settings Utility This allows you to setup names in memory to use Control Form NOTE Before you can set up Fax To entries you must first enter fax ...

Page 31: ...the information in the fields after highlighting the speed dial number Click OK when finished Advanced Fax Settings This section describes Advanced Fax Settings To access this screen click Advanced Fax Settings on the Fax tab of the Compaq A900 Settings Utility This allows you to change advanced features related to faxing Advanced Settings Field Description Options Automatic Reduction Reduces an i...

Page 32: ...me settings for Compaq A900 Select Set A900 Time to PC time or set the time using the down arrows to select the month day year hour minute and second Copy Settings This section describes the different settings for copy mode Copy Settings Field Description Options Type Changes type of copy Settings are Black Draft Black Normal Black Photo Color Draft Color Normal and Color Best Contrast Darkens or ...

Page 33: ... to add up to five application names to the A900 control panel To access this screen press the Scan To Application Setup button on the Scan tab of the Compaq A900 Settings Utility Scan To Application Setup Field Description Options Pagis ScanWorks Application Lists the software applications in your computer Highlight the software application you want to add to the Scan To menu of your Compaq A900 ...

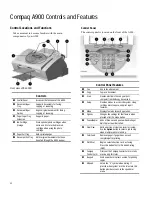
Page 34: ... 2 Copy Copies a document 3 Scan Creates electronic files on your host computer from hardcopy documents 4 Setup Provides menus to access the system setup cartridge maintenance and print report features 5 Menu Displays features for each operation 6 Options Changes the settings for that feature when pressed after the menu button 7 Pause Redial Adds a three second pause when dialing or dials the last...

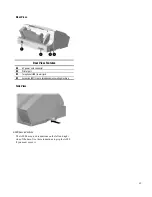
Page 35: ... 2 Printer port 3 Telephone LINE to wall jack 4 Extension EXT Line to telephone or answering machine Side View A900 base indentions The A900 has curved indentions on the left and right side of the base Use these indentions to grip the A900 if you must move it ...

Page 36: ...l Form Getting Started with Control Form Control Form can display up to eight FROM entries and sixteen TO entries in the Fax section These entries are tied to your WinFax Phonebook There are two easy steps to configure faxing with Control Form 1 ý First enter names and telephone numbers into your WinFax Phonebook Make sure the WinFax Phonebook has all the entries that you will want to have printed...

Page 37: ...35 ...

Page 38: ...ver sheet 9 ý Fax Note If you choose YES for cover page the note box and anything you ve written in it will be copied onto the cover page 10 ý Fax Resolution Sets the Fax Resolution 11 ý Copy Scan Type Sets the type of Copy or Scan to be performed 12 ý Copy Size Scaling Reduces or enlarges your copies NOTE This will be ignored if scan or fax options are also checked 13 ý Copy Quantity Sets number ...

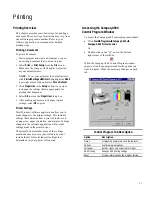
Page 39: ...re applications allow you to make changes to the printer settings This includes settings that determine how a print job looks such as page size paper orientation and margins Settings changed in the software application will override settings made in the printer driver The printer driver includes many of the settings mentioned above in case your software does not include them It also includes all s...

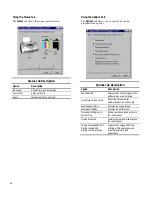
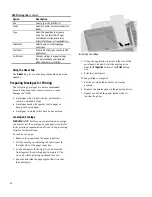
Page 40: ...ys the Control Program in the taskbar when a job is printing Close Status at End of Job Closes the status monitor automatically at the end of a job Enable Sound Effects Activates the sound effects Enable Buffer Mode Activates the buffer mode Place Control Program in System Tray Allows you to have quick access to the control panel Disable Smart Ink Disables the ink level predictions on the control ...

Page 41: ...e the DOS Printing tab to change print settings for printing from DOS applications If you cannot change the settings from within the application use this tab for settings Otherwise the settings in the DOS application will override the DOS Printing tab settings DOS Printing Tab Description Option Description Quality Select Letter Draft or Presentation for print quality Ink Saver Allows you to save ...

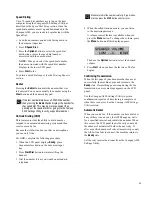
Page 42: ...d paper or deeply embossed paper xý Envelopes in which letters have been enclosed Loading an Envelope IMPORTANT Before you can print on an envelope you must select the envelope as your paper size Refer to the printing documentation of your word processing software for instructions To load an envelope 1 ý Remove the paper from the paper input tray 2 ý Lift the envelope positioning tab that is inset...

Page 43: ... before feeding the document Loading the Documents 1 ý Place the document s to be faxed face down and top down in the document input tray 2 ý Adjust the document guides to match the width of the document if necessary 3 ý Slide the document down into the tray until the machine grips the first sheet The lower LCD panel displays the message Sending a Fax Using the Control Panel To send a fax using th...

Page 44: ...ext or line art This mode provides the fastest fax speed but resolution is 203 x 98 dpi xý Fine Use when the originals are black text or line art Slower than Standard but resolution is 203 x 196 dpi xý Fine Photo Use when the originals are photos or have color content Slower than Fine but resolution is 203 x 196 dpi and gray level imaging is used xý Super Fine Use when the originals are small blac...

Page 45: ...OHD complete the following procedure 1 ý When the LCD panel displays Ready place documents face down on the document input tray 2 ý Press Start Dial button to simulate lifting the handset 3 ý Dial the number just as you would on a standard telephone Make sure to dial the number carefully If you make a mistake press the STOP button and start over 4 ý When the called station answers you can listen t...

Page 46: ...ve a call the All In One answers the call on the second ring and receives a fax automatically You can change the number of rings from the Compaq A900 Settings Utility The fax mode is recommended when you have a dedicated telephone line for your Compaq A900 Receiving Manually in TEL Mode Using an Extension Telephone This feature works best when you are using an extension telephone connected to the ...

Page 47: ...rn has been successfully learned 8 ý When the distinctive ring pattern is detected the All In One answers the call on the second ring and receives a fax automatically All other ring patterns will be ignored Sending Faxes from the Computer Your Compaq A900 comes with the ability to send faxes through your computer Before you send faxes set up and connect your Compaq A900 This section contains basic...

Page 48: ... the Compaq Control Form to Fax You can use the Compaq Control Form to fax documents The Compaq Control Form must be set up in the computer before printing a copy of Compaq Control Form See the Compaq A900 Settings Utility section for instructions Faxing with the Compaq Control Form 1 ý Press the Control Form button and then press the Start button A copy of the Control Form prints Default settings...

Page 49: ... sure any glue ink or correction fluid on the paper is completely dry before feeding the document 1 ý Place the document s to be copied face down and top down in the document input tray 2 ý Adjust document guides to match the width of the document if necessary Loading the Document Using the Copy Scan Sleeve To protect irregular sized or delicate documents or photos that were mentioned above use th...

Page 50: ... when the originals are black text or line art Black Text is slower than Black Draft but the resolution is better xý Black Photo1 Use Black Photo when the originals are photos or have color content Black Photo is faster than the color settings but it prints in grayscale xý Color Draft2 Use Color Draft to make quick color copies xý Color Normal2 Use Color Normal to make color copies with a better r...

Page 51: ...nt options zý Select Reduce Enlarge to set the proper scaling 5 ý Click Copy The All In One then scans the document and sends the image to the selected printer Copying with the Compaq Control Form 1 ý Press the Control Form button and press Start A copy of Control Form prints 2 ý Check the Copy box at the top of the page 3 ý The default settings on Control Form are indicated with a triangle You ca...

Page 52: ...ssy paper zý Onion skin or thin paper xý Remove all staples paper clips and similar items before feeding the document xý Make sure any glue ink or correction fluid on the paper is completely dry before feeding the document Loading the Document Using the Copy Scan Sleeve To protect irregular sized or delicate documents or photos that were mentioned above use the Copy Scan sleeve when scanning 1 ý S...

Page 53: ...e originals are black text or line art This is the fastest scan but the resolution is reduced xý Black Normal Use when the originals are black text or line art This is slower than Black Draft but the resolution is better xý Black Photo Use when the originals are photos or have color content Black Photo is slower than Black Normal but it captures grayscale information xý Color Draft Use when the or...

Page 54: ...age will be sent to when it is scanned 5 ý Click Scan The All In One then scans the document and sends the image to the selected application Scanning with the Compaq Control Form 1 ý Press the Control Form button and then press the Start button A copy of Compaq Control Form prints 2 ý Check the Scan box at the top of the page 3 ý The default settings on the Control Form are indicated with a triang...

Page 55: ...bushing until it reaches the slot 2 Then pull the roller up Removing the white roller 4 ý Wipe the roller surface with a soft cloth dampened with water 5 ý Wipe the scanner glass surface with a soft cloth dampened with water Dry with a soft tissue Cleaning the Cartridge Carrier If the ink cartridge is not printing from some nozzles as indicated on the test page the cartridge carrier contacts may n...

Page 56: ...er assembly you may need to replace the document separator pad Visit the Compaq website at www compaq com to order the separator pad Or call Customer Service at 1 800 OKCOMPAQ 1 800 652 6672 The life of the automatic document feed rubber varies with use You may not have to replace this pad during the life of the A900 ...

Page 57: ...ng Printing Copying or Printing Faxes Paper may get jammed in the printer exit If a paper jam occurs the following displays on the LCD panel If you experience a jam in the printer exit tray 1 ý Carefully pull the jammed paper out the paper exit of the A900 2 ý Clear the printer exit tray s path and ensure that the paper in the paper feed is aligned properly 3 ý Press the Stop Clear button The plai...

Page 58: ...some more pages printed but you will defeat the ink management system and may lose incoming faxes CLR DOCUMENT JAM A document jam or a very long document was scanned Open cover and remove document or jam REMOVE PAPER JAM THEN PRESS CLEAR Paper jam occurred in printer paper path Clear paper jam then press CLEAR STOP See Clear Paper Jam instructions MEMORY TO PRINT A copy collate or incoming fax is ...

Page 59: ...ge of a document Wait for memory to become available then try again or Turn Memory XMIT off from SETUP or A900 Settings Utility MEMORY FULL TO CONTINUE START Memory Full occurred after the first page of a document has been scanned into memory Press START and the A900 will send completely stored pages Current and remaining pages will not be sent Pressing STOP CLEAR will cancel the job NO LINE CONNE...

Page 60: ...SE SOLUTION PC DRPD SETUP FAILED A900 failed to learn the DRPD tones Ring pattern not detected System timed out waiting for ring Note that DRPD mode can not be selected until a ring pattern has been successfully learned Check phone line connection ...

Page 61: ...UMENT JAM A document jam or a very long document was scanned Open the control panel and remove document or jam PC NOT AVAILABLE displayed on the LCD panel with a beep warning tone and return to READY state Computer is not available for a copy task that required computer assistance multiple photo or color copies Verify that the computer is connected and available Make sure the cables are connected ...

Page 62: ...o scan while parallel port is in use by another task Verify that the computer is connected and available Wait for resource to become free then try again CLR DOCUMENT JAM A document jam or a very long document was scanned Open the cover and remove document or jam DOCUMENT OUT PLEASE WAIT Pressing STOP after paper is loaded Wait for all document s in the document input tray to be fed to the document...

Page 63: ...per input tray Load paper into the paper input tray CHANGE BLACK INK Trying to print a Control Form but Smart Ink has determined that the ink cartridge is empty Replace Black ink cartridge Replacing the Black ink cartridge and selecting NEW BLACK CARTRIDGE will reset the ink counting system Note that if you keep the old cartridge installed and tell the system you have installed new cartridges you ...

Page 64: ...ý Insufficient memory to receive fax See Memory To Print Memory Full in Fax Messages Faxes can not be received manually xý Press START twice or 9 on the EXT phone before you hang up the handset The machine will not send a fax xý Make sure the document is loaded face down xý Check the machine you are sending to for problems Incoming faxes are incomplete or contain blank spaces xý The machine sendin...

Page 65: ...re you do not have hard coded spaces at the left margin in your application xý The print cartridge may need to be cleaned See Cleaning Print Cartridges section xý The print cartridge may need to be aligned See Aligning Print Cartridges section Vertical straight lines in tables borders and graphs are not smooth xý The print cartridge may need to be aligned See Aligning Print Cartridges section xý T...

Page 66: ...lt printer xý Check the printer cable connections xý The print head may need to be cleaned See Cleaning Print Cartridges section Printer prints very slowly xý You may be using High print quality Adjust your Print Quality settings to NORMAL or QUICK PRINT xý Graphics print more slowly than text xý Color prints more slowly than black xý Special media prints more slowly than plain paper xý Open appli...

Page 67: ... loading xý If multiple sheets have caused a paper jam clear the paper jam Paper skews or buckles in the paper bin xý Make sure there is not too much paper in the paper input tray xý Make sure the paper guide does not push the paper and cause it to bow xý Make sure you are using the correct type of paper xý Do not force paper down into the printer when loading xý Make sure that the right side of t...

Page 68: ...ation that came with your computer There is no document or the document is loaded improperly Insert the document properly and try again message appears on the screen xý Insert the document properly and push it down until the A900 grips the document Scanner is busy receiving or printing data When the current job is completed try again message appears on the screen xý Your scanner may be busy with a...

Page 69: ...mputer is not available and system has reverted into demo mode xý Verify that an IEEE 1284 cable is connected to the computer and that the computer is on and not in sleep mode xý Verify that the A900 software is properly installed and running by selecting A900 Settings from the Compaq A900 program group ...

Page 70: ...ion may void the user s authority to operate the equipment Cables Connections to this device must be made with shielded cables with metallic RFI EMI connector hoods in order to maintain compliance with FCC Rules and Regulations Declaration Of Conformity For Products Marked With The FCC Logo United States Only This device complies with Part 15 of the FCC Rules Operation is subject to the following ...

Page 71: ...local telephone company to determine the maximum REN for your calling area The REN for this device is 0 7B An FCC Compliant 6 position modular plug is provided with this equipment This equipment is designed to be connected to the telephone network or premises wiring using a compatible 6 position modular jack which is FCC Part 68 Compliant If your telephone equipment causes harm to the telephone ne...

Page 72: ... an interface may consist of any combination of devices subject only to the requirement that the sum of the Ringer Equivalence Numbers of all the devices does not exceed 5 The Ringer Equivalence Number REN for this device is 0 7B For the location of the authorized Canadian maintenance facility nearest you call 1 800 263 5868 or contact RPSDTý DQDGDñý QFï éèý9RJHOOý5RDG 5LFKPRQGý LOOñý2QWDULRýý è ý...

Page 73: ...ou should purchase a power cord that is approved for use in your country The power cord must be rated for the product and for the voltage and current marked on the product s electrical ratings label The voltage and current rating of the cord should be greater than the voltage and current rating marked on the product In addition the diameter of the wire must be a minimum of 0 75 mm 2 18AWG and the ...

Page 74: ...e the following precautions when operating telecommunications and network equipment Failure to observe these precautions could result in fire bodily injury and damage to the equipment xý Do not connect or use a modem or telephone other than a cordless type during a lightning storm There may be a remote risk of electric shock from lightning xý Never connect or use a modem or telephone in a wet loca...

Page 75: ...to resolve the problem by phone If your problems cannot be resolved by phone Compaq will ship an exchange printer to you Upon receipt of the exchange printer pack the defective printer in the carton which contained the exchange printer and make it available for pickup by a Compaq representative If you fail to return the defective printer within 5 business days you will be responsible for the full ...

Page 76: ...be responsible for the full amount of the replacement printer This Limited Warranty is valid only within the United States or Canada and within the country in which the Hardware Product was purchased This Limited Warranty extends only to Products purchased from Compaq or from a Compaq authorized reseller This Limited Warranty also does not extend to any Product that has been damaged or rendered de...

Page 77: ...llow the exclusion or limitation in incidental or consequential damages for consumer products In such states the exclusion or limitation of this Limited Warranty may not apply to you This Limited Warranty gives you specific legal rights You may also have other rights that may vary from state to state You are advised to consult applicable state laws for a full determination of your rights ...

Page 78: ... recommends that you do not connect an answering machine or computer modem to another wall jack on the same telephone line as the A900 The fax information can be corrupted by any voice answering machine or modem activity that occurs during fax reception Equipment plugged into the EXT connection is disconnected from the line during A900 fax activities reducing the possibility of fax corruption Tele...

Page 79: ...s and voice messaging systems xý Internet includes data or bulletin board link If you only have a single line then only one of these functions can be active any one time If you have more than one line then it may be advantageous to dedicate a line to a specific function For example with two telephone lines you can fax and browse the Internet at the same time Devices and Connections This section de...

Page 80: ...x Receive Modes Mode Selection Description FAX Receives faxes automatically TEL To receive faxes manually press Start twice on the A900 or press 9 on the telephone ANS FAX Do not use for this configuration DRPD The A900 answers the previously learned ring pattern on 2 rings WinFax Active Connection Device Selections Selection Description Compaq A900 Fax Send computer faxes using the A900 Note Do n...

Page 81: ... set WinFax for AUTOMATIC FAX RECEPTION This will inhibit printing and scanning functions to the A900 Computer Modem Send or receive computer faxes through a computer modem that is connected to the same telephone line as the A900 This has the advantage that printing and scanning operations can happen concurrently with computer modem faxing or Internet activity If you wish to receive faxes through ...

Page 82: ...mputer faxes via a computer modem that is connected to the same telephone line as the A900 This has the advantage that printing and scanning operations can happen concurrently with computer modem faxing or even Internet activity If you wish to receive faxes through the computer modem instead of the A900 set WinFax for AUTOMATIC FAX RECEPTION You will also need to set the A900 FAX RECEIVE MODE to T...

Page 83: ...WLQJVñýêì OOð Qð2QHý HIDXOWVý6HWWLQJV SULQWýVHWWLQJVñýëç 16î ýPRGHñýéé DQVZHUýRQýULQJ ID ñýëæ DQVZHULQJýPDFKLQH RSWLRQDOýSXUFKDVHñýçñýææ DSSOLFDWLRQýVRIWZDUHñýéñýìí DWWDFKLQJ SULQWHUýFDEOHñýç DXWRPDWLFýUHGLDOñýéê DXWRPDWLFýUHGXFWLRQ ID ñýëä R ýFRQWHQWVñýê EXIIHUýPRGHñýêå FDEOH SULQWHUñýç FDUULDJHýUHWXUQýPRGH 26ý3ULQWLQJñýêä FDUWULGJHñýê LQNýOHYHOVñýêå FDUWULGJHV DOLJQLQJñýëèñýêä FOHDQLQJñýëèñýêä L...

Page 84: ...ý UDIWñýéå ODFNý1RUPDOñýéå ODFNý3KRWRñýéå RORUý HVWñýéå RORUý UDIWñýéå RORUý1RUPDOñýéå FRQWUDVWñýéå FRS ýTXDQWLW ñýéå FRS ýVL Hñýéå FRS ýW SHñýéå FRS îVFDQýVOHHYH XVLQJýWRýFRS ñýéæ FRUG SRZHUñýê WHOHSKRQHñýê FRUUHFWLQJýID ýSUREOHPVñýçë FRUUHFWLQJýSDSHUýIHHGLQJýSUREOHPVñýçè FRUUHFWLQJýSULQWýTXDOLW ýSUREOHPVñýçê FRUUHFWLQJýSULQWLQJýSUREOHPñýçé FRUUHFWLQJýSUREOHPVñýçë FRUUHFWLQJýVFDQQLQJýSUREOHPVñýçç...

Page 85: ...ñýéì UHFHLYHýPRGHñýëæ UHGLDOñýéê UHGLDOLQJýRSWLRQVñýëä UHVROXWLRQñýëæñýéë ULQJýYROXPHñýêí VSHDNHUýYROXPHñýêíñýéê VSHHGýGLDOLQJñýéê 6 VWHPý ñýëæ 6 VWHPý1DPHñýëæ XVLQJý RQWUROý RUPñýéç ID ýFRQILUPDWLRQ SULQWLQJñýëè ID ýHUURUýPHVVDJHVñýèæ D ý URPý6HWXSïý6HHý RQWUROý RUP ID ýPHPRU ý PLW VHWXSýEXWWRQñýëè ýPRGHñýéé ID ýSULQW VHWXSýEXWWRQñýëè ID ýSUREOHPVñýçë ID ýUHFHLYLQJýPRGHV 16î ýPRGHñýéé 53 ýPRGHñýé...

Page 86: ...JDOýSDSHUñýëê ORDGLQJýOHWWHUðVL HGýSDSHUñýëê ORDGLQJýSDSHUñýëê ORFDWLQJýDGGLWLRQDOýKHOSñýì ORFDWLRQ FKRRVLQJñýè 0 PDLQWHQDQFH FDUWULGJHVñýëè PHVVDJHýFRQILUP ID ñýëæ PLVVLQJýRUýGDPDJHGýSDUWV UHWXUQLQJñýê 1 QR OHýWHVWñýëì QR OHV FOHDQLQJñýëì ZLSLQJñýëë 2 2Qý RRNý LDOLQJýõ2 ôñýéê RSHUDWLRQV VWDQGDORQHñýä RSWLRQDOýSXUFKDVHV DQVZHULQJýPDFKLQHñýç H WHQVLRQýSKRQHñýç RYHUYLHZ FRS ñýéæ ID ñýéì SULQWLQJñýêæ...

Page 87: ...EOHñýêê UHFHLYHýORJ SULQWLQJñýëè UHFHLYHýPRGH ID ñýëæ UHFRPPHQGDWLRQV VHWWLQJýXSñýè UHGLDO ID ñýéê UHGLDOLQJýRSWLRQV ID ñýëä UHJLVWUDWLRQýIRUPñýìè UHPRYLQJ SDFNDJLQJýPDWHULDOVñýè WDSHñýè UHVROXWLRQ 26ý3ULQWLQJñýêä ID ñýëæñýéë ULQJýYROXPH ID ñýêí ULQJHUýYROXPHñýëè 6 VDIHW ñýçå SRZHUýFRUGVñýçå VFDOH FRS ñýêí VFDQ OOð Qð2QHý HIDXOWý6HWWLQJVñýêì FRQWUDVWñýêì IURQWýSDQHOñýèí RYHUYLHZñýèí SUHSDULQJýGRFX...

Page 88: ...UýYLHZñýêê WDNLQJýWKHý äííýRXWýRIýWKHýER ñýè WDSH UHPRYLQJñýè 7 ýPRGHñýéé WHOHSKRQH VRFNHWñýç WHOHSKRQHýFRUG FRQQHFWLQJñýç WHVW SDWWHUQVñýëì WHVWýSDJH SULQWLQJñýêä WHVWýSDWWHUQVñýëì WHVWLQJ QR OHVñýëì WH WýER ñýì WH WýFRQYHQWLRQVñýì WH WýVFDOHýPRGH 26ý3ULQWLQJñýêä WLPH äííýVHWWLQJVñýêí WUDQPLVVLRQýORJ SULQWLQJñýëè WUD V GRFXPHQWñýè WURXEOHVKRRWLQJ RQWUROý RUPýPHVVDJHVñýçì FRS ýPHVVDJHVñýèä FRUUHFW...

Reviews: