background image

3-26    Overview of Installing Hardware Options

Writer: Rick Chew   Project: Compaq ProLiant 800 Servers Supporting Pentium II Processors and 100-MHz System

Bus Setup and Installation Guide   Comments: 179489-001

File Name: d-ch03.doc   Last Saved On: 3/31/98 10:10 AM

COMPAQ CONFIDENTIAL - NEED TO KNOW REQUIRED

Table 3-2

Expansion System Board Components

Item

Component

Item

Component

1

I

2

O Connector

9

PCI Connector

2

Replacement Battery

Connector

10

SW1 Configuration Switch

3

Replacement Battery

Jumper

11

PCI Connector

4

Parallel Adapter Cable

12

Parallel Connector

5

PCI/ISA Shared

Connectors

13

Serial A and B Connectors

6

PCI/ISA Shared

Connectors

14

Mouse Connector

7

PCI/ISA Shared

Connectors

15

Keyboard Connector

8

PCI/ISA Shared

Connectors

Table 3-3

SW1 Configuration Switch Settings

SW1 Setting -

Default

Function

1 - OFF

Disable On-Board Video

2 - OFF

Lock Configuration Information

3 - OFF

Reserved

4 - OFF

Disable Floppy

5 - OFF

Disable Password

6 - OFF

Clear NVRAM

Summary of Contents for Proliant 800

Page 1: ...ProLiant 800 Servers Supporting Pentium II Processors and 100 MHz System Bus Setup and Installation Guide ...

Page 2: ...First Edition April 1998 Part Number 179489 001 Compaq Computer Corporation ...

Page 3: ...on may be photocopied or reproduced in any form without prior written consent from Compaq Computer Corporation 1998 Compaq Computer Corporation All rights reserved Printed in the U S A The software described in this guide is furnished under a license agreement or nondisclosure agreement The software may be used or copied only in accordance with the terms of the agreement Compaq Deskpro Fastart Com...

Page 4: ...mpaq Web Site xii Telephone Numbers xiii Chapter 1 Features Customer Support 1 2 Standard Features 1 2 Processors and System Memory 1 2 Expansion Slots 1 3 Disk Controller 1 3 Network Controller 1 4 Mass Storage 1 4 Standard Interfaces 1 4 Video 1 5 ROM 1 5 Power Supply 1 5 Warranty 1 5 Server Configuration and Management 1 6 Compaq SmartStart 1 6 Server Management 1 7 Compaq Insight Manager 1 7 C...

Page 5: ...Routine Maintenance 2 10 Chapter 3 Overview of Installing Hardware Options Opening the Front Bezel of the ProLiant 800 3 3 Removing the Small Access Panel 3 4 Removing the Large Access Panel 3 5 Understanding the Security Provisions 3 7 Security Screws Preinstalled in ProLiant 800 3 7 Front Bezel Keylock for ProLiant 800 3 8 Removing and Replacing the Processor Cage 3 9 Locating the Expansion Boar...

Page 6: ...SI Cabling of a SMART 2 Array Controller Board 4 8 External SCSI Cabling of the External SCSI Connector to Storage Devices 4 10 External SCSI Cabling of a SMART 2 Array Controller to Storage Devices 4 11 Chapter 5 Integrated Management Log Multiple Ways of Viewing the Log 5 1 Compaq Insight Manager 5 2 Compaq Survey Utility 5 3 List of Events 5 4 Appendix A Compaq ProLiant 800 Servers Setup and In...

Page 7: ...Project Compaq ProLiant 800 Servers Supporting Pentium II Processors and 100 MHz System Bus Setup and Installation Guide Comments 179489 001 File Name A FRNT DOC Last Saved On 3 31 98 8 34 AM Mouse Compliance Statement A 9 ...

Page 8: ...ervers Supporting Pentium II Processors and 100 MHz System Bus Setup and Installation Guide Comments 179489 001 File Name A FRNT DOC Last Saved On 3 31 98 8 34 AM Appendix B Electrostatic Discharge Grounding Methods B 1 Appendix C Power Cord Set Requirements General Requirements C 1 Appendix D Specifications and Connector Interfaces Connector Interfaces D 3 Index ...

Page 9: ...des Text Conventions This document uses the following conventions to distinguish elements of text Keys Keys appear in boldface A plus sign between two keys indicates that they should be pressed simultaneously USER INPUT User input appears in a different typeface and in uppercase FILENAMES File names appear in uppercase italics Menu Options Command Names Dialog Box Names These appear in initial cap...

Page 10: ...oss of life CAUTION Indicates that failure to follow directions could result in damage to equipment or loss of information IMPORTANT Presents clarifying information or specific instructions NOTE Presents commentary sidelights or interesting points of information Symbols on Equipment These icons may be located on equipment in areas where hazardous conditions may exist Any surface or area of the equ...

Page 11: ...tium II Processors and 100 MHz System Bus Setup and Installation Guide Comments 179489 001 File Name A FRNT DOC Last Saved On 3 31 98 8 34 AM Any RJ 45 receptacle marked with these symbols indicates a Network Interface Connection WARNING To reduce the risk of electrical shock fire or damage to the equipment do not plug telephone or telecommunications connectors into this receptacle ...

Page 12: ...component allow the surface to cool before touching Power Supplies or Systems marked with these symbols indicate the equipment is supplied by multiple sources of power WARNING To reduce the risk of injury from electrical shock remove all power cords to completely disconnect power from the system Getting Help If you have a problem and have exhausted the information in this guide you can get further...

Page 13: ...tallation Guide Comments 179489 001 File Name A FRNT DOC Last Saved On 3 31 98 8 34 AM Telephone Numbers For the name of your nearest Compaq Authorized Reseller In the United States call 1 800 345 1518 In Canada call 1 800 263 5868 For Compaq technical support In the United States and Canada call 1 800 386 2172 For Compaq technical support phone numbers outside the United States and Canada visit t...

Page 14: ...8 00 AM Chapter 1 Features This manual provides information on the new Compaq ProLiant 800 server New Compaq ProLiant 800 servers are business critical servers that support the following Pentium II processors with 100 MHz system bus Dual processing 100 MHz registered SDRAM Error Checking and Correcting ECC memory upgradeable to 512 megabytes Four 1 or 1 6 Non Hot Plug Drive Cage Two available remo...

Page 15: ...re CD for information on Compaq Service Providers and Authorized Compaq Resellers in your area Standard Features The following features are standard on the new ProLiant 800 server unless otherwise noted Processors and System Memory Standard as a single processor unit with one Intel Pentium II Processor with integrated 512 KB Level 2 Cache on the Compaq system board Error Checking and Correcting EC...

Page 16: ...z Disk Controller Integrated Wide Ultra SCSI 3 Controller on the PCI local bus The controller provides one SCSI bus capable of handling up to six non hot pluggable SCSI devices or seven external drives without using an expansion slot This controller performs at a maximum data transfer rate of 40 megabytes per second MB s Optional controller boards for controller duplexing or expanding storage capa...

Page 17: ...ems Reference Library CD included in the Reference Information pack Mass Storage Maximum of eight internal drive bays four in removable media drive area and four in drive cage One third height dedicated removable media drive bay occupied by 1 44 MB diskette drive One half height removable media drive bay occupied by IDE 24X CD ROM drive Two available half height 5 25 removable media drive bays The...

Page 18: ...ments 179489 001 File Name b ch01 doc Last Saved On 4 1 98 8 00 AM Video Integrated Video Controller provides maximum resolution of 1024 x 768 non interlaced resolution at 256 colors Supports SVGA VGA and EGA graphics resolution 1 MB video memory ROM Software upgradable firmware ROMPaq Utility used to upgrade ROM Power Supply 325 W power supply Warranty Three Year On Site Limited Worldwide Warrant...

Page 19: ...ation Utility Compaq Integrated Remote Console Compaq Integrated Management Log Compaq SmartStart SmartStart located on the SmartStart and Support Software CD is the intelligent way to configure your Compaq server with Novell Microsoft SCO and IBM system software SmartStart uses a step by step process to configure the server and to load the system software thereby achieving a well integrated serve...

Page 20: ...y CD included in the shipping box Compaq Insight Manager Compaq Insight Manager which is loaded from the Compaq Management CD is an easy to use software utility for collecting server information Insight Manager performs the following functions Forwards server alerts fault conditions Monitors fault conditions and server performance Controls server security and configuration Remotely controls server...

Page 21: ...interrupts IRQs manages the installation of memory processor upgrades and mass storage devices such as hard drives tape drives and diskette drives sets and stores power on features like date and time stores configuration information in nonvolatile memory assists in the installation of the operating system assists in running diagnostic tools such as TEST and INSPECT Utilities The first time the ser...

Page 22: ...erates independently of the operating system provides for remote server reboot provides access to system configuration uses out of band communication with dedicated management modem installed in the server For information concerning the standard Integrated Remote Console refer to the Integrated Remote Console User Guide included in the shipping box Compaq Integrated Management Log The standard Com...

Page 23: ...l Configuration Lock Security Lock Provision These security features are established through the Compaq System Configuration Utility For information concerning server security features refer to the Systems Reference Library CD and the SmartStart and Support Software CD included in the shipping box Diagnostic Tools The software and firmware diagnostic tools available for your use are Power On Self ...

Page 24: ... 00 AM Front Panel Components Figure 1 2 and Table 1 1 show and describe the components on the front panel of the server 5 6 8 7 4 2 3 1 9 10 11 12 Figure 1 2 Identifying front panel components Table 1 1 Front Panel Components Ref Component Ref Component 1 SCSI Activity LED 7 Blank Removable Media Bay 2 Power LED 8 Blank Removable Media Bay 3 Power On Off Button 9 Drive Cage Position 3 4 Keylock f...

Page 25: ...e 1 3 and Table 1 2 show the components on the rear panel of the server 3 2 1 4 5 7 8 9 6 10 Figure 1 3 Rear panel of ProLiant 800 Table 1 2 Rear Panel Components Ref Connector Ref Connector 1 Parallel Connector 6 PCI ISA Expansion Slots 2 Serial Connector 7 Mouse Connector 3 Serial Connector 8 Keyboard Connector 4 External SCSI Connector B 9 RJ 45 Ethernet Connector with 3 NIC LEDs Active Link an...

Page 26: ...stallation Guide Comments 179489 001 File Name b ch01 doc Last Saved On 4 1 98 8 00 AM Server Backplane Figure 1 4 and Table 1 5 show the connectors on the backplane of the server 1 2 3 4 5 6 7 9 10 11 12 8 Figure 1 4 Server backplane Table 1 3 Server Backplane Ref Backplane Connector Ref Backplane Connector 1 CD ROM 7 Fan 2 Diskette 8 Power Supply 3 Expansion System Board 9 Reserved 4 Processor B...

Page 27: ... Chapter 4 Overview of Installing Hardware Options See the options kits for detailed instructions NOTE ISA expansion boards are installed after System Configuration utility has been run 3 Connect cables keyboard mouse monitor network and power 4 Install other options additional memory hard drives expansion boards and external storage devices See Chapter 4 Overview of Installing Hardware Options Se...

Page 28: ...artStart program the server automatically starts the System Configuration Utility When the utility is completed you will be prompted to turn the server off install any ISA boards any switch settings required will be provided by the System Configuration Utility and then boot the server again from the SmartStart program Selecting a Site Make sure that the installation site you select has the followi...

Page 29: ... 100 MHz System Bus Setup and Installation Guide Writer Rick Chew Project Compaq ProLiant 800 Servers Supporting Pentium II Processors and 100 MHz System Bus Setup and Installation Guide Comments 179489 001 File Name c ch02 doc Last Saved On 4 1 98 8 17 AM power outlet ...

Page 30: ...uctions and illustrations printed on the shipping carton s Locating Materials Locate the following materials that were shipped with your new server Compaq ProLiant 800 server Keyboard Mouse Power cord Wide to Standard SCSI adapter not needed if installing Wide SCSI devices Documentation inside the server most of the option installation and setup instructions are located on the labels which are att...

Page 31: ...nd Other Major Hardware Options See Chapter 4 Overview of Installing Hardware Options to install PCI expansion boards and other major hardware options The following major hardware options are available for the ProLiant 800 server and may be obtained from your local Compaq Reseller or Authorized Compaq Service Provider This guide covers only the installation of a typical expansion board hard drive ...

Page 32: ... Devices After all internal hardware options have been installed in the server connect the power cord and peripheral devices to the connectors located on the rear panel of the server See Chapter 4 Overview of Installing Hardware Options or see the options kits for detailed instructions WARNING To reduce the risk of electrical shock or fire do not plug telecommunications telephone connectors into t...

Page 33: ...NIC LEDs Active Link and 10 100 Speed 5 Power Connector 10 Video Connector Powering Up the Server After the cables have been connected to the server you are ready to power up the ProLiant 800 server as shown in Figure 2 2 WARNING Be sure that the power outlet you plug your power cord into is easily accessible and located as close to the equipment operator as possible When you need to disconnect po...

Page 34: ...ependability and supportability The SmartStart and Support Software CD holds the Compaq System Configuration Utility and ROMPaq To use the SmartStart and Support Software CD refer to the Server Setup and Management pack included in the shipping box The Compaq System Configuration Utility performs a wide range of configuration activities including the following Configures PCI boards automatically P...

Page 35: ...system Assists in running diagnostic tools such as TEST and INSPECT Utilities The first time the server is configured the SmartStart program automatically creates a system partition and installs the configuration utility and other Compaq utilities in that partition To install the SmartStart and Support Software CD 1 With your server turned on open the removable media access door by pressing on the...

Page 36: ...e CD ROM drive handling the CD by its edges not by the flat surfaces of the disc timber27 EPS Figure 2 4 Inserting the CD ROM 4 When the busy indicator turns green the SmartStart installation sequence will begin Refer to the SmartStart documentation included in the Server Setup and Management pack which is shipped with your server to configure the system and load the operating system To manage the...

Page 37: ...n Self Test POST Diagnostics DIAGS ROMPaq utilities to upgrade flash ROMs Automatic Server Recovery ASR 2 For information concerning Compaq diagnostic tools refer to the Systems Reference Library CD included in the Reference Information pack of the shipping box Registering Your Server You can register your server during the SmartStart configuration process Refer to the Server Setup and Management ...

Page 38: ...ems contact your Authorized Compaq Reseller The new server chassis facilitates the installation of hardware upgrades Most hardware options are installed on the expansion system board on the processor system board and in the drive bay area Use the following table to determine how to gain access to internal server components Table 3 1 Gaining Access to Internal Components To Gain Access To You Will ...

Page 39: ...Processors and 100 MHz System Bus Setup and Installation Guide Comments 179489 001 File Name d ch03 doc Last Saved On 3 31 98 10 10 AM If security screw is installed as shipped then open the front bezel and remove the large access panel in order to remove the security screw before attempting to remove the processor cage ...

Page 40: ... 10 10 AM WARNING To reduce the risk of personal injury from hot surfaces allow the internal system components to cool before touching WARNING To reduce the risk of injury or damage to the equipment when installing options ensure that the power to the server is turned off and that the AC power cord is disconnected CAUTION Electrostatic discharge can damage electronic components Be sure you are pro...

Page 41: ... 100 MHz System Bus Setup and Installation Guide Comments 179489 001 File Name d ch03 doc Last Saved On 3 31 98 10 10 AM Opening the Front Bezel of the ProLiant 800 To open the front bezel of the ProLiant 800 1 If the keylock is locked turn the keylock 2 Open the front bezel front door to the right Figure 3 1 Opening the front bezel ...

Page 42: ...mall access panel removed This panel is an integral part of the cooling system and removing it while the system is running may adversely affect data integrity To remove the small access panel 1 If the computer is on turn it off and disconnect the power cord 2 Disconnect any other external equipment connected to the computer 3 If required open the front bezel 4 Loosen the top thumbscrew 5 Slide the...

Page 43: ...the expansion system board and expansion slots inside the chassis Removing the Large Access Panel CAUTION Do not operate the server with the large access panel removed This panel is an integral part of the cooling system and removing it while the system is running may adversely affect data integrity To remove the large access panel 1 If the computer is on turn it off and disconnect the power cord ...

Page 44: ...00 MHz System Bus Setup and Installation Guide Comments 179489 001 File Name d ch03 doc Last Saved On 3 31 98 10 10 AM Figure 3 3 Removing the large access panel 7 Turn the large access panel over to locate the Processor Cage Configuration Label and the Drive Configuration Label These labels provide information on installing processor board options configuring drives installing drives and setting ...

Page 45: ... server is equipped with unique security access provisions including one keylock for the front bezel one security screw for the expansion I O board cage and one security screw for the processor cage Security Screws Preinstalled in ProLiant 800 Figure 3 4 shows the location of the two security screws If you need to remove the processor cage or the expansion I O board cage make sure that you remove ...

Page 46: ...em Bus Setup and Installation Guide Comments 179489 001 File Name d ch03 doc Last Saved On 3 31 98 10 10 AM timber 08 EPS Figure 3 5 Security screws with exploded view of removing processor cage screw Front Bezel Keylock for ProLiant 800 To use the front bezel keylock on the ProLiant 800 close the front bezel and turn the keylock to lock the bezel timber 09 EPS Figure 3 6 Securing ProLiant 800 fro...

Page 47: ...Pentium II processor a processor power module switches and connectors To remove the cage 1 If the computer is on turn it off and disconnect the power cord 2 Disconnect any other external equipment connected to the processor cage CAUTION If a security screw is installed in the left side of the processor cage remove the screw before opening the cage See Figure 3 5 3 Open the processor cage by first ...

Page 48: ...or cage 5 Turn the cage over loosen the thumbscrew and lift the cover to locate the processor and memory components 6 For installation of these components refer to the Hardware Installation and Configuration Poster included in the shipping box or to the Processor Cage Configuration Label located on the inside of the large access panel 7 To reassemble the server reverse steps 1 through 5 NOTE If yo...

Page 49: ... located in the expansion I O board cage which is located directly beneath the small access panel Four shared PCI ISA expansion slots slots 1 4 Two dedicated PCI local bus expansion slot slots 5 6 NOTE Although there are two physical connectors one ISA and one PCI for each shared PCI ISA slot the connectors are placed so that only one of the connector slots can have a board installed at a time Exp...

Page 50: ... the option kit For a text overview of the procedure refer to the procedure below For an illustrated overview of the procedure refer to the Hardware Installation and Configuration poster included in the shipping box or to the Expansion Board Installation Label located on the inside of the small access panel The expansion slots may be populated in any order Slots 4 5 and 6 are connected to the prim...

Page 51: ...ew Project Compaq ProLiant 800 Servers Supporting Pentium II Processors and 100 MHz System Bus Setup and Installation Guide Comments 179489 001 File Name d ch03 doc Last Saved On 3 31 98 10 10 AM Figure 3 10 Opening expansion slot latch and removing slot cover ...

Page 52: ...nd 100 MHz System Bus Setup and Installation Guide Comments 179489 001 File Name d ch03 doc Last Saved On 3 31 98 10 10 AM 6 Insert the expansion board Figure 3 11 Inserting expansion board 7 Close the expansion slot latch to secure the board Figure 3 12 Securing Expansion Board 8 Close the server and reconnect all cables 9 Turn on the computer 10 Run the Compaq System Configuration Utility if nec...

Page 53: ...tion sources For a text and illustrated procedure refer to the installation documentation that came with the option kit For a text overview of the procedure refer to the procedure below For an illustrated overview of the procedure refer to the Hardware Installation and Configuration poster included in the shipping box or to the processor cage Configuration Label located on the inside of the large ...

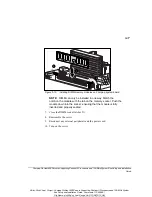
Page 54: ...89 001 File Name d ch03 doc Last Saved On 3 31 98 10 10 AM 2 2 1 Figure 3 13 Installing DIMM memory modules on Compaq system board NOTE DIMM can only be installed in one way Match the notch on the module with the tab on the memory socket Push the module down into the socket ensuring that the module is fully inserted and properly seated 7 Close the DIMM socket latches 8 Reassemble the server 9 Reco...

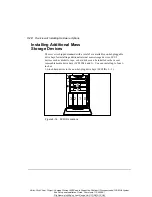
Page 55: ...ditional Mass Storage Devices The server is shipped standard with a total of six available non hot pluggable drive bays for installing additional internal mass storage devices SCSI devices such as diskette tape or hard drives can be installed in the vacant removable media drive bays SCSI IDs 4 and 5 You can install up to four 1 inch or 1 6 inch hard drives in the non hot plug drive bays SCSI IDs 0...

Page 56: ...ller Because of each server s physical and configuration constraints the maximum number will be different You must set the SCSI ID manually on each drive to a unique value in the range of 0 to 6 Consult the documentation that came with the drive for instructions on setting the SCSI ID If only one SCSI hard drive is used it should be installed in the lowest numbered bay Compaq SCSI non hot plug cab...

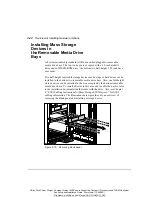
Page 57: ... drive the bottom two half height 5 25 inch bays are vacant Two half height removable storage devices such as tape or hard drives can be installed in the bottom two removable media drive bays Also one full height storage device can be installed in the area occupied by the bottom removable media drive bays To install a device in this area and to cable the device refer to the installation documentat...

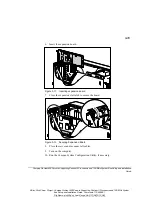
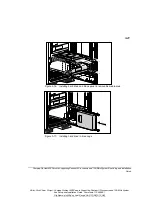
Page 58: ...ject Compaq ProLiant 800 Servers Supporting Pentium II Processors and 100 MHz System Bus Setup and Installation Guide Comments 179489 001 File Name d ch03 doc Last Saved On 3 31 98 10 10 AM timber 19 EPS Figure 3 16 Installing hard drive and blank panel in removable media area timber 22 EPS Figure 3 17 Installing hard drive in drive cage ...

Page 59: ... and 100 MHz System Bus Setup and Installation Guide Comments 179489 001 File Name d ch03 doc Last Saved On 3 31 98 10 10 AM 1 2 Figure 3 18 SCSI bus connector attached to removable media area and drive cage The shaded cable in Figure 3 17 is the SCSI cable connected from the SCSI bus to the removable media area and the drive cage ...

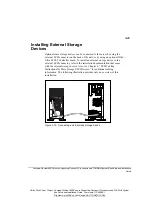
Page 60: ... mass storage devices can be connected to the server by using the external SCSI connector on the back of the unit or by using an optional Wide Ultra SCSI 3 Controller board To install an external storage device to the external SCSI connector refer to the installation documentation that came with the external storage device Also see Chapter 4 SCSI Cabling Instructions for Mass Storage SCSI Devices ...

Page 61: ...edure refer to the procedure below For an illustrated overview of the procedure refer to the Hardware Installation and Configuration poster included in the shipping box or to the Processor Cage Configuration Label located on the inside of the large access panel To install a second processor 1 If the server is on turn it off and disconnect the power cord 2 Disconnect any other external equipment co...

Page 62: ...0 10 AM 5 If required set the processor bus core frequency switch on the Compaq system board 6 Reassemble the server 7 Reconnect any external peripherals and the power cord Board Layouts These illustrations provide information to locate switches LEDs connectors board slots and other board components This information is also provided on the access panel labels located inside your server Expansion S...

Page 63: ...nector 2 Replacement Battery Connector 10 SW1 Configuration Switch 3 Replacement Battery Jumper 11 PCI Connector 4 Parallel Adapter Cable 12 Parallel Connector 5 PCI ISA Shared Connectors 13 Serial A and B Connectors 6 PCI ISA Shared Connectors 14 Mouse Connector 7 PCI ISA Shared Connectors 15 Keyboard Connector 8 PCI ISA Shared Connectors Table 3 3 SW1 Configuration Switch Settings SW1 Setting De...

Page 64: ... Compaq System Board 1 2 4 5 6 3 8 7 c b 10 11 9 13 12 a c b 14 Figure 3 22 Compaq System Board Table 3 4 Compaq System Board Components Item Component Item Component 1 Video Connector 10 Bus Ratio Switch SW2 2 RJ 45 Connector 11 Processor Power Module Installed 3 SCSI External B Connector 12 Processor 1 4 NIC Active LED 13 DIMM Slots 1 4 5 NIC Link LED 14 Switch Core Bus Ratio SW1 6 NIC 10 100 Sp...

Page 65: ... Options Writer Rick Chew Project Compaq ProLiant 800 Servers Supporting Pentium II Processors and 100 MHz System Bus Setup and Installation Guide Comments 179489 001 File Name d ch03 doc Last Saved On 3 31 98 10 10 AM 9 Processor 2 Slot ...

Page 66: ...nt 800 Servers Supporting Pentium II Processors and 100 MHz System Bus Setup and Installation Guide Comments 179489 001 File Name d ch03 doc Last Saved On 3 31 98 10 10 AM Table 3 5 Bus Core Frequency Ratio Switches SW1 and SW2 SW1 SW2 Bus Core Frequency Ratio 1 2 3 4 100 350 MHz ON ON OFF OFF OFF 100 400 MHz ON OFF ON ON OFF 100 450 MHz ON OFF ON OFF OFF ...

Page 67: ...e cage and externally with external storage devices All of the required SCSI cabling equipment you will need to install Compaq mass storage devices is shipped with your Compaq server and the Compaq mass storage SCSI device option kits Wide to Standard SCSI Cable Adapter for Using Fast SCSI 2 Devices To enable the use of Fast SCSI 2 devices in the removable media area with the Integrated Wide Ultra...

Page 68: ...ck Chew Project Compaq ProLiant 800 Servers Supporting Pentium II Processors and 100 MHz System Bus Setup and Installation Guide Comments 179489 001 File Name e ch04 doc Last Saved On 3 31 98 10 32 AM DAZ1 5 EPS 1 2 Figure 4 1 Wide to standard SCSI cable adapter ...

Page 69: ...I ID 0 that it will occupy If only one SCSI hard drive is used it should be installed in the lowest numbered bay Be sure to remove all terminating jumpers from third party SCSI devices Run System Configuration Utility after installing a drive Determining SCSI Cabling Requirements Answer all of the following questions about the mass storage device you will be installing to determine SCSI informatio...

Page 70: ...an be installed in the drive cage and removable media area Fast SCSI 2 devices require the SCSI adapter PN 199618 001 when using the Integrated Wide Ultra SCSI 3 Controller SCSI tape drives are installed in the removable media area SCSI CD ROM drives are installed in the removable media area Separate SCSI controller boards are installed in the expansion slots 5 Is the internal SCSI mass storage de...

Page 71: ...er to Internal SCSI Devices NHP Hard Drives Selected Fast SCSI 2 Tape Drives and SCSI CD ROM Installed in Removable Media Area 1 Locate the Wide SCSI cable No additional cables are required 2 Connect controller end of Wide SCSI cable to Integrated SCSI Controller 3 Connect wide to standard cable adapter if needed 4 Connect an available connector on SCSI cable to the device s 5 Ensure SCSI ID uniqu...

Page 72: ...oject Compaq ProLiant 800 Servers Supporting Pentium II Processors and 100 MHz System Bus Setup and Installation Guide Comments 179489 001 File Name e ch04 doc Last Saved On 3 31 98 10 32 AM 1 2 Figure 4 2 SCSI bus connector attached to removable media area and drive cage ...

Page 73: ...l SCSI Devices NHP Hard Drives Selected SCSI Tape Drives and SCSI CD ROM Drive Installed in Removable Media Area 1 Locate the Wide SCSI cable No additional cables are required 2 Connect controller end of Wide SCSI cable to 32 Bit Fast Wide SCSI 2 Controller P or Wide Ultra Controller P board 3 Connect wide to standard cable adapter to device end of SCSI cable if needed 4 Connect an available conne...

Page 74: ...mpaq ProLiant 800 Servers Supporting Pentium II Processors and 100 MHz System Bus Setup and Installation Guide Comments 179489 001 File Name e ch04 doc Last Saved On 3 31 98 10 32 AM 1 3 2 Figure 4 3 32 Bit Fast Wide Controller connected to removable media area and NHP drive cage ...

Page 75: ...ices Table 4 3 assumes that the controller end of the Wide SCSI cable has not been connected to the Integrated Wide Ultra SCSI 3 Controller Table 4 3 Cabling of SMART 2 Controller to Internal SCSI Devices NHP Hard Drives Selected SCSI Tape Drives and SCSI CD ROM Installed in Removable Media Area 1 Locate the Wide SCSI cable No additional cables are required 2 Connect controller end of Wide SCSI ca...

Page 76: ...ompaq ProLiant 800 Servers Supporting Pentium II Processors and 100 MHz System Bus Setup and Installation Guide Comments 179489 001 File Name e ch04 doc Last Saved On 3 31 98 10 32 AM 1 2 3 Figure 4 4 SCSI Cabling SMART 2 Controller to removable media area and NHP drive cage ...

Page 77: ...me e ch04 doc Last Saved On 3 31 98 10 32 AM External SCSI Cabling of the External SCSI Connector to Storage Devices Optional mass storage SCSI devices such as the Compaq ProLiant Storage Systems can be connected to the server by using the external SCSI connector on the back of the unit To connect to an external storage device refer to the installation documentation that came with the external sto...

Page 78: ... 2DH and SMART 2 P Array Controllers are configured with two SCSI buses an internal and an external One or both buses may be available for connection to external storage devices If you want both buses to control devices external to the server you will need to bring access of the internal SCSI bus on the controller to rear of the server To use both SCSI buses on a SMART 2DH or SMART 2 P controller ...

Page 79: ...s 179489 001 File Name e ch04 doc Last Saved On 3 31 98 10 32 AM DAZ3 18 eps Figure 4 7 Attaching the Internal External SCSI cable You now have both of the SMART 2 Controller SCSI buses at the rear of the server The SCSI bus can then be connected to external storage devices You also have the Integrated Wide Ultra SCSI 3 Controller available for connection to SCSI devices Figure 4 8 Connecting both...

Page 80: ...en marks each event with a time stamp with one minute granularity Events listed in the Integrated Management Log are categorized as one of four event severity levels Status indicates that the message is informational only Repaired indicates that corrective action has been taken Caution indicates a non fatal error condition Critical indicates a component failure The Integrated Management Log requir...

Page 81: ...diate action You can view and print the event list from within Compaq Insight Manager by following the instructions below You can also mark a critical or caution event as repaired after the affected component has been replaced for example if a fan that has failed has been replaced By marking it as repaired you can lower the severity of the event Viewing the Event List 1 From Compaq Insight Manager...

Page 82: ...k the Configuration button 3 Click the Recovery button 4 Select Print Compaq Survey Utility The Compaq Survey Utility is a serviceability tool available for Microsoft Windows NT and Novell NetWare that delivers online configuration capture and comparison to maximize server availability It is delivered on the Compaq Management CD in the Server Setup and Management pack or is available on the Compaq...

Page 83: ...e affected components and the associated error messages Though the same basic information is displayed the format of the list may be different depending on how you are viewing it from within Compaq Insight Manager or from within the Compaq Survey Utility The table on the following page identifies the event types affected components and associated event messages This table includes all events that ...

Page 84: ...ns Not Redundant System Overheating Zone X Location Main Memory Correctable Error threshold exceeded Corrected Memory Error threshold passed Slot X Memory Module X Corrected Memory Error threshold passed System Memory Corrected Memory Error threshold passed Memory Module unknown Uncorrectable Error Uncorrectable Memory Error Slot X Memory Module X Uncorrectable Memory Error System Memory Uncorrect...

Page 85: ... Power Supply Failure Power Supply X System Power Supply Inserted Power Supply X System Power Supply Removed Power Supply X System Power Supplies Not Redundant Real Time Clock Battery Failing A CPU Power Module System Board Socket X A CPU Power Module Slot X Socket X System Power Modules Not Redundant System AC Power Problem Power Supply X System AC Power Overload Power Supply X Automatic Server R...

Page 86: ...heir intended function and are therefore covered by these rules These rules place computers and related peripheral devices into two classes A and B depending upon their intended installation Class A devices are those that may reasonably be expected to be installed in a business or commercial environment Class B devices are those that may reasonably be expected to be installed in a residential envi...

Page 87: ...io or television reception which can be determined by turning the equipment off and on the user is encouraged to try to correct the interference by one or more of the following measures Reorient or relocate the receiving antenna Increase the separation between the equipment and receiver Connect the equipment into an outlet on a circuit different from that to which the receiver is connected Consult...

Page 88: ...EMI connector hoods in order to maintain compliance with FCC Rules and Regulations Canadian Notice Avis Canadien Class B Equipment This Class B digital apparatus meets all requirements of the Canadian Interference Causing Equipment Regulations Cet appareil numérique de la classe B respecte toutes les exigences du Règlement sur le matériel brouilleur du Canada European Union Notice Products with th...

Page 89: ...1 98 8 36 AM Japanese Notice Australian Notice This customer equipment is to be installed and maintained by service personnel as defined by AS NZS 3260 Clause 1 2 14 3 Service Personnel Incorrect connection of connected equipment to the General Purpose Outlet could result in a hazardous situation Safety requirements are not fulfilled unless the equipment is connected to a wall socket outlet with p...

Page 90: ...tally enclosed during all modes of customer operation and maintenance Laser Safety Warnings WARNING To reduce the risk of fire bodily injury and damage to the equipment observe the following precautions Do not operate controls make adjustments or perform procedures to a laser device other than those specified herein or in the CD ROM drive installation guide Allow only Compaq Authorized Service Tec...

Page 91: ...The following label or equivalent is located on the surface of your CD ROM drive This label indicates that the product is classified as a CLASS 1 LASER PRODUCT This label appears on a laser device installed in your product Laser Information Laser Type Semiconductor GaAIAs Wave Length 780 nm 35 nm Divergence Angle 53 5 degrees 0 5 degrees Output Power Less than 0 2 mW 10 869 W m 2 sr 1 Polarization...

Page 92: ...d Service Provider The computer contains an internal Lithium Manganese battery Replacement of the internal battery should be done by a Compaq Authorized Service Provider WARNING To reduce the risk of personal injury do not attempt to recharge the battery disassemble it immerse it in water or dispose of it in fire Your computer contains an internal Lithium Manganese battery pack There is risk of fi...

Page 93: ...e Comments 179489 001 File Name g appa doc Last Saved On 4 1 98 8 36 AM Mouse Compliance Statement This device complies with Part 15 of the FCC Rules Operation is subject to the following two conditions 1 this device may not cause harmful interference and 2 this device must accept any interference received including interference that may cause undesired operation ...

Page 94: ... transporting and storing products in static safe containers Keep electrostatic sensitive parts in their containers until they arrive at static free workstations Place parts on a grounded surface before removing them from their containers Avoid touching pins leads or circuitry Always be properly grounded when touching a static sensitive component or assembly Grounding Methods There are several met...

Page 95: ... 001 File Name h appb doc Last Saved On 3 31 98 11 00 AM Use a portable field service kit with a folding static dissipating work mat If you do not have any of the suggested equipment for proper grounding have an Authorized Compaq Reseller install the part NOTE For more information on static electricity or assistance with product installation contact your Authorized Compaq Reseller ...

Page 96: ...st meet the requirements of the country where you use the server For more information on power cord set requirements contact your Authorized Compaq Dealer General Requirements The requirements listed below are applicable to all countries The length of the power cord must be at least 6 0 feet 1 8 m and a maximum of 12 feet 3 7 m The power cord set must be approved by an acceptable accredited agency...

Page 97: ...n JIS 3 Norway NEMKO 1 Sweden SEMKO 1 Switzerland SEV 1 United BSI 1 United States UL 2 Notes 1 Flexible cord must be HAR Type HO5VV F 3 conductor 1 0 mm2 conductor size Power cord set fittings appliance coupler and wall plug must bear the certification mark of the agency responsible for evaluation in the country where it will be used 2 Flexible cord must be Type SVT or equivalent No 18 AWG 3 cond...

Page 98: ...rs and 100 MHz System Bus Setup and Installation Guide Writer Rick Chew Project Compaq ProLiant 800 Servers Supporting Pentium II Processors and 100 MHz System Bus Setup and Installation Guide Comments 179489 001 File Name i appc doc Last Saved On 3 31 98 11 03 AM ...

Page 99: ...I Processors and 100 MHz System Bus Setup and Installation Guide Comments 179489 001 File Name j appd doc Last Saved On 5 13 98 5 18 PM Appendix D Specifications and Connector Interfaces This appendix provides operating and performance specifications for Compaq ProLiant 800 servers Also provided are the connector interfaces For other specifications refer to the Systems Reference Library CD ...

Page 100: ... 92 in 45 52 cm Depth 22 67 in 57 58 cm Width 8 83 in 22 43 cm Weight No Drives Installed 50 0 lb 22 68 kg Input Requirements Rated Input Voltage 100 to 240 VAC Rated Input Frequency 50 60 Hz Rated Input Current 6 3 A Power Supply Output Power Rated Steady State Power 325 W Maximum Peak Power 425 W Temperature Range Operating 50 to 95 F 10 to 35 C Shipping 22 to 122 F 30 to 50 C Relative Humidity ...

Page 101: ...Pentium II Processors and 100 MHz System Bus Setup and Installation Guide Comments 179489 001 File Name j appd doc Last Saved On 5 13 98 5 18 PM Connector Interfaces For the pinouts and signals of these connector interfaces refer to the Systems Reference Library CD Keyboard hot pluggable Pointing Device Mouse Serial 2 Parallel Monitor External SCSI 2 Connector Ethernet RJ 45 Video ...

Page 102: ...circulation role of access panels 3 4 ASR See Automatic Server Recovery ASR 2 See Automatic Server Recovery Automatic Server Recovery 1 10 2 10 B backplane 1 13 battery replacement connector 3 24 replacement jumper 3 24 bezel keylock 3 7 3 8 bezel front opening 3 3 board slots location 3 23 bus ratio switch system board 3 25 Bus Core frequency ratio switch 3 26 buses PCI 3 12 C cables adapter 4 1 ...

Page 103: ...ckplane 1 13 external SCSI 1 12 2 6 3 21 fan backplane 1 13 I 2 O 3 24 keyboard 1 12 2 6 3 24 LED backplane 1 13 location 3 23 mouse 1 12 2 6 3 24 network 1 12 2 6 network controllers 1 4 parallel port 1 12 2 6 PCI 3 24 connecting Continued PCI ISA shared 3 24 power 1 12 2 6 Power Supplies backplane 1 13 power supply backplane 1 13 Processor Board backplane 1 13 rear panel 2 6 replacement battery ...

Page 104: ... connector 1 13 write control 1 10 diskette boot override 1 10 diskette drive control 1 10 installation 3 18 position 1 11 diskette drives 1 4 configuring with SmartStart 2 7 documentation 2 3 drive bays accessing 3 1 SCSI cabling 4 4 drive cage optional 1 4 drive cage positions 1 11 drives See hard drives or diskette drives Dual Inline Memory Modules DRAM 3 14 E ECC See Error Checking and Correct...

Page 105: ...stallation guidelines 3 17 hard drives configuration label 3 6 configuring with SmartStart 2 7 installing 3 16 installing SCSI drives guidelines 4 2 hardware options installing 3 1 help customer support 1 2 sources ix Systems Reference Library CD See disk controllers telephone x http www compaq com ix x I I 2 O connector 3 24 icons See Symbols on Equipment IDs SCSI 4 2 IML See Integrated Managemen...

Page 106: ... event list 5 4 printing from Insight Manager 5 2 severity levels 5 1 viewing from Insight Manager 5 2 viewing the log 5 1 viewing using Survey Utility 5 3 integrated network controller See network controllers Integrated Remote Console 1 9 Integrated SCSI Controller 4 4 Integrated Wide Ultra SCSI 3 Controller 1 3 See also disk controllers interfaces 1 4 internal components accessing 3 1 interrupt ...

Page 107: ...grated Management Log 1 9 modem 1 9 management CD 2 9 mass storage See hard drives CD ROM drives or diskette drives materials packed with server 2 3 media drive bays accessing 3 1 memory accessing components 3 10 accessing expansion sockets 3 1 configuring with SmartStart 2 7 DIMM installation alignment 3 14 DIMM socket latches 3 15 memory Continued Error Checking and Correcting 1 2 installing 3 1...

Page 108: ...sion board components 3 24 PCI ISA shared connectors 3 24 Pentium II See processors Pentium II Processor board 1 2 peripheral devices installing 2 5 pointer See mouse port addresses 1 8 setting with SmartStart 2 7 POST See Power On Self Test See Power On Self Test power interlock on processor cage 3 10 power connector 1 12 2 6 power cord Compaq ProLiant 800r considerations and cautions 2 6 install...

Page 109: ...panel 2 5 standard features 1 2 Q QuickLock 1 10 R rapid recovery 1 7 rear panel ProLiant 800 2 5 rear panel components 1 12 recovery services 1 7 recovery rapid 1 7 registering the server 2 10 release levers processor cage 3 9 remote control 1 7 Integrated Remote Console 1 9 server reboot 1 9 remote services features 1 7 removable media drive bays 3 18 installation 3 18 removable media access doo...

Page 110: ...termination 3 17 types 3 17 Wide Ultra Controller 4 6 SCSI Activity LED position 1 11 SCSI Bus backplane connector 1 13 SCSI interface 1 4 SDRAM 1 2 3 14 security features 3 7 keylock 3 8 security features 1 10 security lock 1 10 security screw 3 1 expansion I O board cage 3 7 processor cage 3 7 security screws 3 7 3 8 selecting a site 2 2 serial interface control 1 10 Serial A and B Connectors 3 ...

Page 111: ...ed by configuration utility 1 8 switches accessing processor switches 3 1 bus core frequency ratio 3 26 clear NVRAM 3 24 disable floppy 3 24 disable password 3 24 disable video 3 24 expansion system board 3 24 switches Continued location 3 23 lock configuration information 3 24 processor bus core frequency 3 23 SW1 settings 3 24 tower to rack conversion 3 24 symbols in text viii on equipment viii ...

Page 112: ...aved On 5 13 98 5 50 PM U unpacking 2 3 upgrades configuration assistance 1 8 UPS Uninterruptible Power Supply 2 3 utilities configuration 2 7 INSPECT 1 8 2 8 Survey Utility 5 3 System Configuration Utility 2 7 TEST 1 8 2 8 utility configuration 1 8 V video 1 5 connector 1 12 2 6 connector system board 3 25 controller 1 5 interface 1 4 memory 1 5 resolution 1 5 types 1 5 W warnings defined viii wa...

Reviews: