background image

1-14

   RAID Array 3000 Controller Shelf Hardware User’s Guide

Compaq Confidential – Need to Know Required

Writer: Bob Young  Project: RAID Array 3000 Controller Shelf Hardware User’s Guide  Comments: 

Part Number: EK-SMCPQ-UG. D01  File Name: b-ch1 Product Overview.doc  Last Saved On: 12/4/00 1:09 PM

Controller Shelf Power Supplies

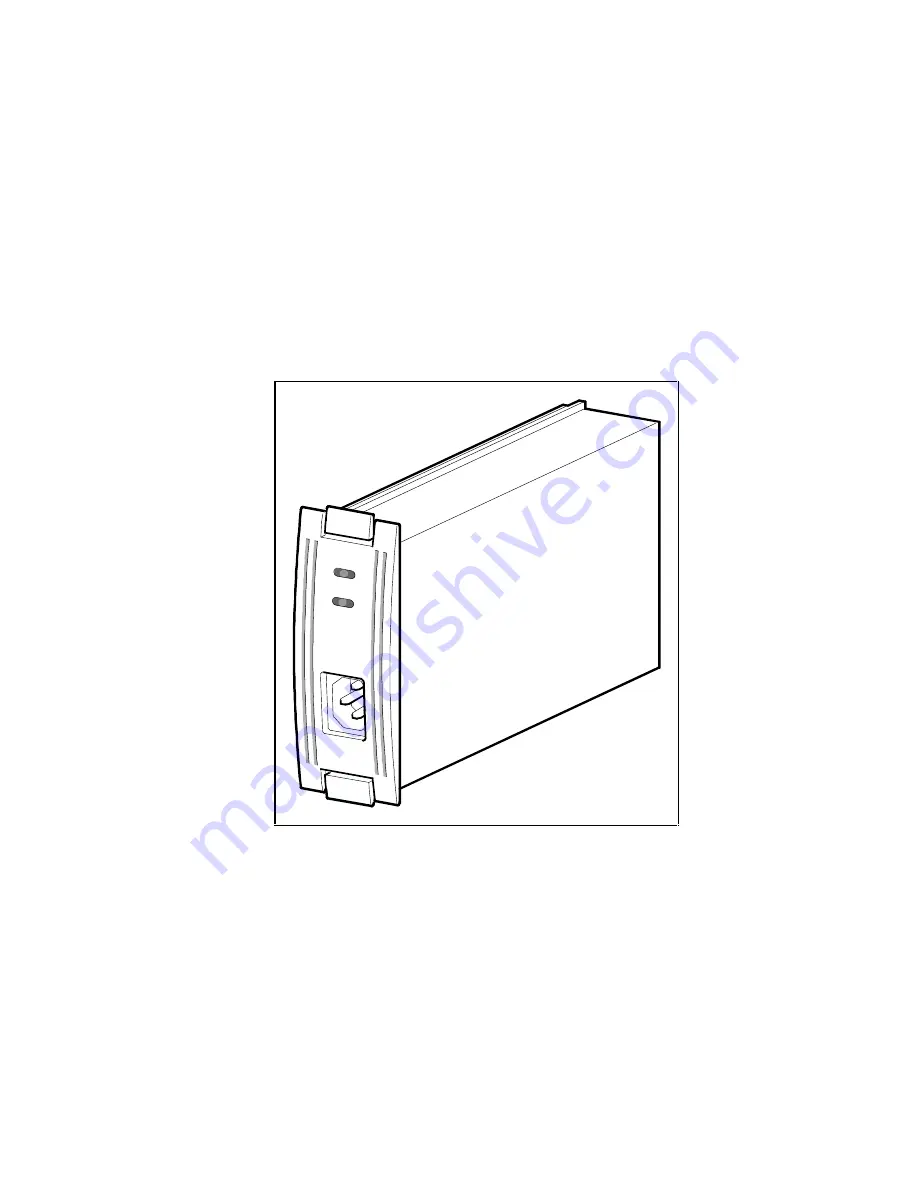
The controller shelf has two interchangeable, air-cooled, 180 watt AC power
supply SBBs (see Figure 1– 8) located in the left two SBB slots of the shelf.
The power supplies provide redundant power if one of the units should
malfunction. Each supply pr5 and +12 VDC to power the RAID
controllers, the host I/O modules, the device I/O module, and the blowers. The
first power supply from the left edge of the shelf is designated as A and the
second as B. The SBB front panel has an AC input power receptacle, a power
supply status LED, and a shelf status LED.

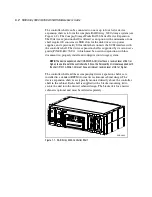
SHR-1034

Figure 1-8.  Power supply

UPS

The primary function of the UPS is to keep the entire storage system powered
up to enable the controllers to flush cache to disks. The UPS also protects the
storage system from problems associated with poor quality AC power or a
complete loss of AC power. The UPS is normally mounted in a lower shelf
slot in the cabinet using a custom set of mounting brackets.

Summary of Contents for StorageWorks TM RAID Array 3000 Pedestal Storage Subsystem

Page 1: ...Compaq StorageWorks RAID Array 3000 Controller Shelf Hardware User s Guide Fourth Edition January 2001 Part Number EK SMCPQ UG D01 Compaq Computer Corporation ...

Page 2: ...mation in this document is subject to change without notice THE INFORMATION IN THIS PUBLICATION IS PROVIDED AS IS WITHOUT WARRANTY OF ANY KIND THE ENTIRE RISK ARISING OUT OF THE USE OF THIS INFORMATION REMAINS WITH RECIPIENT IN NO EVENT SHALL COMPAQ BE LIABLE FOR ANY DIRECT CONSEQUENTIAL INCIDENTAL SPECIAL PUNITIVE OR OTHER DAMAGES WHATSOEVER INCLUDING WITHOUT LIMITATION DAMAGES FOR LOSS OF BUSINE...

Page 3: ... xiv Compaq Website xv Compaq Authorized Reseller xv Chapter 1 Product Overview Product Description 1 1 Controller Shelf Features 1 6 Controller Shelf Enclosure 1 6 Shelf Cabinet 1 8 RAID Array 3000 Controller 1 8 Device I O Module 1 9 Host I O Module 1 12 Shelf Cooling 1 13 Controller Shelf Power Supplies 1 14 UPS 1 14 6 Slot Device Expansion Shelf Optional 1 15 Connecting the Controller Shelf to...

Page 4: ...Installation Guidelines 3 1 Installing Shelves in the Cabinet 3 2 Installing Shelf Supports 3 7 Installing UPS Brackets 3 10 Power and SCSI Cable Connection Procedures 3 14 SCSI Bus Target Addresses and Termination 3 15 Cabling a Single Device Expansion Shelf Subsystem 3 16 Cabling a Two Device Expansion Shelf Subsystem 3 19 Cabling a Three Device Expansion Shelf Subsystem 3 21 Cabling a Four Devi...

Page 5: ...ce I O module 1 10 Figure 1 6 Device I O module blower status LEDs 1 11 Figure 1 7 Host I O module 1 12 Figure 1 8 Power supply 1 14 Figure 1 9 Single host single adapter with one active controller 1 17 Figure 1 10 Single host single adapter with two active controllers 1 18 Figure 1 11 Single host dual adapter two ports with two active controllers 1 19 Figure 1 12 Dual host single adapter with one...

Page 6: ...shelf cabling diagram 3 25 Figure 3 14 Shelf status LEDs 3 27 Figure 3 15 Controller shelf FRUs 3 29 Figure 3 16 Replacing the host I O SBB 3 30 Figure 3 17 Removing the controller from the shelf 3 32 Figure 3 18 Replacing a blower assembly 3 34 Figure 3 19 Controller cache modules 3 36 Figure 3 20 Release locking clips 3 36 Figure 3 21 Remove installed SIMM modules 3 37 Figure 3 22 Install replac...

Page 7: ...e Controller per Host 1 20 Table 1 6 Controller Shelf Technical Specifications 1 21 Table 1 7 Controller Shelf Power and Physical Specifications 1 24 Table 2 1 LED Reset Switch Interface 2 5 Table 2 2 Raid Levels Supported 2 9 Table 2 3 Shelf RAID Set Restrictions 2 9 Table 2 4 RAID 0 1 Example 2 13 Table 2 5 Response to Various AC Power Conditions 2 19 Table 3 1 Shelf Support Mounting Kits and In...

Page 8: ......

Page 9: ...elf User s Guide Intended Audience This document is written for installers and operators Document Structure This guide contains the following information Chapter 1 Product Overview Product description Controller Shelf Features Controller Shelf Enclosure Shelf Cabinet 6 Slot Device Expansion Shelf Optional Connecting the Controller Shelf to a Host System Specifications ...

Page 10: ... Levels Supported Redundant Operation Environmental Chapter 3 Installation and Maintenance Installation Guidelines Installing Shelves in the Cabinet Power and SCSI Cable Connection Procedures Controller Shelf Status LEDs Controller Status LEDs Replacing Field Replaceable Units FRUs Chapter 4 Second Controller Option Installing the Upgrade Configuring a Dual Controller Installation for a Single Ser...

Page 11: ...able 1 Related Documents Document Title Part Number RAID Array 3000 Subsystem Second Controller Option Installation Guide EK SM3KC IG E01 Command Console V2 2 for the RAID Array 3000 Pedestal and Rack Mount Models User s Guide AA RBF2C TE RAID Array 3000 Pedestal Storage Subsystem Hardware User s Guide EK SMCPO UG C01 ...

Page 12: ... appear in uppercase unless case sensitive Type When you are instructed to type information type the information without pressing the Enter key Enter When you are instructed to enter information type the information and then press the Enter key Symbols in Text The following symbols are found in the text of this guide to indicate different types of information WARNING Text set off in this manner in...

Page 13: ...k of injury from electric shock hazards do not open this enclosure Refer all maintenance upgrades and servicing to qualified personnel This symbol indicates the presence of electric shock hazards The area contains no user or field serviceable parts Do not open for any reason WARNING To reduce the risk of injury from electric shock hazards do not open this enclosure This symbol on an RJ 45 receptac...

Page 14: ...educe the risk of personal injury or damage to the equipment be sure that The leveling jacks are extended to the floor The full weight of the rack rests on the leveling jacks The stabilizing feet are attached to the rack if it is a single rack installation The racks are coupled together in multiple rack installations Only one component is extended at a time A rack may become unstable if more than ...

Page 15: ...number if applicable Product serial number Product model name and number Applicable error messages Add on boards or hardware Third party hardware or software Operating system type and revision level Compaq Website The Compaq website has information on this product Access the Compaq website http www compaq com storage Compaq Authorized Reseller For the name of your nearest Compaq authorized reselle...

Page 16: ......

Page 17: ... information refer to the Getting Started RAID Array 3000 Installation Guide and the Command Console V2 2 for the RAID Array 3000 Pedestal and Rack Mount Models User s Guide Product Description The controller shelf Figure 1 1 is a rackmount storage system containing the basic components required to manage a storage array with two 16 bit differential UltraSCSI bus host interfaces The devices referr...

Page 18: ...d in conjunction with this document too properly install and configure your storage system NOTE The device expansion shelf DS SWXRA GN must have a revision level of B01 or higher to operate with the controller shelf Also the Personality I O module supplied with the shelf P N 70 33067 02 must have a minimum revision level of H01 or higher The controller shelf and the accompanying device expansion s...

Page 19: ...UPS is normally installed in the lowest available slot in the cabinet CAUTION The UPS is sized to perform this function for the controller and device expansion shelves only No other electrical devices should be plugged into the UPS As an option a second RAID controller module can be added for redundancy The second controller operates in conjunction with the installed controller to protect data in ...

Page 20: ...ingle ended device I O module One 1000 watt UPS with rackmount bracket One five meter host SCSI cable Two 9 pin serial controller cables Two Trilink SCSI cable adapters One gray C13 to 125 V power cord One black C13 to 125 V power cord One controller shelf rackmount kit User documentation Requires Solutions Software kit for platform host adapter and disks Options second HSZ22 AA controller and cac...

Page 21: ...t personality I O assembly shelf rack mounting kit power cords user documentation DS HSZ22 AA RA3000 second controller option which includes DS HSZ22 AA SCSI controller three 16 MB SIMM modules 0 8 m adapter to SCSI 3 cable 5 m SCSI cable 9 pin serial cable user documentation DS HSZ22 AB RA3000 second controller option which includes DS HSZ22 AB SCSI controller four 32 MB SIMM modules 0 8 m adapte...

Page 22: ...redundant controller two host I O assemblies and a dual bus device I O assembly Two blowers located at the back of the enclosure cool the shelf An internal backplane assembly connects the RAID controller and the power and host I O SBBs The backplane contains five connectors that provide the interface between the shelf SBBs and the controller Two 300 pin connectors located in the center of the back...

Page 23: ...shelf has a toggle switch that allows the operator to disable the shelf alarm during an error condition The shelf host I O assemblies each contain two 68 pin VHDCI female SCSI connectors that interconnect the host systems to the RAID controller Each host I O assembly contains a 9 pin serial port connector for controller configuration and a 9 pin UPS monitor connector Two AC power supplies one redu...

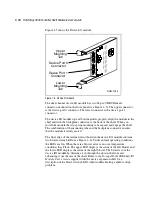
Page 24: ...s installation into either cabinet RAID Array 3000 Controller The controller shelf Figure 1 4 contains Wide Ultra SCSI differential host channels and Wide Ultra SCSI single ended disk channels In dual controller configurations the controllers support fully automatic and smooth controller failover in the event of a RAID controller fault SHR 1048 Cache Memory Modules Figure 1 4 RAID Array 3000 contr...

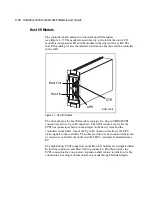
Page 25: ...r host SCSI channel using StorageWorks Command Console SWCC see the operating system platform kit for details Update of firmware via host channel Device I O Module The device I O module provides the electrical interface between the controller shelf and the device buses Figure 1 5 The module resides in the far right slot of the Shelf and has the following features Ability to electrically isolate th...

Page 26: ...ng mounting tabs expand and engage the shelf The combination of the mounting tabs and the backplane connector ensures that the module is firmly seated The front edge of the internal circuit board in the device I O module contains two blower status LEDs see Figure 1 6 Under normal operating conditions the LEDs are On When there is a blower error or an over temperature condition they Flash The upper...

Page 27: ... not control the target addresses of the SBB slots in the device expansion shelves This switch has been electrically disabled by design Refer to the StorageWorks SBB Shelf I O Module User s Guide supplied with the device expansion shelf for a description of how to set the SCSI IDs in each shelf SCSI bus termination switch S4 configures the SCSI bus termination of the device expansion shelves in th...

Page 28: ...two 68 pin VHDCI SCSI connectors and two 9 pin D connectors The SCSI connectors provide the SCSI bus connections between the adapter in the host system and the controllers in the Shelf One of the 9 pin D connectors interfaces the UPS status signals to the controller The other provides a serial connection between its respective controller the shelf and the SWCC configuration maintenance PC The high...

Page 29: ...s by drawing ambient air in through the front of the SBBs and exhausting it out the rear of the controller shelf The blowers normally operate at low speed Reduction of the airflow through the shelf or an increase in the ambient temperature may result in overheating causing component failure or data corruption The device I O module ambient temperature circuitry monitors the air flowing through the ...

Page 30: ... I O module and the blowers The first power supply from the left edge of the shelf is designated as A and the second as B The SBB front panel has an AC input power receptacle a power supply status LED and a shelf status LED SHR 1034 Figure 1 8 Power supply UPS The primary function of the UPS is to keep the entire storage system powered up to enable the controllers to flush cache to disks The UPS a...

Page 31: ...ength of the power outage Its own installation operation and service manual support the UPS The manual describes the UPS in detail and is part of the documentation set enclosed with your storage system 6 Slot Device Expansion Shelf Optional NOTE The device expansion shelf must have a revision level of B01 or higher to operate with the controller shelf Also the personality I O module supplied with ...

Page 32: ...ows how to connect four possible controller shelf host configurations The configurations are Single host single adapter with one active controller Single host single adapter with two active controllers Single host dual adapter two ports with two active controllers Dual host single adapter with one active controller per host ...

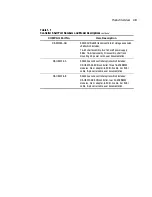
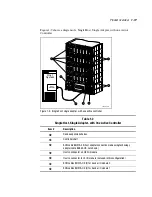
Page 33: ... 2 Single Host Single Adapter with One Active Controller Item Description å Device expansion shelves Controller shelf ê SCSI cable BN37A 05 host adapter connection made using technology adapter cable BN38E OB not shown Host In connector on H0 I O module Host In connector to H1 I O module not used in this configuration ñ SCSI cables BN37A OE 2 for device I O module 0 ò SCSI cables BN37A OE 2 for de...

Page 34: ... Controllers Item Description å Device expansion shelves Host In connector on H0 I O module ê Controller shelf SCSI cable BN37A 05 host adapter connection made using technology adapter cable BN38E OB not shown SCSI cable BN37A OE combining host modules H0 and H1 ñ Host In connector on H0 I O module ò Host In connector on H1 I O module ô H1 host I O module Host Out connector not used in this config...

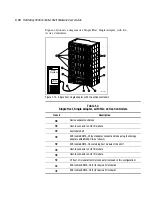
Page 35: ...pter Two Port with Two Active Controllers Item Description å Device expansion shelves Controller shelf ê SCSI cable BN37A 05 host adapter connection made using technology adapter cable BN38E OB not shown SCSI cable BN37A 05 host adapter connection made using technology adapter cable BN38E OB not shown Host In connector on H0 I O module ñ Host In connector on H1 I O module ò SCSI cables BN37A OE 2 ...

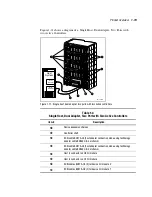
Page 36: ...Table 1 5 Dual Host Single Adapter with One Active Controller per Host Item Description å Device expansion shelves Controller shelf ê SCSI cable BN37A 05 host adapter connection made using technology adapter cable BN38E OB not shown SCSI cable BN37A 05 host adapter connection made using technology adapter cable BN38E OB not shown Host In connector on H0 I O module ñ Host In connector on H1 I O mod...

Page 37: ...Z22 standard Dual active controllers With DS HSZ22 second controller upgrade Controller cache 16 MB standard 64 MB standard with two controllers Backup for cache 1000 VA UPS standard with controller shelf Controller operation with 2 controllers Active Active recommended Active Passive spare Controller failover Yes automatic Mirrored write back cache Yes Write through cache Yes Command Queuing Yes ...

Page 38: ...to 30 RAID sets Up to 16 redundancy groups LUNs per RAID set Maximum disk RAID sets Two 32 blocks theoretical 2 2 petabytes restricted by drive capacity Boot from RAID set Yes operating systems dependent Passthrough to tape CD Not supported Maximum number of disks 24 in four disk shelves Maximum disks per device port 12 Global spare Yes Drive support 2 4 9 18 36 GB wide UltraSCSI drives in SBB Red...

Page 39: ...anger GUI support StorageWorks Command Console V2 2 SWCC available for all platforms Regulatory approvals EMI R I FCC Class A CSA 108 8 Class A VCCI level 1 BICQ Class A CISPR 22 Class A C Tick Class A Safety UL 1950 3 rd edition AS NZ 3260 IEC 950 CSA 22 2 950 1995 EN60950 A3 1995 VDE 0905 TUV GS Mark CE mark ...

Page 40: ...required 40 to 60 non condensing 10 to 90 non condensing Maximum wet bulb temperature 82 o F 28 o C Minimum dew point 36 o F 2 o C Altitude Up to 8 000 ft 2 400 m Inlet air volume 0 026 cubic meter per second 50 cubic feet per minute Air quality Not to exceed 500 000 particles per cubic foot of air at a size of 0 5 micron or larger Temperature 40 F to 151 F 40 C to 66 C Relative humidity 8 to 95 n...

Page 41: ...d Physical Specifications continued Operating Environment Specification Height 150 cm 5 9 in 4U 8 9mm 3 5 in 2U Width 445 cm 17 5 in 48 2mm 19 in Depth 350 cm 13 8 in 40 6mm 16 0 in Weight Controller shelf 9 5kg 21 lb Disk shelf 7 3 kg 16 lb UPS 27kg 59 5 lb ...

Page 42: ......

Page 43: ...ge consists of the controller board a 300 pin connector mechanical insertion assists and a front panel LED reset switch interface All signals to the controller are routed through the backplane connector Figure 2 1 shows a simplified block diagram of the controller and its interfaces to the major components in the RAID Array 3000 The unit is configured with two Wide Ultra differential SCSI host cha...

Page 44: ...ller will be half the amount installed Thus in a single controller setup the maximum usable cache is 64 MB while a redundant setup has a maximum usable cache of 32 MB per controller RAID Array 3000 Controller Shelf H0 Port 0 H1 Port 1 Write Back Cache Module 2 Device Ports Device I O Assy Host I O Assy Host System 0 Host System 1 Cache Interface Controller Bus Modules RAID Controller Ultra SCSI Wi...

Page 45: ...a standby passive mode redundancy groups virtual LUNs can be mapped to either SCSI host port or to both as in the single controller model In both cases a single controller failure will not affect the subsystem because the surviving controller will take over Controller Features The controller is the intelligent bridge between the host and the devices in the shelf From the host s perspective the con...

Page 46: ...inary disk drives into a single high performance storage unit called a storageset Storagesets are implementations of RAID technology also known as a Redundant Array of Independent Disks Every storageset shares one important feature whether it uses two disk drives or 12 each storageset looks like a single storage unit to the host You create storage units by combining disk drives into storagesets su...

Page 47: ...y storage unit Controller Reset and LED Indicators Figure 2 4 shows the front panel of the controller All LEDs are numbered from left to right The reset button LED 0 flashes green about once every second heartbeat to indicate that the controller is operating normally LEDs 1 through 4 display host and disk channel activity amber LED 5 normally Off turns On red during a controller failure The LED Re...

Page 48: ...xibility to configure RAID sets in several different ways RAID sets can comprise drives from any drive channel and SCSI ID A RAID set can contain all the drives connected to the controller a single drive or any number of drives in between The controller supports RAID Levels 0 1 0 1 4 and 5 It also supports Just a Bunch of Drives JBOD allowing you to connect standalone disk drives such as a system ...

Page 49: ... RAID levels 4 and 5 DMA ASIC Controls the data path hardware for the various I O ports CPU Interface ASIC Supports the controller s MIPS R3000 RISC central processing unit Memory Controller ASIC Controls the memory system and supports data movement on the internal bus at a maximum burst rate of 80 Mb s and a maximum sustainable rate of 60 Mb s Efficient Write and Read Algorithms Standard RAID wri...

Page 50: ...o wait for a lengthy RAID write before proceeding to another task Write Gathering The controller will attempt to consolidate multiple writes destined for contiguous blocks and then write the entire data block in one operation The controller stores the data in cache until it performs the write Ideally the controller will wait until it has gathered enough data to fill an entire stripe This enables t...

Page 51: ...th fixed parity drive 5 Striping with floating parity drive JBOD just a bunch of drives There are some restrictions you must adhere to when creating a RAID set using the RAID 3000 shelf The minimum and maximum number of drives required to support each RAID level is listed in Table 2 3 Table 2 3 Shelf RAID Set Restrictions RAID Level Min No of Drives Max No of Drives JBOD 1 1 0 2 24 1 2 24 0 1 4 16...

Page 52: ... the write operation Likewise a RAID 0 read operation employs multiple drives to assemble a single large data block This makes RAID 0 ideal for applications such as graphics video and imaging that involve the writing and reading of large sequential blocks Figure 2 5 shows a diagram of a RAID 0 write CAUTION The lack of parity means that a RAID 0 disk array offers no redundancy and thus cannot reco...

Page 53: ...res multiple drives to achieve the storage capacity of a single drive Figure 2 6 shows a RAID 1 write 0010 1011 0110 Host Data Controller writes data from cache to all drives in the array SHR 1055 Figure 2 6 Diagram of a RAID 1 write A RAID 1 array will show up on the monitor as degraded when at least one drive fails even if two or more members of the redundancy group remain in good working order ...

Page 54: ... to half the drives in the array while writing duplicate chunks to the remaining drives 1110 1101 1011 Host Data Controller divides the data into chunksized units 1110 1101 1011 Striped data written to half the drives Striped data mirrored to the remaining drives SHR 1056 Figure 2 7 Diagram of RAID 0 1 write In the event of a drive failure a RAID 0 1 array will enter degraded mode and continue to ...

Page 55: ...ves another mirrored pair with the second two drives and so on Table 2 4 lists how the controller uses the drives in a RAID 0 1 set Table 2 4 RAID 0 1 Example Drives Selected Function Channel 1 ID 0 First member of stripe set Channel 1 ID 1 Mirror of channel 1 ID 0 Channel 1 ID 2 Second member of stripe set Channel 2 ID 0 Mirror of channel 1 ID 2 Channel 2 ID 1 Third member of stripe set Channel 2...

Page 56: ...eves the chunks containing the addressed data reconstitutes the data from the chunks and passes the data to the host 0011 1011 0110 1110 0110 0000 1111 1110 Host Data Controller divides the data into chunksized units and calculates parity There is still data left so the Controller repeats the Process 0011 0011 0110 0110 1011 1011 0000 0000 0110 0110 1111 1111 1110 1110 1110 1110 Striped data and p...

Page 57: ...I O operations such as transaction processing This is due to the controller s intelligent caching which efficiently handles small I O reads and writes and to the relatively less complex algorithms needed to implement RAID 4 The benefits of RAID 4 disappear when you have many small I O operations scattered randomly and widely across the disks in the array RAID 4 s fixed parity disk becomes a bottle...

Page 58: ...e 2 since they would be addressing different parity drives 1101 0110 1011 0010 0111 1110 0001 0110 Host Data Controller divides the data into chunksized units and calculates parity There is still data left so the Controller repeats the Process 1101 1011 0111 0111 0110 0110 1110 1110 1011 1011 0001 0001 0010 0010 0110 0110 Striped data and parity written to the array Striped data written to the arr...

Page 59: ...of a RAID set but it is made available to the host on the same SCSI bus as the other devices controlled by the controller The system parameters allow you to customize certain aspects of the controller via the SWCC Graphical User Interface GUI Redundant Operation When operating in a redundant configuration the two controllers are linked such that in case of a failure the surviving controller can ac...

Page 60: ... begins failing over If the controllers cannot exchange messages due to communication problems over the backplane they will break the connection and each controller will switch to a stand alone mode Failover Failover describes the process of transferring data from a failed controller to a survivor and completing any active tasks When one controller begins the fail over process it sends a reset to ...

Page 61: ...ower supplies Conditions of poor or no power cause the following UPS responses Table 2 5 Response to Various AC Power Conditions Condition Response Low line voltage UPS compensation circuit automatically increases output voltage without placing load on the UPS battery No line voltage AC loss UPS switches to the battery which supplies power to the controller maintaining full functionality UPS signa...

Page 62: ......

Page 63: ... process consists of mounting the support brackets for the specific number of shelves in your subsystem configuration setting the UltraSCSI bus termination and target ID addresses and making the power and SCSI cable connections between the rackmount components The cabling section is divided into four separate cabling procedures one for each of the number of device expansion shelves in your specifi...

Page 64: ...expansion shelves in the cabinet depends on the number of expansion shelves in your subsystem configuration The shelves should be grouped as shown in Figures 3 1 through 3 4 Figure 3 1 shows a single device expansion shelf installation Figures 3 2 3 3 and 3 4 show a two three and four shelf installation respectively Install the UPS at the bottom of the cabinet with the subsystem shelves directly a...

Page 65: ...re 0 5 In a double expansion shelf configuration the IDs in both expansion shelves are also 0 5 because each shelf is connected to a separate device I O bus from the controller In a three and four shelf configuration Figures 3 3 and 3 4 respectively the second expansion shelf on each device I O bus is connected to the first via a Trilink adapter and must be set to 8 13 SHR 1096 5 P S P S P S P S 4...

Page 66: ...Hardware User s Guide Figure 3 2 shows the Recommended Controller Shelf Installation two expansion shelves SHR 1097 5 5 P S P S P S P S P S P S 4 4 3 3 2 2 1 1 0 0 Figure 3 2 Recommended controller shelf installation two expansion shelves ...

Page 67: ...e 3 3 shows the Recommended Controller Shelf installation three expansion shelves SHR 1098 5 5 13 P S P S P S P S P S P S P S P S 4 4 12 3 3 11 2 2 10 1 1 9 0 0 8 Figure 3 3 Recommended controller shelf installation three expansion shelves ...

Page 68: ...ure 3 4 shows the Recommended Controller Shelf installation four expansion shelves SHR 1099 5 5 13 13 P S P S P S P S P S P S P S P S P S P S 4 4 12 12 3 3 11 11 2 2 10 10 1 1 9 9 0 0 8 8 Figure 3 4 Recommended controller shelf installation four expansion shelves ...

Page 69: ...ments and procedures that contain the instructions needed to install them Table 3 1 Shelf Support Mounting Kits and Installation Guides Cabinet Style Shelf Support Kit Part No Installation Guide Part No RETMA cabinet installation round hole 70 33381 01 See Installing Shelf Supports in a RETMA Cabinet Round Hole RETMA cabinet installation square hole 70 33381 01 See Installing Shelf Supports in a R...

Page 70: ...65 00 Nut 10 x 32 2 2 Determine the mounting location in your cabinet 3 Install the left shelf support by aligning the bracket and cabinet rail holes and then securing the support to the cabinet using two screws item 7 Figure 3 5 Do not tighten screws 4 Install the nut plate item 5 Figure 3 5 behind the left rail and secure with three screws Tighten all five screws 5 Repeat steps 2 3 and 4 to inst...

Page 71: ...n in your cabinet 4 Install the left shelf support by aligning the support and cabinet rail holes and then securing the support to the cabinet using three screws item 7 Figure 3 5 and washers Tighten the screws 5 Repeat steps 3 and 4 to install the right shelf support in the cabinet Align the support with the left unit and tighten the screws 6 Install the support bracket item 6 Figure 3 5 by secur...

Page 72: ...lf supports Installing UPS Brackets The shelf brackets that support and secure the UPS in the cabinet are a custom design The following procedure describes how to install the rack mount brackets It applies to both cabinet designs RETMA and metric You will need the following items to properly install the UPS brackets in your style cabinet 2 UPS rack mount brackets 74 53154 01 and 02 1 bag Table 3 3...

Page 73: ...3 6 shows the left and right hand UPS bracket assemblies Figures 3 7 and 3 8 illustrate the front and rear bracket mounting holes for both cabinet designs Refer to these figures throughout the bracket installation procedure 1 Determine the mounting location in your cabinet bottom of cabinet recommended for stability 2 Install U nuts or cage nuts depending on cabinet style corresponding to the E ho...

Page 74: ... assemblies Figure 3 7 UPS bracket RETMA and metric hole locations front 4 Pull and extend the rear bracket assembly until it reaches the hole mounting channel at the rear of the cabinet and install cage nuts or U nuts at the rear of the rail into the corresponding holes in the cabinet see Figure 3 7 Extend the bracket beyond rail and tighten the hardware to secure the bracket to the cabinet 5 Ins...

Page 75: ...le or multiple device expansion shelf subsystem installation Each procedure describes how to connect the controller shelf to the device expansion shelves the host system the UPS and the maintenance PC Your controller and device expansion shelf shipment contains all of the power serial control and SCSI data cables required to connect and configure your system These cables along with two Trilink ada...

Page 76: ... device expansion shelves The target addresses of the disk drives are set by address switch S3 on the personality module in each device expansion shelf The SCSI bus device address and termination switches should be set before connecting the SCSI cables between the controller and device expansion shelves The SCSI bus addresses of the devices in each device expansion shelf is set by address switch S...

Page 77: ...ves from the AC power source to the outside power supply on each shelf see Figure 3 10 6 Connect the gray power cables from the inside power supply on each shelf to the power receptacles on the back of the UPS ensure the UPS is connected to an AC source 7 Connect a 0 5 meter SCSI cable BN37A 0E from the top SCSI connector on the Controller shelf device I O module device bus 1 and the SCSI connecto...

Page 78: ...s and tie wrap related cable groups and then refer to the Getting Started RAID Array 3000 Installation Guide and Command Console V2 2 for the RAID Array 3000 Pedestal and Rack Mount Models User s Guide for information describing how to setup and configure your subsystem SHR 1117 DEVICE EXPANSION SHELF 1 CONTROLLER SHELF P S A P S B P S B P S A CTR 0 Host 0 I O Module Device I O Module Personality ...

Page 79: ...SHELF 1 CONTROLLER SHELF UPS P S A P S B P S B P S A UPS Host 0 I O Module To Device Expansion Shelves 2 3 and 4 Gray Power Cords Black Power Cords AC Power Receptacles UPS Control 17 04729 01 AC Power Source Figure 3 10 AC power wiring diagram NOTE Dip switch position is down white and black position is up ...

Page 80: ...3 10 6 Connect the gray power cables from the inside power supply on each shelf to the power receptacles on the back of the UPS ensure the UPS is connected to an AC source 7 Connect a 0 5 meter SCSI cable BN37A 0E from the top SCSI connector on the controller shelf device I O module device bus 1 and the SCSI connector on the front of the personality I O module on the expansion shelf 8 Connect a se...

Page 81: ...o device expansion shelf cabling diagram CAUTION To prevent possible damage to the equipment the input voltage level of the UPS must be set to your specific line voltage before proceeding Refer to the UPS manual and set the input level to your AC power sources 13 After the UPS has been set to the correct voltage level set the UPS low battery warning option to five minutes refer to UPS manual for i...

Page 82: ...6 Connect the gray power cables from the inside power supply on each shelf to the power receptacles on the back of the UPS ensure the UPS is connected to a secondary AC source 7 Connect the single connector end of a Trilink adapter to the SCSI connector on the personality module in device expansion shelf 1 Tighten the screws on the adapter to ensure it is firmly seated 8 Connect a 0 5 meter SCSI c...

Page 83: ...Bus T ermination Switch S4 OFF ON Figure 3 12 Controller three device expansion shelf cabling diagram 13 Connect the UPS serial control cable 17 04729 01 from the UPS connector controller shelf host 0 I O module to the like connector on the UPS 14 Install jumper connector 12 49700 01 to the controller shelf UPS connector on the host 1 I O module CAUTION To prevent possible damage to the equipment ...

Page 84: ...ay power cables from the inside power supply on each shelf to the power receptacles on the back of the UPS ensure the UPS is connected to a secondary AC source 7 Connect the single connector end of a Trilink adapter to the SCSI connector on the personality module in device expansion shelf 1 Tighten the screws on the adapter to ensure it is firmly seated 8 Connect the single connector end of a seco...

Page 85: ...le Personality I O Module SCSI Cable BN37A 0E SCSI Cable BN37A 0E To Maintenance PC To Host System SCSI Cable BN37A 05 Serial Control Cable 17 04730 01 ON OFF 1 2 3 4 5 6 7 SCSI Bus Address Switch S3 1 2 3 4 SCSI Bus Termination Switch S4 OFF ON ON OFF 1 2 3 4 5 6 7 SCSI Bus Address Switch S3 1 2 3 4 SCSI Bus Termination Switch S4 OFF ON Figure 3 13 Controller four device expansion shelf cabling d...

Page 86: ...er to UPS manual for instructions 18 This completes the controller and device expansion shelf cabling procedure Dress and tie wrap related cable groups and then refer to the Getting Started RAID Array 3000 Installation Guide and Command Console V2 2 for the RAID Array 3000 Pedestal and Rack Mount Models User s Guide for information describing how to setup and configure your subsystem Controller Sh...

Page 87: ...sable the audible alarm by using the switch SHR 1063 Fault LED Amber DC Power LED Green Figure 3 14 Shelf status LEDs Controller Status LEDs The LEDs on the front panel of the controller monitor host and disk channel activity and a controller fault condition The reset button LED flashes green approximately once every second heartbeat to indicate that the controller is operating normally See Figure...

Page 88: ...into the following subsections Replacing a Host I O or Device I O SBB in the controller shelf Replacing a shelf power supply SBB Replacing the RAID controller Replacing the UPS Replacing a blower Replacing a controller memory cache module NOTE The rack mount UPS is also field replaceable Refer to the user s guide supplied with the unit for the order number and instructions of how to replace it ...

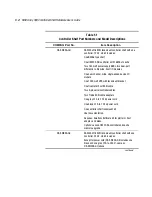
Page 89: ...rt numbers SHR 1052 1 3 4 5 2 Figure 3 15 Controller shelf FRUs Table 3 4 Controller Shelf Field Replaceable Units Item Qty Part Number Description å 2 DS BA35X HH Power supply 180 W 50 60 Hz 5 V 12V 1 70 33523 01 RAID controller ê 2 70 33525 01 Host I O module 1 70 33067 05 Device I O module 2 70 29761 07 Blower Assembly Second redundant controller is optional ...

Page 90: ... from the front panel of the SBB 3 Release the SBB from the shelf slot by squeezing the mounting tabs on the SBB together and pulling it forward until clear of the shelf Figure 3 16 4 Insert an identical model SBB in the slot and push it in until an audible click is heard indicating the SBB is fully seated SBB front panel mounting tabs expand and engage the shelf 5 Observe that the SBB status LEDs...

Page 91: ...abs to release the unit and pull it out of the shelf 3 Insert the replacement power supply into the shelf slot align the guide slots and then push it in until the SBB tabs lock into place 4 Connect the input power cable to the power supply AC receptacle 5 Observe the LEDs on the replacement power supply and ensure that the unit is operating properly 6 If the shelf power is removed during power sup...

Page 92: ...ler and pull them forward until the controller disengages from its mounting slot Figure 3 17 3 Remove the controller by sliding it forward and free of the shelf 4 Transfer the SIMMs to the new controller 5 Insert the replacement controller into the open slot align the module into the card guides and gently slide it into the shelf until the connector engages the backplane connector in the shelf 6 T...

Page 93: ... power up the shelf Replacing a Blower WARNING Only qualified service personnel should access the rear of the shelf to replace a blower The controller shelf has two blowers mounted on the rear Connectors on the backplane provide the 12 VDC to operate the blowers When a blower fails the shelf status amber LED on the power supply SBB turns Off and an error message is passed to the controller or host...

Page 94: ... blower see Figure 3 18 2 Press the upper and lower blower mounting tabs together to release the blower 3 Pull the blower straight out to disconnect it from the shelf power connector 4 Align the replacement blower connector and push the blower straight in making sure that both mounting tabs lock in place Figure 3 18 Replacing a blower assembly 5 Insert the safety screw 6 Verify that the shelf and ...

Page 95: ...ing tabs lock in place 6 Insert the Phillips safety screw 7 Reinstall the shelf and reconnect the cables 8 Verify that the shelf and all SBBs are operating properly by observing the LEDs NOTE If the blower status LEDs on the device I O assembly are not off and all shelf power supplies are operating the second blower could have failed or the wrong blower was replaced Replacing the Controller Memory...

Page 96: ...roller disengages from the shelf see Figure 3 17 3 Remove the controller from the shelf and place it on a flat working surface 4 Remove the two installed cache memory SIMM modules by releasing the locking clips at each end of the module until it disengages and snaps into an upright position as shown in Figures 3 19 and 3 20 SHR 1048 Cache Memory Modules Figure 3 19 Controller cache modules Figure ...

Page 97: ...cing you when installing the modules in the following step 5 Install the two replacement memory modules by aligning the module and connector pins check alignment guide in center of module and gently pivot the module into the main controller board until it snaps into place see Figures 3 19 and 3 20 6 Replace the controller into the shelf 7 Power On the UPS and then power On the controller shelf ...

Page 98: ...ide 8 Check the activity LEDs on the front panel of the controller The reset switch LEDs should begin to flash at a half second rate heartbeat and the host activity LEDs should flash Figure 3 22 Install replacement SIMM Figure 3 23 Pivot SIMM down to secure ...

Page 99: ...nit to your subsystem to preserve the integrity of data should the first controller malfunction The second controller is installed directly below the existing controller in the bottom controller slot of the controller shelf The installation procedure consists of adding two Single Inline Memory Module SIMM to the redundant controller and depending on the option kit you are installing see inventory ...

Page 100: ...or option kit DS HSZ22 AB 4 SIMMs Model label Warranty card Installing the Upgrade CAUTION To prevent an electrical discharge from damaging the SIMMs always wear an ESD wrist or foot strap connected to a suitable ground when handling the memory modules NOTE You can upgrade your firmware using the SCSI or network connection methods These methods provide the fastest way to upgrade your firmware To u...

Page 101: ...ks Command Console Client SWCC before performing the installation procedure Otherwise the RAID controller may lose your configuration To save your current configuration Select the Storage pull down menu from the Toolbar click Controller select Configuration and then Save see Figure 4 1 Figure 4 1 Saving the existing configuration ...

Page 102: ...ing Firmware CAUTION If the systems disk is on the RA3000 firmware cannot be upgraded with SWCC Establish a temporary system disk on a disk drive outside the RA3000 and proceed with these instructions or follow the alternative shown in Updating Firmware Using Serial Interface Updating Firmware Using SWCC Start SWCC and choose SCSI or Network Connection From the Storage menu click Controller and th...

Page 103: ...computer or a computer other than that attached to the RA3000 connect a serial cable between the COM port on that machine and the corresponding serial port CTR1 or CTR2 for the controller on the RA3000 3 Start a terminal emulator session For Windows NT or Windows 2000 we suggest the HyperTerminal emulator Settings to be used are 9600 baud 8 bits No Parity 1 stop bit XON XOFF 4 Press the Escape key...

Page 104: ...eceiving code for System Version ver message followed by a series of characters cycling at the end of the line At 9600 baud the download will take between 45 60 minutes At 38400 it should take around 10 12 minutes At completion you will see the FLASH Programming Complete message followed by the FLASH Boot Utility Options menu again 9 Select item 9 Restart Controller You will be instructed to reset...

Page 105: ... all SIMM modules are of the same type by aligning the connector pins and inserting the modules into connectors as shown in Figure 4 5 Figure 4 5 Insert SIMM into connector 2 Ensure the SIMM is firmly seated and then gently pivot it toward the controller board until it snaps into place as shown in Figure 4 6 Figure 4 6 Pivot SIMM down to seat ...

Page 106: ...SHR 1062 Figure 4 7 Remove controller from top slot NOTE Ensure you install the new controller in the same slot as the existing controller removed in step 1 above Do not leave the existing controller in the controller shelf while performing the following step 2 Power up the system and restore the configuration on the new controller as explained in the following section ...

Page 107: ...he SWCC in the Serial Mode refer to the Getting Started RAID Array 3000 Installation Guide for instructions 2 Select the Storage pull down menu from the Toolbar then choose Controller 3 From the Controller pull down menu select Configuration and then Restore Figure 4 8 Figure 4 8 Restoring configuration to new controller ...

Page 108: ...are Using Serial Interface 2 After the configuration has been restored and firmware has been updated power down the system Installing the Original Controller 1 If installing option kit DS HSZ22 AA add the second SIMM to the original controller If installing option kit DS HSZ22 AB replace the existing SIMM with the two remaining SIMMs supplied with the kit See Installing Two SIMMs into Second Contr...

Page 109: ...tem using a serial connection Verifying the controller operating parameters Configuring the RA3000 for the Active Mode of Operation If you are upgrading from a single controller storage system the installed controller will be in the active passive mode of operation To configure the storage system using a single serial connection the dual controllers must be placed in active active mode Perform the...

Page 110: ...dnt Ctrlr Parameters The controller values should display Active Passive 12 Transfer the serial cable to the serial port on the top controller on the RA3000 and press the Ctrl Z keys 13 Check the Rdnt Ctrlr Parameters The controller values should display Passive Active Your storage system is now properly configured for dual controller operation from a single serial host port Proceed to the next se...

Page 111: ...rt that the JBOD should be created on There is a single connection to the controller so only one host port will be available Select Next 12 Choose a LUN number and enable the write back cache 13 Select Next and then Finish You have now created one virtual device JBOD on the top controller 14 Disconnect the serial cable from the top controller and reconnect the cable to the serial port connector on...

Page 112: ...l 0 for Controller 1 top to Active Host I O channel 1 for Controller 1 to Passive Channel 0 Target ID for Controller 1 to 0 Channel 1 Target ID for Controller 2 to 1 NOTE It is allowable to configure the host I O and target IDs as follows Controller 1 top may be set to Passive while host I O channel 1 for Controller 1 is set to Active As long as each host channel value and channel target ID value ...

Reviews: