background image

AIT Drive Reference Guide

E–1

E

Daisy Chaining

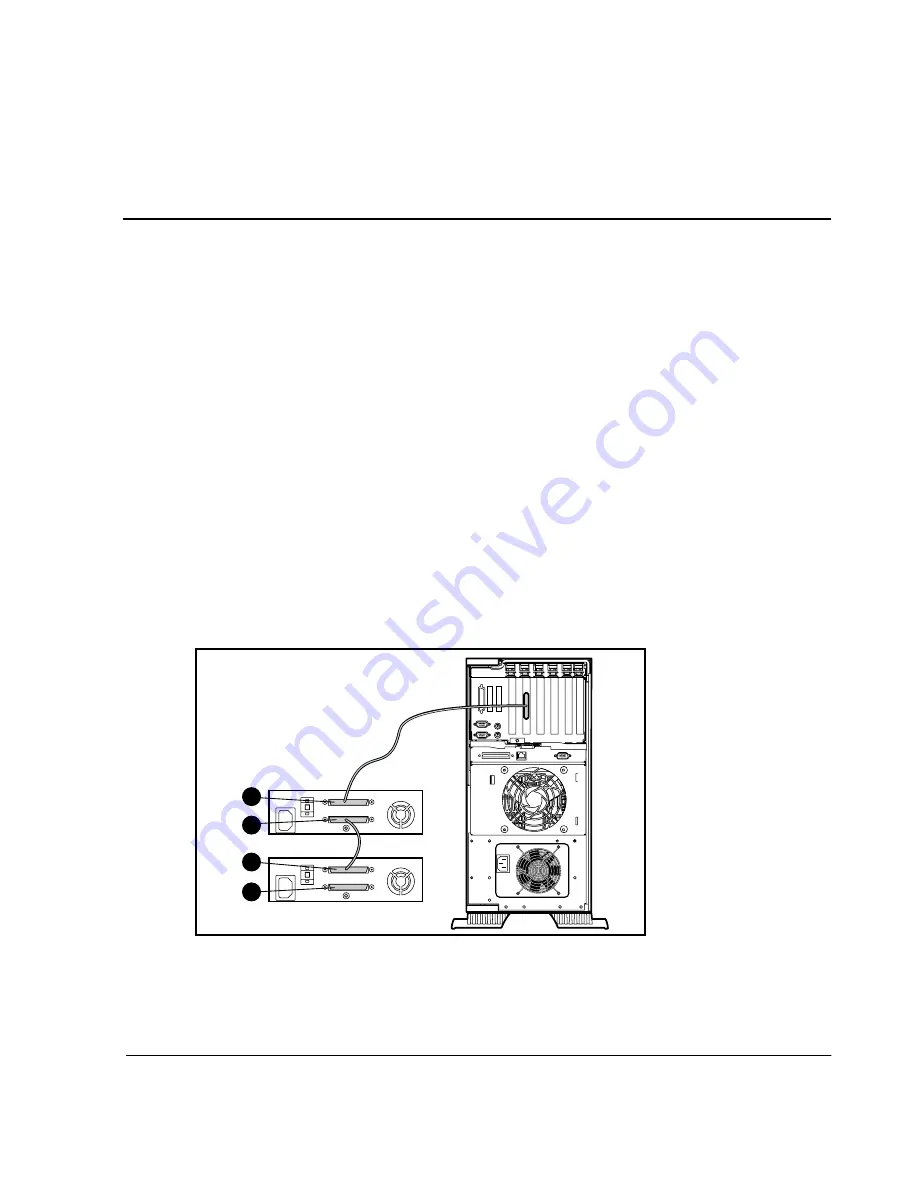
As an optional configuration, two AIT tape drives can be connected to the same SCSI 
channel at the same time. Use no longer than a 6-ft cable to attach the intial drive, then 
use no longer than a 3-ft cable to daisy chain the additional drive.

IMPORTANT:  Do not connect more than two drives per SCSI controller.

1. If the first drive has a terminator on the SCSI connector 

2

, remove it.

2. Connect the tape drives together by placing a SCSI cable between the SCSI 

connector 

2

 of the first drive to the SSI connector 

3

 of the second drive.

3. Place the terminator (not shown) on the SCSI connector 

4

 of the second drive.

4. Power ON all peripheral devices.

5. Power ON the computer.

Figure E–1:  Daisy Chaining

1

2

3

4

Summary of Contents for StorageWorks

Page 1: ...geWorks AIT Drive Reference Guide Part Number 155450 003 Third Edition November 2001 This guide provides step by step instructions for installation and as a reference for operation troubleshooting and future upgrades ...

Page 2: ...f their respective companies Compaq shall not be liable for technical or editorial errors or omissions contained herein The information in this document is provided as is without warranty of any kind and is subject to change without notice The warranties for Compaq products are set forth in the express limited warranty statements accompanying such products Nothing herein should be construed as con...

Page 3: ...seller xi 1 Overview of the AIT Drive Requirements 1 1 Disaster Recovery Feature 1 1 Features 1 2 Installation Overview 1 3 2 Installing the Software Drivers Device Drivers 2 1 Windows NT 2 2 Additional Information 2 2 Windows 2000 2 2 Novell NetWare 2 3 NetWare ASPI Support 2 4 Compaq Tru64 UNIX 2 4 OpenVMS 2 5 SCO OpenServer 2 5 Configuring the SCSI ID for SCO OpenServer 2 6 SCO UnixWare 2 6 Sun...

Page 4: ... 4 2 Tape Drive Cleaning Procedure 4 3 5 Troubleshooting the AIT Drive Eliminating Resource Conflicts 5 1 Completing the System Configuration Worksheet 5 1 Quick Checklist 5 2 Hardware 5 2 Software 5 3 Installation Troubleshooting 5 3 SCO OpenServer Systems 5 5 Windows NT Systems 5 5 Novell NetWare Systems 5 5 Compaq AlphaServer Troubleshooting 5 6 Compaq Tru64 UNIX and OpenVMS Systems 5 6 Windows...

Page 5: ...quipment A 2 Canadian Notice Avis Canadien A 3 Class A Equipment A 3 Class B Equipment A 3 European Union Notice A 4 Japanese Notice A 4 Taiwanese Notice A 5 B Electrostatic Discharge Grounding Methods B 2 C Specifications Dimensions and Weight C 1 Acoustic Noise C 1 Altitude C 2 Temperature and Humidity Range C 2 Power Requirements C 3 D Data Compression E Daisy Chaining Index ...

Page 6: ...vi AIT Drive Reference Guide Contents ...

Page 7: ...Home Print Screen Num Lock Esc PgUp A plus sign between two keys means that you should press them simultaneously Ctrl A Ctrl Home Alt Ctrl Del Menu Items Directory Names Button Names Dialog Box Names Initial Caps for UNIX AIX and Solaris directory names the exact case of every character is displayed On the File menu choose Save Save the file in the C StorageSets Default directory UNIX AIX Solaris ...

Page 8: ..._CONTROLLER to change parameters To manage storage enter RUN sysmgr exe UNIX AIX Solaris To list files give the ls command Drive Names Navigate to your CD ROM drive usually D or E filenames Unless case sensitive use lowercase italics If filenames are case sensitive UNIX AIX Solaris or are easier to understand with some upper case letters the exact case of each character is displayed To configure s...

Page 9: ... instructions NOTE Text set off in this manner presents commentary sidelights or interesting points of information Symbols on Equipment These symbols may be located on equipment in areas where hazardous conditions may exist This symbol in conjunction with any of the following symbols indicates the presence of a potential hazard The potential for injury exists if warnings are not observed Consult y...

Page 10: ... contacted the potential for injury exists WARNING To reduce the risk of injury from a hot component allow the surface to cool before touching These symbols on power supplies or systems indicate the equipment is supplied by multiple sources of power WARNING To reduce the risk of injury from electric shock remove all power cords to completely disconnect power from the system This symbol indicates t...

Page 11: ...e Compaq website http www compaq com Be sure to have the following information available before you call Compaq Technical support registration number if applicable Product serial numbers Product model names and numbers Applicable error messages Operating system type and revision level Detailed specific questions Compaq Website The Compaq website has the latest information on this product as well a...

Page 12: ......

Page 13: ...allation using the documentation included with the controller IMPORTANT All SCSI devices on the same bus must either be internal within the computer or in an external storage device but not both The exception is a CD ROM drive which may be internal when other devices are external or vice versa NOTE This requirement does not apply to the AIT 35 IDE tape drive Disaster Recovery Feature Your new tape...

Page 14: ...mately 24 MByte sec with data compression Supported format AIT 1 AIT 1 AIT 1 AIT 2 AIT 1 AIT 2 AIT 3 Burst transfer rate 66 6 MB s 40 MB s 40 MB s 160 MB s Buffer Memory 8 MB 8 MB non parity 8 MB parity 18 MB Interface IDE ATAPI UDMA 4 Embedded SCSI Ultra160LVD Ultra WIDE Single ended or Low Voltage Differential Embedded SCSI Ultra160LVD Ultra WIDE Single ended or Low Voltage Differential Embedded...

Page 15: ... installation instructions on the Compaq AIT Drive Documentation CD NOTE Step 2 does not apply to the Compaq AIT 35 IDE tape drive 3 Install the tape drive Refer to the installation instructions on the Compaq AIT Drive Documentation CD 4 Install the software drivers See Chapter 2 Installing the Software Drivers 5 Install backup application software ...

Page 16: ...1 4 AIT Drive Reference Guide Overview of the AIT Drive ...

Page 17: ...vice driver location depends on the operating system and third party software that is being used The Compaq Native Drivers CD contains generic drivers for Microsoft related server products You can also download SCSI and tape drivers from the Compaq website at www compaq com The drivers on downloaded Support Software Diskettes may be newer versions with new functionality and upgraded utilities Refe...

Page 18: ...ng the tape driver Additional Information For additional information Refer to your backup application installation guide for more information regarding additional software that may be needed Refer to Compaq SCSI Controller Support in the ntreadme hlp file on the Compaq Support Software for Microsoft Windows NT diskette version 1 21 or later Refer to Compaq Tape Support in the ntreadme hlp file on ...

Page 19: ...howing which drivers were loaded successfully Novell NetWare Drivers for the SCSI controllers are located on the Compaq SmartStart for Servers CD and Support Software Diskettes Smart Start ships with each computer Support Software can be downloaded from the Compaq website The software tape device driver is located either with your tape backup software or with the operating system Compaq does not p...

Page 20: ...from the Novell website Refer your third party vendor documentation for specific details regarding how tape drivers are loaded Compaq Tru64 UNIX The Compaq Tru64 UNIX operating system uses Dynamic Device Recognition DDR which allows the operating system to recognize the AIT drive without a software tape device driver If the following message is seen on any version of Compaq Tru64 UNIX you should u...

Page 21: ...tion on configuring the driver An appropriate SCSI controller driver Drivers for the SCSI controllers and tape drive hardware are located on the Support Software Diskettes and on the Compaq SmartStart for Servers CD The Support Software ships with each computer or can be downloaded from the Compaq website The software tape device driver is located either with your tape backup software or with the ...

Page 22: ...elink the kernel and reboot the computer to multi user mode 6 Run the hwconfig command to ensure the new tape configuration is correct The information will appear in a line such as tape type S ha 0 id 2 lun 0 ht In the above example id 2 indicates that the SCSI ID is 2 See the Getting Started booklet that came with the AIT tape drive for more information on setting the SCSI ID IMPORTANT The SCO Op...

Page 23: ...ompaq website Sun Solaris Intel Platform Edition The table below provides information on identifying appropriate drivers for Compaq SCSI controllers Table 2 2 Sun Solaris Controller Software Driver Information 32 Bit Fast SCSI 2 32 Bit Fast Wide SCSI 2 Wide Ultra SCSI 3 64 Bit Dual Channel Wide Ultra 2 SCSI For Solaris 2 6 7 and 8 refer to the Solaris documentation The Compaq Solaris driver update...

Page 24: ...2 8 AIT Drive Reference Guide Installing the Software Drivers ...

Page 25: ...ng Compaq approved cassettes Cassette loading and ejecting Forcing the ejection of a cassette Write protecting a cassette Cassette handling and storage Front Panel The front panel of the AIT drive contains Power 1 Busy 2 Tape 3 and Status 4 Light Emitting Diode LED indicators and an eject button 5 as described in Table 3 1 ...

Page 26: ...anel components NOTE Depending on your model your tape drive may differ slightly from the illustration Table 3 1 Front Panel Callout Icon Description 1 None Power LED 2 Busy LED 3 Tape LED 4 Status LED 5 Eject Button NOTE The power LED is not on the internal unit 1 2 3 5 4 ...

Page 27: ...oading Unloading Write protected None Loaded End of Cleaning Tape None Loaded None SCSI Loaded None SCSI Drive Loaded None Loaded Write protected Loaded Error Rate Warning Cleaning Request Self Test Failure Waiting for Reset Waiting for Eject Legend NOTE The AIT external drive has a power LED LED Flash Symbol LED display Off On Quick flashes Quick flashes with a long pause in between Long flash wi...

Page 28: ...tomatically loads it into the drive mechanism Ejecting a Cassette The cassette can be removed from the drive either by using a software command or by pressing the eject button If you press the eject button the cassette rewinds before the drive ejects the cassette from the slot NOTE If the eject button is pressed when the drive is busy the drive finishes the task it is engaged in before it responds...

Page 29: ...ck way to eject the cassette A cassette can be forced to eject when immediate ejection is required even at the risk of losing data To eject a cassette immediately hold the eject button down for at least 5 seconds The cassette is immediately unthreaded and the cassette is ejected regardless of what operation the drive was performing WARNING There is a risk of electrical shock If a cassette is jamme...

Page 30: ...t Memory in Cassette MIC This feature enables the cassettes to store important cassette information in memory which allows faster access to data MIC cassettes can be easily identified by the gold connector pads located left of the write protect switch IMPORTANT The Tape Log which contains a history of usage of the tape is not updated when the cassette is write protected The Tape Log becomes inaccu...

Page 31: ... F If the cassette has been exposed to conditions outside of the operating specifications stabilize it at room temperature for the same amount of time it was exposed up to 24 hours Do not place the cassette near electromagnetic interference sources such as video monitors motors magnets and video or X ray equipment Data on the cassette can be altered Store the cassette in a dust free environment wh...

Page 32: ...3 8 AIT Drive Reference Guide Operating the AIT Drive ...

Page 33: ...r example if a tape drive designed for 1 GB backups is being used to back up a 10 GB computer the result on that drive will be premature aging and reliability problems Importance of Routine Cleaning The tape drive has a cleaning roller built in which assists in preventing and recovering from head contamination This feature minimizes buildup on the read write heads so fewer cleaning cycles with a c...

Page 34: ...dropout can result in reduced cassette capacity and backup performance Media errors The backup cassettes can be jammed torn or otherwise damaged by a dirty read write head Read or write errors Because of a dirty read write head data may not be recorded on the cassette during backup Even if the data is on the backup cassette retrieval may not be possible if the dirty head cannot read the data Forma...

Page 35: ... cassette cleaning is finished the drive ejects it 2 If the tape drive does not eject the cassette and the Status LED is flashing see Chapter 3 Operating the AIT Drive Table 3 2 press the eject button discard the cassette and insert a new cleaning cassette NOTE Step 2 indicates the cleaning cassette is exhausted Throw away the used cleaning cassette After removing the cleaning cassette from the dr...

Page 36: ...4 4 AIT Drive Reference Guide Cleaning the AIT Drive ...

Page 37: ... 5 1 Use the worksheet to identify and correct resource conflicts Completing the System Configuration Worksheet 1 Run the Compaq System Configuration Utility and select Step 4 2 Record the switch settings for all option boards on the worksheet see Table 5 1 under Recommended Switch Settings 3 Remove the computer cover and record the actual switch settings from all option boards under Actual Option...

Page 38: ... for conflicts The System Reference Manual SRM console AlphaServers only has verified the tape drive installation The AlphaBios AlphaServers only has verified the tape drive installation Table 5 1 System Configuration Worksheet Item Notes Operating System Operating System Version Software Available Base Memory Tape Software Vendor and Product Tape Software Version Compaq System Configuration Utili...

Page 39: ...red using the SRM console or AlphaBios AlphaServers only The correct software drivers are being used Make sure that the operating system driver for the tape drive matches the drive type The version of the tape drive software supports the tape hardware you are using If software problems persist try reinstalling the tape drive software Installation Troubleshooting Follow the procedures in this secti...

Page 40: ...phaServers Use the SRM console command line system to verify and or correct the adapter configuration Use AlphaBios to verify and or correct the adapter configuration Compaq System Configuration Utility or the SRM console or AlphaBios does not recognize the tape drive Check the connections of the signal cable Check the seating of the controller adapter Ensure tape drive power cable is oriented cor...

Page 41: ... Windows NT Systems 1 Confirm that the SCSI controller software driver has been installed and started a Use the Windows NT Setup program to determine if the driver is installed b Use the Devices Control Panel applet to determine if the driver is started c If necessary reinstall the driver 2 Confirm that the tape drive driver has been installed and started a Use the Windows NT Setup program to dete...

Page 42: ...rver user manual for additional information b If the SCSI ID is changed enter initialize at the SRM prompt This reinitializes the system power up diagnostics c Enter show device at the SRM prompt to confirm the new SCSI ID number d Make sure the terminator on the tape drive is present and the power and SCSI signal cables are seated properly Windows NT Systems Confirm that the tape drive has been i...

Page 43: ...he last tape backup a If the system configuration has been changed try removing the change to see if it affects the tape backup system b If a board or option has been added check its DMA IRQ and port address settings for conflicts Try removing the board or option c If a SCSI device has been added check for SCSI ID conflicts and proper termination 7 Check the AIT tape drive connections Reseat the c...

Page 44: ...ding Firmware Upgrading Firmware To upgrade firmware on Compaq Intel based computers use the Tape Storage Management Console TSMC a firmware upgrade cassette or Options ROMPaq Upgrading Firmware Using TSMC TSMC keeps track of all available firmware versions for specific Compaq products TSMC has three options to retrieve firmware or application updates from the Web You can use the Download command ...

Page 45: ...paq FTP site Click Manual if you have a specific firmware file that you want to use NOTE Manual firmware files MUST be located in the Downloads folder of the parent TSMC directory Typically this is located at Program Files Compaq TSMC Server Downloads After you select a file the Download options screen appears Before proceeding be sure to read the following cautions CAUTION Do not interrupt the do...

Page 46: ...ading the Firmware by Cassette for all Computers IMPORTANT To obtain a firmware upgrade cassette contact a Compaq authorized service provider The Compaq AIT tape drive allows you to upgrade the firmware using a firmware upgrade cassette Follow the steps below to complete the firmware upgrade The process takes at least 3 minutes to complete CAUTION Do not disconnect power at any time during the upg...

Page 47: ...e Options ROMPaq Utilities must be run from diskette If you download the utilities from the Compaq website follow the directions on the website to create the diskette Creating an Options ROMPaq Diskette from Compaq SmartStart If you use the Compaq SmartStart for Servers CD follow these directions to create the diskette 1 Be sure that you are using the most current version of the Compaq SmartStart ...

Page 48: ...ion screen Press Enter to reprogram the system ROM or Esc to discontinue reprogramming and return to the Select An Image screen A message that says Reprogramming Firmware indicates that the option ROM is being reprogrammed Do not interrupt ROM reprogramming CAUTION Do not interrupt this cycle Interrupting the ROM reprogramming leaves the firmware in an unknown state You may not be able to use the ...

Page 49: ...m Many electronic devices including computers generate RF energy incidental to their intended function and are therefore covered by these rules These rules place computers and related peripheral devices into two classes A and B depending upon their intended installation Class A devices are those that may reasonably be expected to be installed in a business or commercial environment Class B devices...

Page 50: ...ble protection against harmful interference in a residential installation This equipment generates uses and can radiate radio frequency energy and if not installed and used in accordance with the instructions may cause harmful interference to radio communications However there is no guarantee that interference will not occur in a particular installation If this equipment does cause harmful interfe...

Page 51: ...questions regarding this FCC declaration contact Compaq Computer Corporation P O Box 692000 Mail Stop 510101 Houston Texas 77269 2000 or call 281 514 3333 To identify this product refer to the Part Series or Model number found on the product Canadian Notice Avis Canadien Class A Equipment This Class A digital apparatus meets all requirements of the Canadian Interference Causing Equipment Regulatio...

Page 52: ...communication functionality the R TTE Directive 1999 5 EC Compliance with these directives implies conformity to the following European Norms in parentheses are the equivalent international standards and regulations EN 55022 CISPR 22 Electromagnetic Interference EN55024 IEC61000 4 2 3 4 5 6 8 11 Electromagnetic Immunity EN61000 3 2 IEC61000 3 2 Power Line Harmonics EN61000 3 3 IEC61000 3 3 Power L...

Page 53: ...AIT Drive Reference Guide A 5 Agency Notices Taiwanese Notice ...

Page 54: ...A 6 AIT Drive Reference Guide Agency Notices ...

Page 55: ...is type of damage can reduce the life expectancy of the device To prevent electrostatic damage observe the following precautions Avoid hand contact by transporting and storing products in static safe containers Keep electrostatic sensitive parts in their containers until they arrive at static free workstations Place parts on a grounded surface before removing them from their containers Avoid touch...

Page 56: ...ound cords To provide proper ground wear the strap snug against the skin Use heel straps toe straps or boot straps at standing workstations Wear the straps on both feet when standing on conductive floors or dissipating floor mats Use conductive field service tools Use a portable field service kit with a folding static dissipating work mat If you do not have any of the suggested equipment for prope...

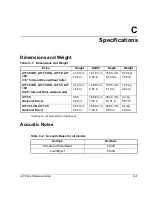
Page 57: ...101 6 mm 4 00 in 155 0 mm 6 10 mm 0 75 kg 1 65 lb AIT 35 IDE AIT 35 LVD AIT 50 AIT 100 5 25 Internal Drive without rails 41 2 mm 1 62 in 149 0 mm 5 87 in 155 0 mm 6 10 in 1 02 kg 2 24 lb AIT 50 External Drive 58 0 2 28 in 189 0 mm 7 44 in 262 0 mm 10 31 in 2 3 kg 5 07 lb AIT 35 LVD AIT 100 External Drive 64 5 mm 2 54 in 198 0 mm 7 80 in 246 0 mm 9 69 in 2 4 kg 5 29 lb Table C 2 Acoustic Noise for ...

Page 58: ...emperature and Humidity for all models Actions Temperature Humidity Operating 5 C to 40 C T 10 C h 41 F to 104 F T 50 F h 20 to 60 RH 20 to 80 for AIT 100 non condensing Maximum wet bulb temperature 26 C 79 F Non Operating mech 40 C to 70 C T 20 C h 40 F to 158 F T 68 F h 5 to 95 RH RH 30 h IMPORTANT Do not cover fan The tape drive can malfunction if the internal temperature rises too high ...

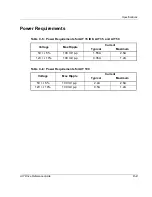
Page 59: ...Requirements for AIT 35 IDE AIT 35 and AIT 50 Voltage Max Ripple Current Typical Maximum 5V 5 100 mV p p 1 55A 2 5A 12V 10 100 mV p p 0 35A 1 2A Table C 6 Power Requirements for AIT 100 Voltage Max Ripple Current Typical Maximum 5V 5 100 mV p p 2 4A 2 6A 12V 10 100 mV p p 0 5A 1 2A ...

Page 60: ...C 4 AIT Drive Reference Guide Specifications ...

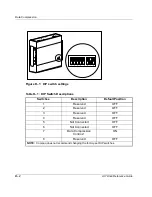
Page 61: ...s mode data is always compressed when writing to the cassette but the drive is capable of reading both compressed and uncompressed cassettes For the drive to write uncompressed data you must change the data compression setting This can be changed through software or using the DIP switches see Figure D 1 Consult your backup application software documentation for the data compression enabling and di...

Page 62: ...P Switch Descriptions Switches Description Default Position 1 Reserved OFF 2 Reserved OFF 3 Reserved OFF 4 Reserved OFF 5 Not Connected OFF 6 Not Connected OFF 7 Data Compression Control 1 ON 8 Reserved OFF NOTE Compaq does not recommend changing the factory set DIP switches 1 2 3 4 5 6 7 8 ...

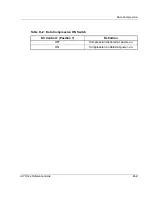
Page 63: ...AIT Drive Reference Guide D 3 Data Compression Table D 2 Data Compression ON Switch DC Control 1 Position 7 Definition OFF Compression disabled at power on ON Compression enabled at power on ...

Page 64: ...D 4 AIT Drive Reference Guide Data Compression ...

Page 65: ...dditional drive IMPORTANT Do not connect more than two drives per SCSI controller 1 If the first drive has a terminator on the SCSI connector 2 remove it 2 Connect the tape drives together by placing a SCSI cable between the SCSI connector 2 of the first drive to the SSI connector 3 of the second drive 3 Place the terminator not shown on the SCSI connector 4 of the second drive 4 Power ON all peri...

Page 66: ...E 2 AIT Drive Reference Guide Daisy Chaining ...

Page 67: ...cassette life cycle 4 3 importance of 4 1 procedure 4 3 recommended schedule 4 1 Compaq SmartStart 2 1 Support and Software CD 2 1 Tape Drive Supplemental Driver CD 2 1 Tru64 UNIX 2 4 controller requirements 1 1 D daisy chaining E 1 data compression D 1 depth C 1 device drivers 2 1 DIP switch settings D 2 disaster recovery 1 1 drivers Microsoft Windows 2000 2 3 Microsoft Windows NT 2 2 Novell Netw...

Page 68: ...rs 2 2 Windows 2000 drivers 2 3 Windows NT software drivers 2 2 N notices agency A 1 Novell ASPI support 2 4 Netware drivers 2 3 Novell Netware ASPI support 2 4 drivers 2 3 O OpenVMS 2 5 drivers 2 5 operating systems supported 2 1 operating the AIT drive 3 1 Options ROMPaq Diskette creating from SmartStart 5 11 upgrading firmware from 5 11 P power LED 3 2 power requirements C 3 R read errors 4 2 r...

Page 69: ...fer rate 1 2 System Configuration Utility does not recognize drive 5 4 worksheet 5 1 5 2 T Taiwanese notice A 5 Tape Drive Supplemental Driver CD 2 1 tape LED 3 2 Tape Management Storage Console 5 8 temperature range C 2 troubleshooting 5 2 W weight C 1 width C 1 write errors 4 2 ...

Page 70: ...Index 4 AIT Drive Reference Guide Index ...

Reviews: