background image

Page | 5  

PRODUCT INSTALLATION


INSTALLATION REQUIREMENTS 


BEFORE YOU BEGIN: READ THESE INSTRUCTIONS COMPLETELY AND CAREFULLY. 

For your safety, the information in this manual must be 
followed to minimise the risk of fire, explosion, electric 
shock, and to prevent property damage, personal injury, or 
death. 

For personal safety, keep the power cable plugged out, 
remove local fuse or open circuit breaker before installation 
to avoid severe or fatal shock injury. 

The Compax One

 may be installed on wet room walls, 

with or without wet room membrane, and walls with tiles, 
concrete, plywood, or plaster.


Do not allow items to fall or collect behind the Compax 
One

 after installation. Failure to follow this instruction 

could result in malfunction. 

Care should be exercised when the appliance is installed or 
removed, to reduce the likelihood of damage to the power 
supply cord.


The Compax One

 is designed for 

WALL-MOUNTED


installations 

ONLY

While performing installations described in these 
instructions, gloves, and safety glasses should be worn.


REMEMBER -

 Observe and comply with all governing codes 

and ordinances. 

Note to Installer

 - Be sure to leave these instructions for 

the operators and local inspector. 

Note to Customer and Operator

 - Save these instructions 

for future reference. 

Skill Level

 - Installation of this appliance requires basic 

mechanical and electrical skills. 

Completion Time 

-


10 to 30 minutes

.

 New installations 

require more time than replacement installations. 

Proper installation is the responsibility of the installer. 
Product failure due to improper installation is not covered 
under the Compax One

 Limited Warranty.  

IMPORTANT: 

If you receive a damaged Compax One

, you 

should immediately contact Compax Solutions Customer 
Service or visit www.compaxsolutions.com/support. 
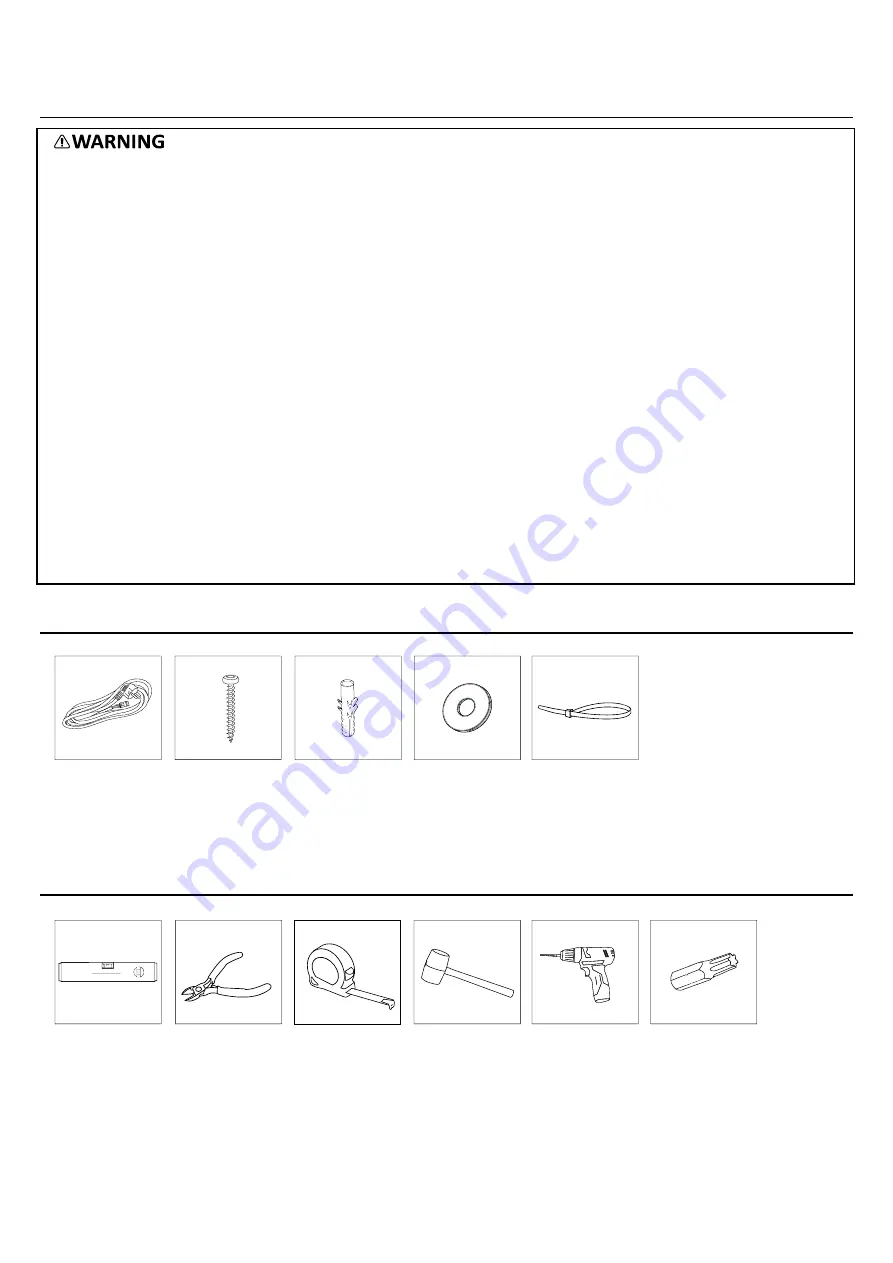
PARTS SUPPLIED 


All parts are located in 

a  a  age inside the Com a  One™.


To order additional parts, contact Compax Solutions Customer Service or visit www.compaxsolutions.com. 


TOOLS AND EQUIPMENT REQUIRED  


  m

     O E  CAB E

     C E  

        mm

        mm

      A TIC   U  

     UBBE   A HE  

    CAB E TIE 

 E E 

  IE  

MEA U IN  TA E

HAMME 

 ith a s itable drill bit of   

  I  IN  MACHINE

 C E   I E  O  BIT

Tor  T  

Summary of Contents for Compax One

Page 1: ...om INSTRUCTION MANUAL Compax One TABLE OF CONTENTS Product Safety 2 Product Logistics 13 Product Information 4 Product Disposal 13 Product Installation 5 Compax One Limited Warranty 14 Product Use and Operation 9 Declaration of Conformity 15 Product Care 12 Original Instructions ...

Page 2: ...sidential commercial and light industry environments only The Compax One must be properly connected to protective earth Unplug the Compax One before servicing or making any repairs Do not modify the plug attached to the Compax One use only with a grounded receptacle NOTE All service and repairs must be performed by qualified or trained personnel To prevent hazard of electrical shock the Compax One...

Page 3: ...ts and is connected to the mains power network supplying 16 A and 220 240 V at a frequency of 50 60 Hz This implies that an electrical shock hazard may occur in some relevant cases Therefore Compax Solutions strongly recommend all personnel interacting with the appliance to be aware of the consequences of misuse and faulty grounding of the Com a One in arti lar IMPORTANT Observe and comply with al...

Page 4: ... sealing of the waste bag a gasket is attached on top of the bag holder device When the lid reaches the closed position the Compax One Original Bag is sealed between the gasket and the lid and evacuation of the internal air is initiated STAGE 4 COMPRESSING CONFIGURATION When the Compax One Original Bag is sealed the air is evacuated from the bag The shape and design of the lid ensures a smooth dis...

Page 5: ... described in these instructions gloves and safety glasses should be worn REMEMBER Observe and comply with all governing codes and ordinances Note to Installer Be sure to leave these instructions for the operators and local inspector Note to Customer and Operator Save these instructions for future reference Skill Level Installation of this appliance requires basic mechanical and electrical skills ...

Page 6: ...ing it upside down such that the hinges are on the left hand side instead The following procedure describes how to change the direction of the door Open the door to approximately 90 Find the spring loaded pin underneath the lower hinge and push it up while tilting the door away from its hinged axis When the lower hinge is free from its designated hole the upper hinge can be gently guided free from...

Page 7: ... be used in the proper grounding type receptacle Schuko socket CEE 7 3 If a Schuko type wall receptacle is not available it is the responsibility and obligation of the customer to have it installed by a qualified electrician A direct connection of the power cable to the nearest properly grounded branch circuit may serve as an alternative to the general plug and socket if installed by a qualified e...

Page 8: ...ugh the hole in the bottom of the appliance frame and connected to the corresponding socket on the appliance end Depending on the room for which the Compax One is to be installed the power supply cable may be connected to the mains power network through plug and socket or directly onto a grounded branch circuit In the former case the plug should be pulled out of the socket in advance to prevent po...

Page 9: ...Timeout If the compression cycle is not stopped after approximately 70 seconds it will be stopped by exceeding a timeout threshold of 85 seconds 4 Interruption If motion is detected during a compression cycle the cycle is terminated In this case the Compax One will initiate a new y le as soon as the room is leared if needed Howe er the Com a One may be allowed to complete a compression cycle despi...

Page 10: ...If the rotation of the door has been flipped and the direction of the cabinet lock rotation has been changed accordingly the knob should be turned 90 counterclockwise WASTE BAG REMOVAL When the waste in the Com a One Original Bag can no longer be further compressed the waste bag is full and should be removed and replaced by a new one 1 Open the door by turning the knob clockwise 90 5 pulling it ou...

Page 11: ...9 0 seconds but is configurable based on customer needs 7 To exit the stationary state a system reboot must be performed NOTE Consult with Compax Solutions Customer Service before performing system reboot Overloading of the Compax One may lead to overflowing waste and unhygienic surroundings Also in the case where the waste is jammed between the moving lid and the gasket proper performance is not ...

Page 12: ...ctronics and result in malfunction of the appliance PRODUCT CARE MAINTENANCE Compax One needs proper and regular care and maintenance in order to provide the continued performance and quality expected of it Occasional maintenance like lubricating the cabinet lock may be necessary CLEANING THE COMPAX ONE General cleaning can be done while the Compax One is powered ON and in stand by configuration H...

Page 13: ... packaging includes handles to ease general handling lifting and moving processes If transported in bulk or on pallets the Compax One and associated packaging should be stacked in upright orientation However they should be wrapped in plastic foil in order to maintain proper stability during transport When the Compax One is out of the packaging special care should be given when handling the applian...

Page 14: ...ished user operator or installation instructions 2 On site instruction on how to use the Compax One 3 Service to correct improper product maintenance or installation installation not in accordance with governing electrical codes and ordinances or correction of premises electrical i e wiring or fuses 4 Defects or damage caused by unauthorised mechanical or electrical interference with the Compax On...

Page 15: ...EN 301 489 17 V3 2 4 RoHSD EN 50581 2012 Man fa t rer s name Compax Solutions AS Man fa t rer s address Fornebuveien 42 Postcode city and country 1366 Lysaker Norway Telephone number E mail address Type of product Smart waste bin Model s identifier Com a One Model s name Com a One Batch Serial number I hereby declare that the product described above is in conformity with the relevant Union harmoni...

Reviews: