Using the Recovery CD
<頁頁頁頁頁頁>
Chapter 13: System Maintenance
13-1
Chapter 13: System Maintenance
Using the Recovery CD
The recovery CD supplied with the unit allows you to restore the system back to its initial factory settings.
You may want to back up the video archives to an external disk drive before restoring the system. To begin
restoring RS-3232 to factory settings, make sure you have the recovery CD at hand first and then follow the
steps below.
Caution!
Be aware that all the recordings and user files will be lost after the system
is restored.
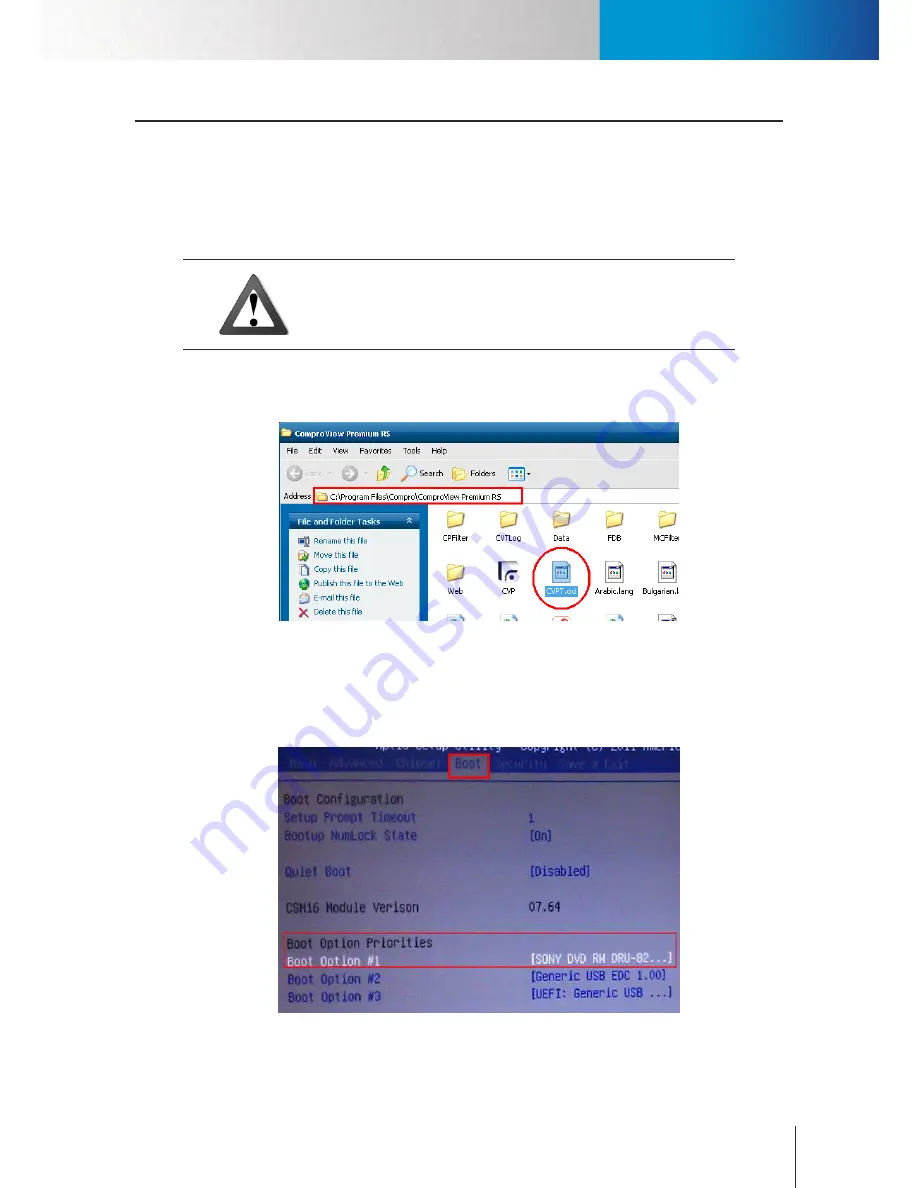
1. Back up “CVPT.cid” from the ComproView installation folder to another disk drive. “CVPT.cid” can be
located by navigating to the “C:\Program Files\Compro\ComproView Premium RS” folder.
Figure 13-1. Location of key file
2. Prepare a CD-ROM drive and attach the CD-ROM drive to RS-3232 while removing all the other drive
devices from RS-3232.
3. Put the RS-3232 recovery CD into the CD-ROM drive and then configure the BIOS boot option to boot
RS-3232 from CD.
Figure 13-2. Boot option
Summary of Contents for RS-3232
Page 1: ...Network Video Recorder RS 3232 Model No V2 120510 ...
Page 34: ... Compro RS 3232 User s Manual 4 12 ...
Page 58: ...Talk and Broadcast Voice Compro RS 3232 User s Manual 6 8 ...
Page 64: ...Manual Recording Compro RS 3232 User s Manual 7 6 ...
Page 74: ...Add and Manage Bookmarks Compro RS 3232 User s Manual 8 10 ...
Page 78: ...Schedule a Backup Operation Compro RS 3232 User s Manual 9 4 ...
Page 82: ...Add an E Map Compro RS 3232 User s Manual 10 4 Figure 10 3 Emap example ...
Page 92: ...Remote Playback on WebVUer Compro RS 3232 User s Manual 11 10 ...
Page 112: ... Compro RS 3232 User s Manual 12 20 ...
Page 120: ...Contacting Compro Technical Support Compro RS 3232 User s Manual 14 4 ...


