Play Recordings
Set Up Video Recording
Chapter 5: How to...
5-9
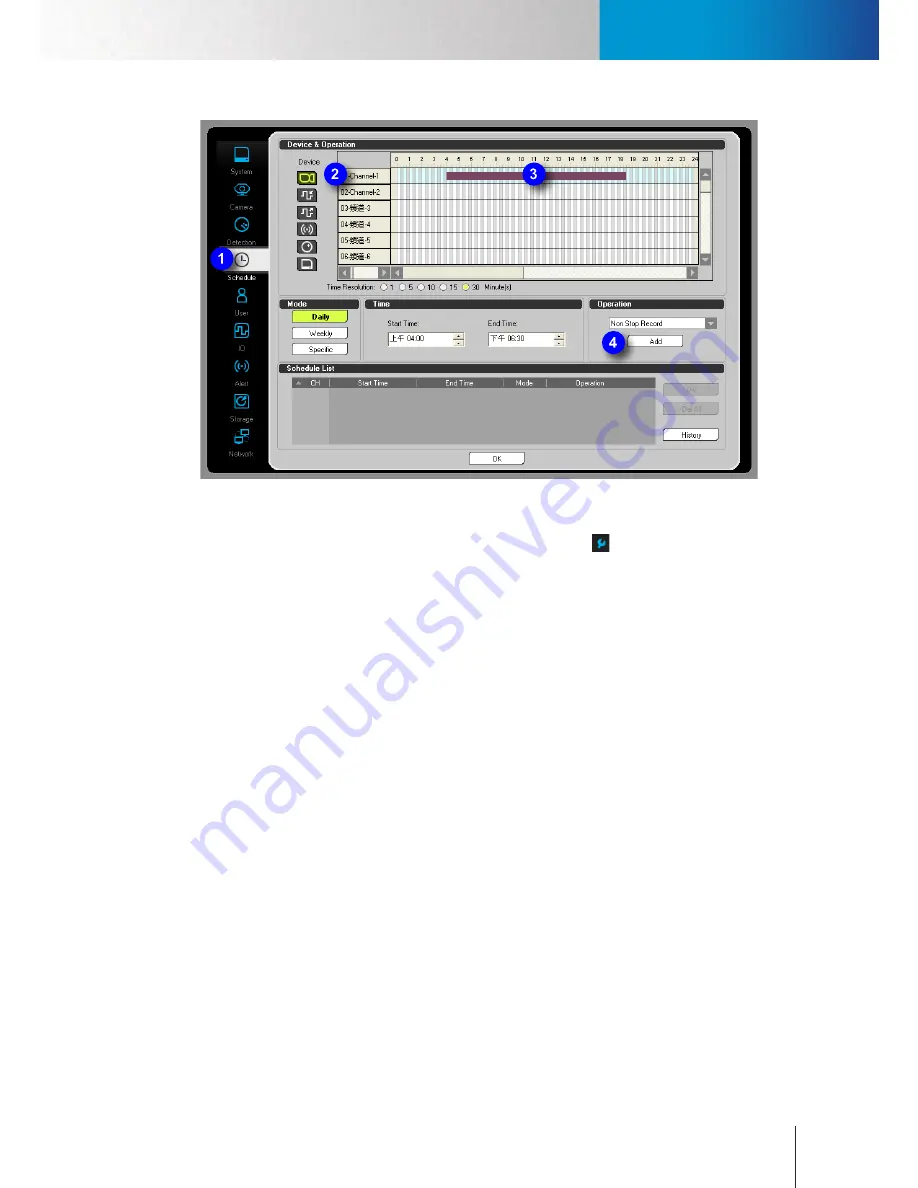
Figure 5-14. Schedule Video Recording
1. Enter the system configuration console by clicking on the setup icon (
)
and then choose “Setup” from
the fly-out menu.
2. Go to the “Schedule” tab.
3. Click on the channel number (row header) to choose a channel. The selected channel will be highlighted
in light blue.
4. Set Start/End Time in the Time section. You can also click on the timeline to set the start time, and then
drag the time bar to the point in time when you want the recording to end and then click again to set
the end time. To update your start/end time, simply click and drag on the timeline again.
5. Make sure “Non-stop Recording” is selected from the “Operation” drop-down list. Then, press “Add” to
add a new schedule.
6. Click [OK] to exit the configuration console.
Play Recordings
After some recordings have been made, you can use the Playback console to search for and play back your
recordings. Follow the steps below to play back your recordings.
Summary of Contents for RS-3232
Page 1: ...Network Video Recorder RS 3232 Model No V2 120510 ...
Page 34: ... Compro RS 3232 User s Manual 4 12 ...
Page 58: ...Talk and Broadcast Voice Compro RS 3232 User s Manual 6 8 ...
Page 64: ...Manual Recording Compro RS 3232 User s Manual 7 6 ...
Page 74: ...Add and Manage Bookmarks Compro RS 3232 User s Manual 8 10 ...
Page 78: ...Schedule a Backup Operation Compro RS 3232 User s Manual 9 4 ...
Page 82: ...Add an E Map Compro RS 3232 User s Manual 10 4 Figure 10 3 Emap example ...
Page 92: ...Remote Playback on WebVUer Compro RS 3232 User s Manual 11 10 ...
Page 112: ... Compro RS 3232 User s Manual 12 20 ...
Page 120: ...Contacting Compro Technical Support Compro RS 3232 User s Manual 14 4 ...


