background image

- 12 -

press

+

+

+

+

or

utton to set the card type.

Press Enter again to register the setting value

4.6a

4.6a

4.6a

4.6a Change

Change

Change

Change the

the

the

the Monthly

Monthly

Monthly

Monthly pay

pay

pay

pay period

period

period

period end

end

end

end day

day

day

day

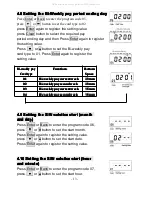
When the pay period end day is set to 00, the first row

on the 1~15 row card surface is automatically as blank

row.

The set value is from 00 to 31.

4.7

4.7

4.7

4.7 Setting

Setting

Setting

Setting the

the

the

the Weekly

Weekly

Weekly

Weekly pay

pay

pay

pay period

period

period

period ending

ending

ending

ending day

day

day

day

Press Enter or Back to enter the program code 05,

press

+

+

+

+

or

button to set the card type to 01

Press Enter again to register the setting value.

Press Clear button to select the required pay

period ending day and then Press Enter again to register

the setting value.

W

W

W

Weekly

eekly

eekly

eekly pay

pay

pay

pay

Card

Card

Card

Card type

type

type

type

Functions

Functions

Functions

Functions

Bottom

Bottom

Bottom

Bottom

Space

Space

Space

Space

01

01

01

01

Upper

Upper

Upper

Upper part

part

part

part weekly

weekly

weekly

weekly pay

pay

pay

pay

23mm

23mm

23mm

23mm

02

02

02

02

Lower

Lower

Lower

Lower part

part

part

part weekly

weekly

weekly

weekly pay

pay

pay

pay

23

23

23

23mm

mm

mm

mm

03

03

03

03

Upper

Upper

Upper

Upper part

part

part

part weekly

weekly

weekly

weekly pay

pay

pay

pay

3

3

3

35mm

5mm

5mm

5mm

04

04

04

04

Lower

Lower

Lower

Lower part

part

part

part weekly

weekly

weekly

weekly pay

pay

pay

pay

35mm

35mm

35mm

35mm

press

+

+

+

+

or

button to set the weekly pay card type to 01

Press Enter again to register the setting value

Card

Card

Card

Card Type

Type

Type

Type

Functions

Functions

Functions

Functions

00

00

00

00

Month

Month

Month

Month pay

pay

pay

pay time

time

time

time card

card

card

card

01

01

01

01

Weekly

Weekly

Weekly

Weekly pay

pay

pay

pay time

time

time

time card

card

card

card

02

02

02

02

Bi-weekly

Bi-weekly

Bi-weekly

Bi-weekly pay

pay

pay

pay time

time

time

time card

card

card

card

All manuals and user guides at all-guides.com

Summary of Contents for TR220D

Page 1: ...Electronic Time Recorder Instruction Instruction Instruction Instruction Manual Manual Manual Manual All manuals and user guides at all guides com a l l g u i d e s c o m...

Page 2: ...Weekly Bi weekly pay period ending day 11 4 6a Change the Monthly pay period end day 12 4 7 Setting the Weekly pay period ending day 12 4 8 Setting the Bi Weekly pay period ending day 13 4 9 Setting...

Page 3: ...shifting time 15 4 18 Setting the 2 color printing 16 5 All reset 16 6 Trouble shooting 17 7 Replacing ribbon cartridge 18 8 Cautions 18 9 Specifications 19 10 Error Code 19 All manuals and user guide...

Page 4: ...this manual thoroughly Models Functions LCD Analogue LCD Display Clock Face Two color printing Time Signal Perpetual calendar Back up battery Auto In Out adjustment External Signal Unit Data memory ba...

Page 5: ...order Instruction Manual 2 pcs key Card 1 1 1 1 2 2 2 2 Pa Pa Pa Parts rts rts rts identification identification identification identification a a a a Keypad Keypad Keypad Keypad Note Note Note Note T...

Page 6: ...crease the set value by 1 Enter to save the set value enter the next step Back to backspace the set value Clear to cancel the set value Program switch Normal Programming Battery Battery On Off Reset R...

Page 7: ...election selection selection 00 0 00 0 00 0 00 01 1 1 1 Setting the time Year Month Date 0 0 0 02 2 2 2 Setting the time system 0 0 0 03 3 3 3 Setting the time Hour Minute 0 0 0 04 4 4 4 Setting the d...

Page 8: ...ck of card 1 1 1 13 3 3 3 Setting the Duration of time signal Seconds 1 1 1 14 4 4 4 Setting the time of 1st group of ringing 15 15 15 15 Setting the time of 2nd group of ringing 16 16 16 16 Setting t...

Page 9: ...5 Setting the time of shifting to 2nd column 46 46 46 46 Setting the time of shifting to 3rd column 47 47 47 47 Setting the time of shifting to 4th column 48 48 48 48 Setting the time of shifting to 5...

Page 10: ...lack 3 3 3 3 Be Be Be Be ready ready ready ready for for for for setting setting setting setting 1 Power Supply 1 Stable power source are highly recommended 2 Please check the correct voltage power co...

Page 11: ...gister the setting value 4 4 4 4 3 3 3 3 Setting Setting Setting Setting the the the the time time time time system system system system Press Enter or Back to enter the program Code 0 0 0 02 2 2 2 pr...

Page 12: ...type type type Functions Functions Functions Functions Bottom Bottom Bottom Bottom Space Space Space Space 01 01 01 01 Upper Upper Upper Upper part part part part weekly weekly weekly weekly pay pay...

Page 13: ...ekly weekly pay pay pay pay second second second second week week week week 23mm 23mm 23mm 23mm 03 03 03 03 Bi weekly Bi weekly Bi weekly Bi weekly pay pay pay pay current current current current week...

Page 14: ...ur hour and and and and minute minute minute minute Press Enter or Back to enter the program code 09 press or button to set the end hour Press Enter again to register the setting value press or button...

Page 15: ...t cut out cut out 4 4 4 4 1 1 1 16 6 6 6 Setting Setting Setting Setting the the the the regular regular regular regular time time time time signal signal signal signal 0 0 0 0 99 99 99 99Seconds Seco...

Page 16: ...set the Hour Press Enter again to register the setting value Press or button to set the Minute Press Enter again to register the setting value Press button to set the week Press button to cancel the w...

Page 17: ...the power outlet 4 Pull the power plug out of the power outlet then insert again The clock is slow or fast 1 Mistakes in setting the clock 2 Power failure Set it correctly Light printing 1 The ribbon...

Page 18: ...position use the handle to take out the cartridge 3 Correctly insert a new cartridge between the ribbon guide and the printer head Push the cartridge head until it clicks into place Turn the knob cloc...

Page 19: ...e time time time time recorder recorder recorder recorder E1E1 Wrong E1E1 Wrong E1E1 Wrong E1E1 Wrong position position position position of of of of Up Up Up Up Down Down Down Down E2E2 Wrong E2E2 Wr...

Reviews: